 Druid
Druid Oracle
 Shaman
 Huntress
 Amazon
 Ritualist
 Spirit Walker
 Mercenary
 Gemling Legionnaire
 Tactician
 Witchhunter
 Monk
Monk Acolyte of Chayula
 Invoker
 Martial Artist
 Ranger
 Deadeye
 Pathfinder
 Sorceress
 Chronomancer
 Stormweaver
 Disciple of Varashta
 Warrior
 Smith of Kitava
 Titan
Titan Warbringer
 Witch
Witch Blood Mage
 Infernalist
 Lich
Lich Abyssal Lich
The campaign in Path of Exile 2 offers the possibility of obtaining many permanent buffs that help boost and improve your character’s stats. These bonuses come from defeating optional bosses, completing side quests, or interacting with special objects. However, many of these upgrades are easy to miss, as they are not always marked in the quest log.
This guide covers all Path of Exile 2 permanent stat bonuses from the campaign that are currently available in Acts 1-4 and Interludes (mini-acts) to help you make sure that you do not leave any optional powergain behind.
What Are Permanent Buffs?
Permanent buffs provide lasting stat increases to your character, such as:
- Increased elemental resistances.
- Additional passive skill points for Weapon Specializations.
- Improved survivability with extra life or spirit.
- Unique build-specific bonuses.
Unlike temporary effects, these buffs remain active throughout your adventure! Acquiring them often involves exploring optional areas, completing side quests, or defeating hidden bosses.
Summary of Permanent Buffs
By the end of your story playthrough, you can get the following Path of Exile 2 permanent stat bonuses from the campaign:
- Weapon Set Passive Skill Points: 24 points
- Elemental Resistances: +20% to Fire, Cold, and Lightning
- Spirit: +100
- Maximum Life: +20
- Increased Maximum Life: +8%
- Choice-Based Buffs:
- Swappable:
- +30% increased Charm Charges gained
- +15% increased Mana Recovery from Flasks
- Permanent (cannot be changed):
- +25% increased Stun Threshold
- +30% increased Elemental Ailment Threshold
- +25% increased Mana Regeneration Rate
- Swappable:
Act 1
Act 1 introduces a variety of buffs, including elemental resistance, skill points, and life bonuses.
| Location | Objective | Reward |
|---|---|---|
| Clearfell | Defeat Beira of the Rotten Pack | +10% Cold Resistance |
| Hunting Grounds | Defeat Crowbell | +2 Weapon Set Passive Skill Points |
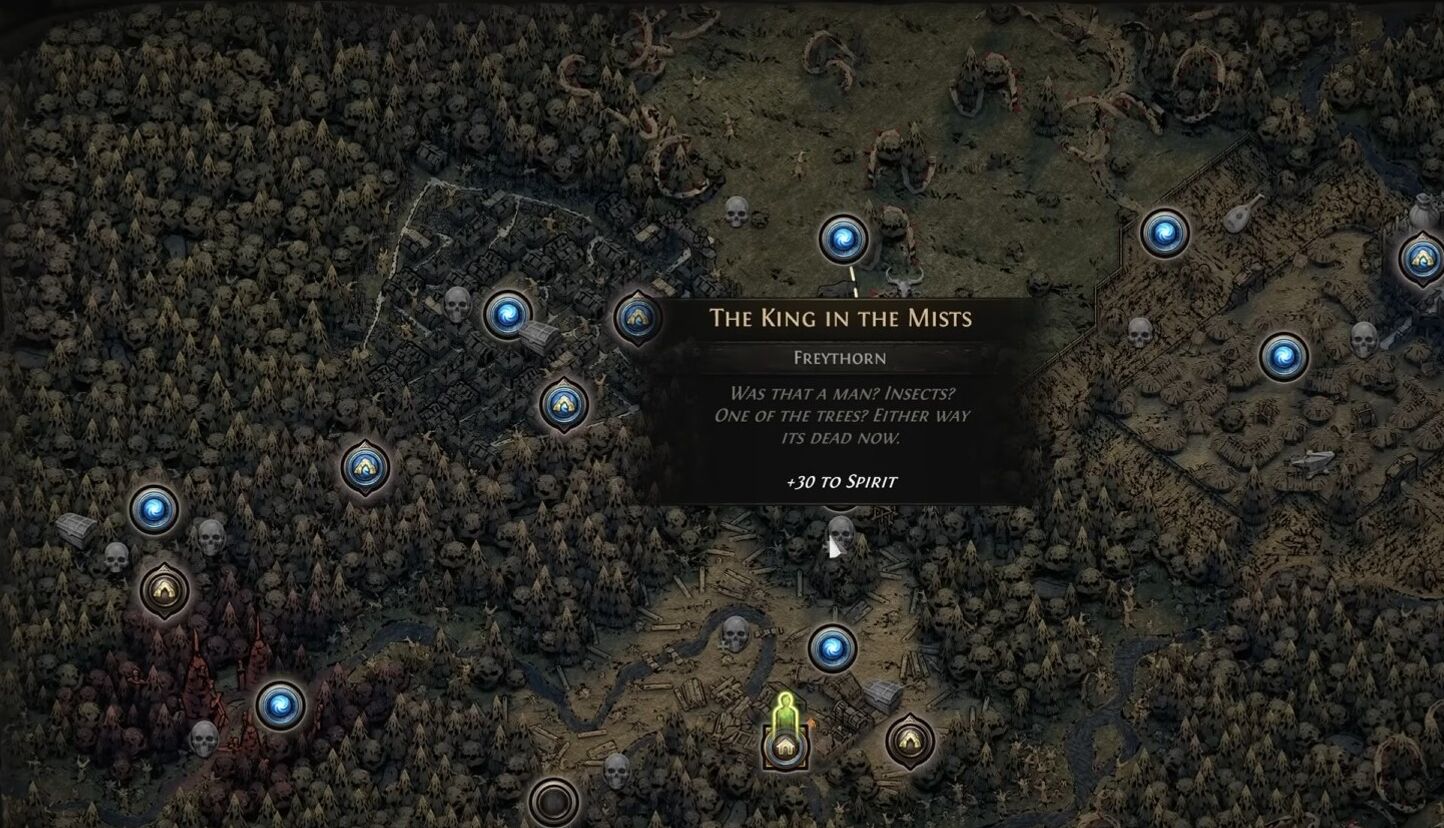
| Freythorn | Defeat The King in the Mists | +30 Spirit |
| Ogham Farmlands | Retrieve Una’s Lute and deliver to Una | +2 Weapon Set Passive Skill Points |
| Ogham Manor | Defeat Candlemass, The Living Rite | +20 Maximum Life |
Act 2
Act 2 introduces the first optional choice mechanics, where you can select one of several buffs that can significantly impact any build.
| Location | Objective | Reward |
|---|---|---|
| Keth | Defeat Kabala, Constrictor Queen | +2 Weapon Set Passive Skill Points |
| Valley of the Titans | Deliver Kabala and Sun Clan Relics to the altar | Choice between: +30% increased Charm Charges gained +1 Charm Slot or +30% increased Charm Effect Duration +1 Charm Slot (can be swapped) |
| Deshar | Deliver the Final Letter to Shambrin | +2 Weapon Set Passive Skill Points |
| Spires of Deshar | Interact with the Sisters of Garukhan Shrine | +10% Lightning Resistance |
Tip for Veterans: Focus on Charm Charges for builds relying on crowd control or utility. Mana Recovery is ideal for builds with heavy skill spam.
Act 3
Act 3 ramps up the stakes, offering powerful buffs but introducing choices that cannot be changed later.
| Location | Objective | Reward |
|---|---|---|
| Jungle Ruins | Defeat Mighty Silverfist | +2 Weapon Set Passive Skill Points |
| The Azak Bog | Defeat Ignagduk, The Bog Witch | +20 Spirit (Normal) |
| The Venom Crypts | Deliver the Venom Vial to Servi | Choice between: +25% increased Stun Threshold +30% increased Elemental Ailment Threshold or +25% increased Mana Regeneration Rate (cannot be changed) |
| Jiquani’s Machinarium | Defeat Blackjaw, The Remnant | +10% Fire Resistance |
| Aggorat | Sacrifice the Sacrificial Heart at the altar | +2 Weapon Set Passive Skill Points |
Note: The Venom Draught choice is permanent, so pick the bonus that best complements your build.
Act 4
During Act 4, you have access to a total of 8 islands. Those can be completed in any order that you want. Each Island has a quest objective. Only three Islands contain the requisite main quest objectives that you need in order to progress through the campaign. These will be randomized with each new League.
| Location | Objective | Reward |
|---|---|---|
| Isle of Kin | Slay the Blind Beast | +2 Weapon Set Skill Points |
| Halls of the Dead | Trial of Ngkanu Quest Items Choice | Choose between: • Dexterity Tattoo of Tawhoa, Grants +5 to Dexterity • Lightning Tattoo of Tawhoa, Grants +5% to Lightning Resistance • Strength Tattoo of Ngamahu, Grants +5 to Strength • Fire Tattoo of Ngamahu, Grants +5% to Fire Resistance • Intelligence Tattoo of Tasalio, Grants +5 to Intelligence • Cold Tattoo of Tasalio, Grants +5% to Cold Resistance |
| Eye of Hinekora | In the Silent Hall, simply pay your respect (required to do through the campaign quest) | +5% increased maximum Mana |
| Trail of the Ancestors | Complete the Trial and speak to Hinekora | +2 Weapon Set Skill Points |
| Abandoned Prison | Ask the Goddess of Justice for a bonus | Choose between: • 30% increased Mana Recovery from Flasks • 30% increased Life Recovery from Flasks |
Interludes (Mini-Acts)
After completing Act 4, you get access to three interludes (for now. This will probably change once Act 5 & 6 become available). Completing them will get you to Level 65 and opens up access to endgame content.
- Interlude 1: The Curse of Holten
Journey back to Ogham to help Renly rebuild the village and defeat the corruption that stands in his way.- At Wolvenhold (found shortly after Holten), kill Oswin The Dread Warden for +2 Weapon Set Skill Points
- Interlude 2: The Stolen Barya
Return to the Vastiri Desert and aid Asala in fulfilling her sacred duty.- In the Vastiri Desert, The Khari Crossing in a side area called Skullmaw Stairway, obtain the Molten One’s Gift quest item – Grants 5% increased Maximum Life
- In the Vastiri Desert, complete the quest “Clearing the Way” by slaying the Worm and Scorpion and talk to Risu after to get +2 Weapon Set Skill Points
- In Qimah, pick one of the following bonuses. This one you can change by going back:
- +5% to elemental resistances
- +5 to all attributes
- 12% increased Cooldown Recovery Rate
- 20% increased Presence Area of Effect
- 15% increased Global Defenses
- 3% increased Movement Speed
- 5% increased Experience Gain
- Interlude 3: Doryani’s Contingency
Climb a great mountain in search of the lost Vaal descendants. Find the hidden vault and uncover the secrets within:- Kriar Village, Slay Lythara for +40 Maximum Spirit
- Howling Caves, Slay the Yeti for +2 Weapon Set Skill Points
- Complete the Interlude with the quest “Siege of Oriath” for +2 Weapon Set Skill Points
Map Icon Indicators
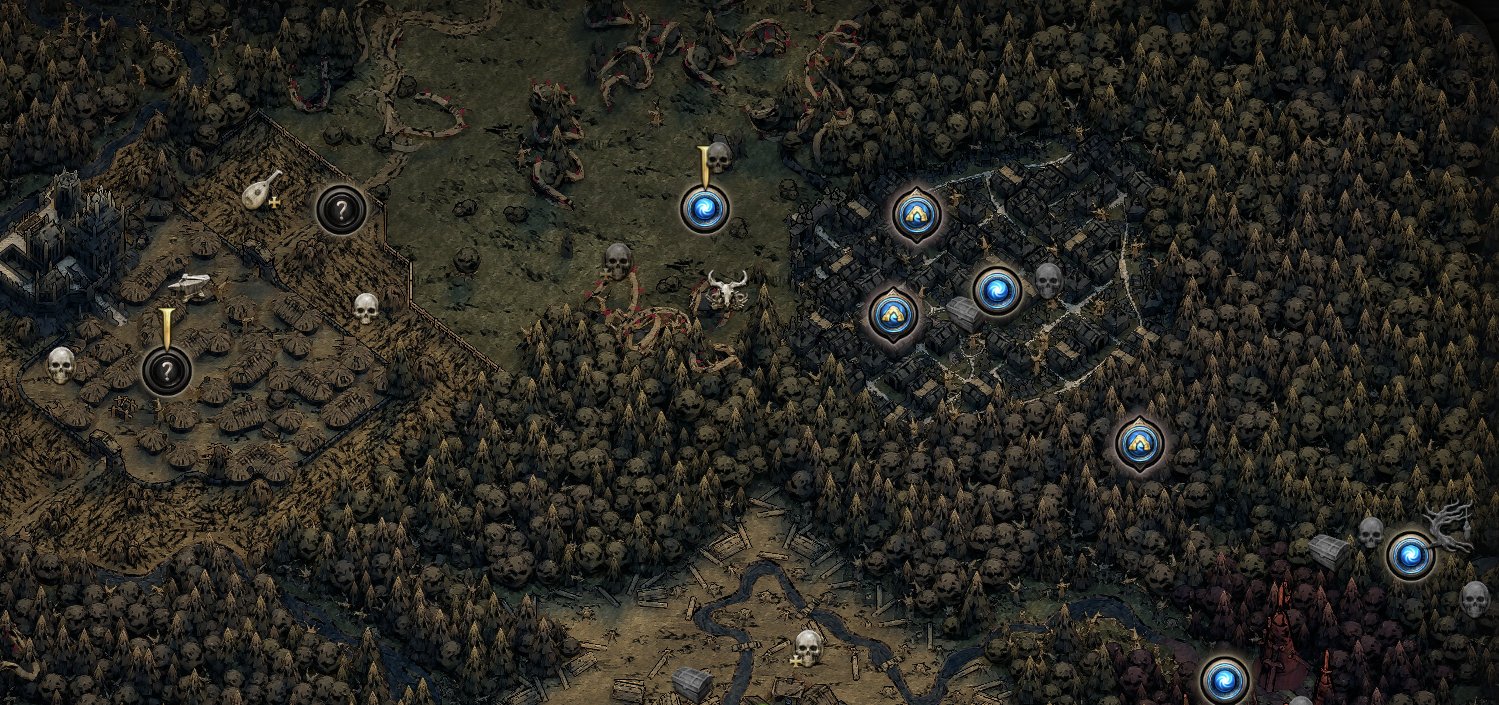
The campaign map includes helpful symbols that display where you can get permanent buffs:
- Skulls: Optional bosses.
- Skulls with a plus: Bosses that grant a permanent buff.
- Chests: Valuable loot.
- Pouch: Notable loot.
- Shrines: Interactive locations that immediately grant bonuses upon activation.
- Other Symbols: Side quests.
To locate the bosses that grant permanent buffs in Path of Exile 2, simply take a closer look at the in-game map. Bosses that offer buffs are marked with a skull icon that has a small plus sign next to it. If the icon is grayed out, it means you have already defeated that boss.
Tip for New Players: Use the Underground Map (accessible via the toggle on the right side within the map interface) to make sure that you do not miss objectives hidden below ground.
Good to Know!
Swappable Buffs: In Act 2, the choice between increased Charm Charges and Mana Recovery can be changed by revisiting the altar in the Valley of the Titans.
In the Vastiri Interlude, you can always go back to switch out the bonus you picked in Qimah.
Permanent Choices: In Act 3, the selection of buffs from the Venom Vial is irreversible, so make sure you choose something that fits your build.
Crafting Benches and Utility Unlocks
Some campaign objectives unlock necessary crafting tools:
- Salvaging Bench: Unlocked in Ogham Village by delivering Smithing Tools.
- Reforging Bench: Unlocked in The Molten Vault after defeating Mektul, The Forgemaster.
If you are looking for more help with builds, crafting, or other endgame mechanics, check out our related guides below!
