Druid
Druid Oracle
 Shaman
 Huntress
 Amazon
 Ritualist
 Spirit Walker
 Mercenary
 Gemling Legionnaire
 Tactician
 Witchhunter
 Monk
Monk Acolyte of Chayula
 Invoker
 Martial Artist
 Ranger
 Deadeye
 Pathfinder
 Sorceress
 Chronomancer
 Stormweaver
 Disciple of Varashta
 Warrior
 Smith of Kitava
 Titan
Titan Warbringer
 Witch
Witch Blood Mage
 Infernalist
 Lich
Lich Abyssal Lich
Introduction
Path of Exile 2’s 0.4 patch features the game’s second full League: “Fate of the Vaal”. This league adds Vaal Beacons to each zone, allowing you to access the Temple of Atziri. As you visit the Temple, you’ll build your own dungeon room-by-room, upgrade them to be more rewarding, and find new Bosses, Uniques, and crafting methods!
Accessing the Temple
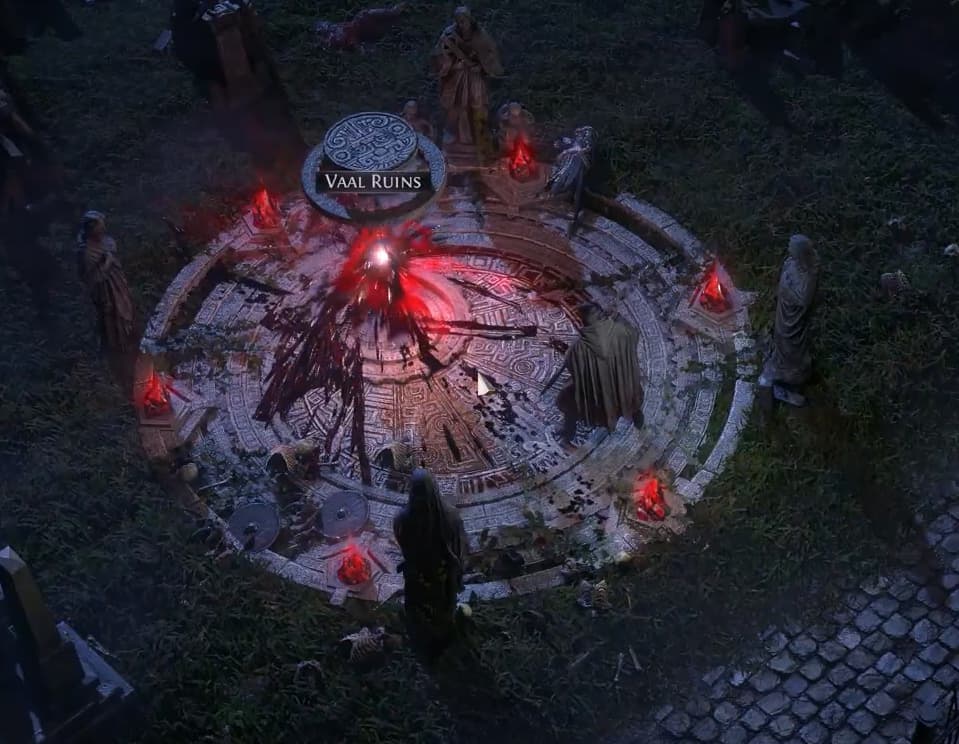
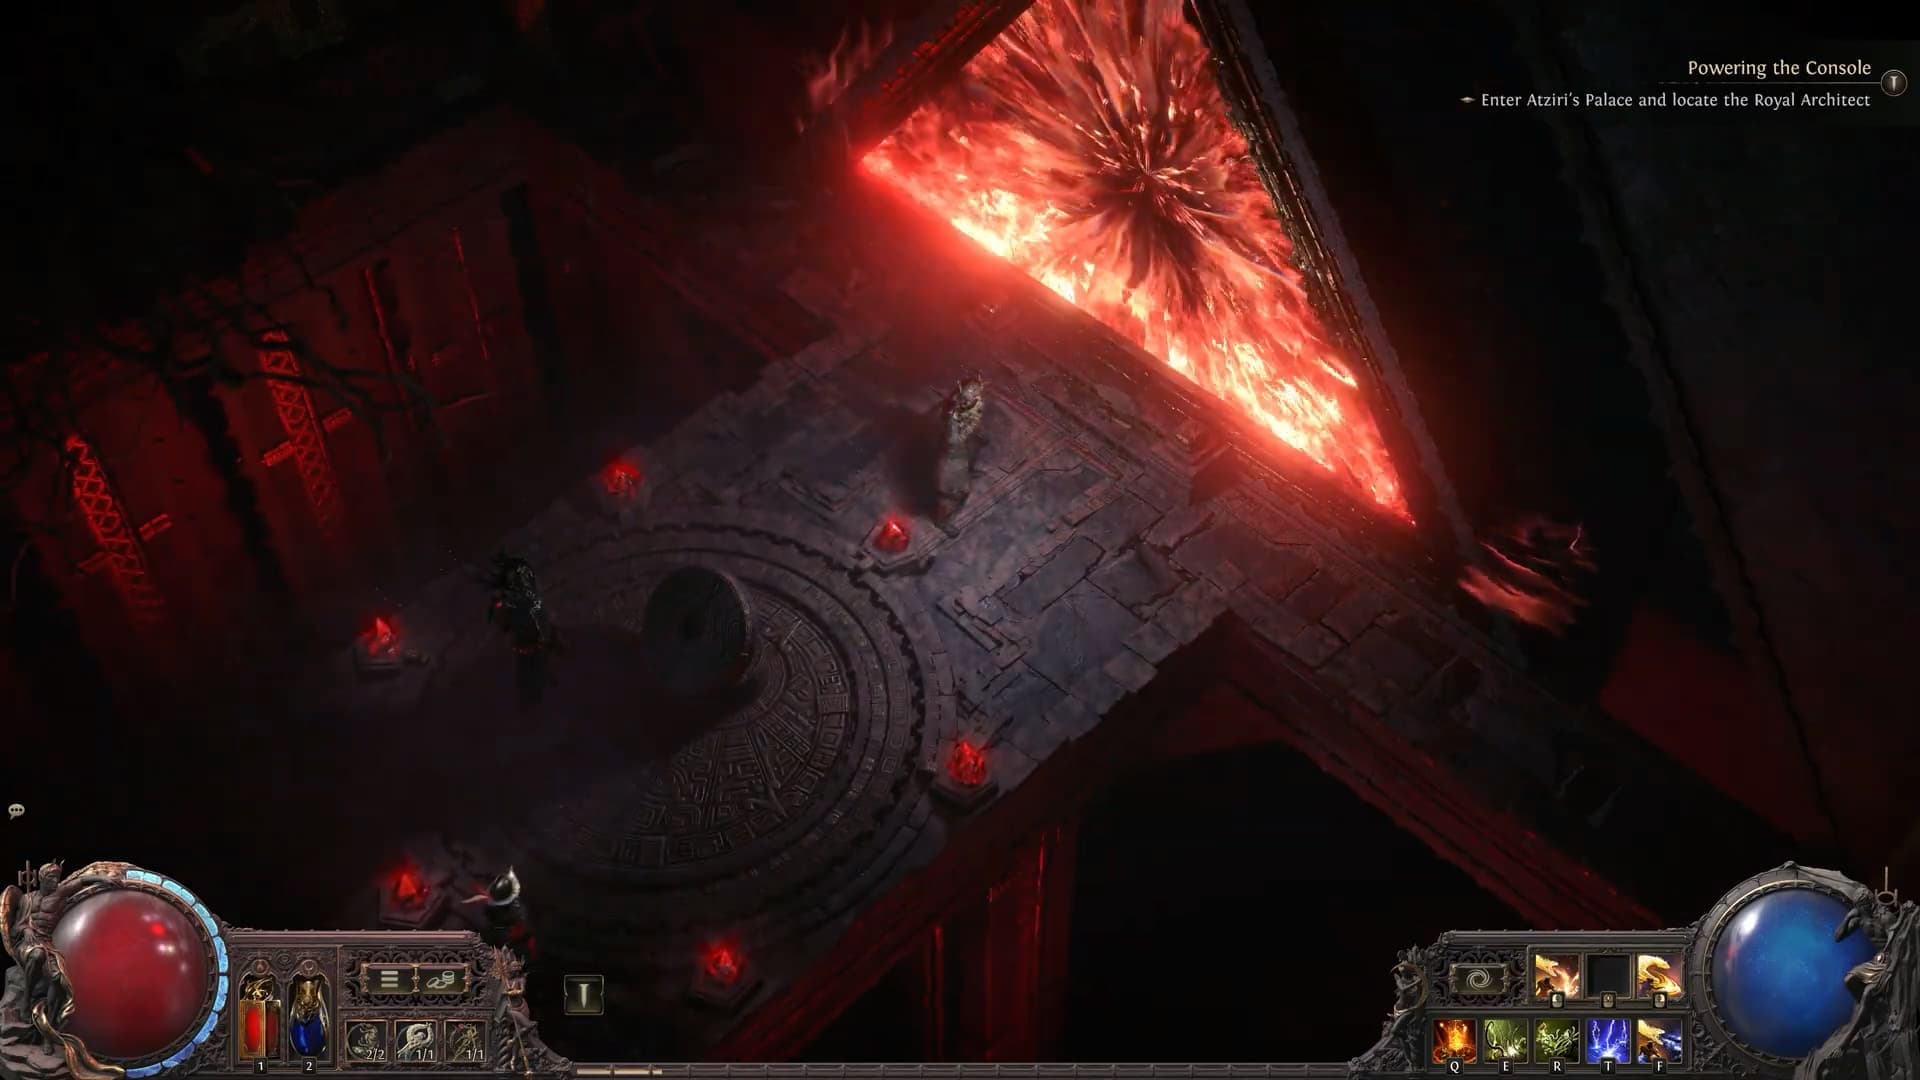
In each zone in the game, you will encounter a Vaal Beacon. Similar to an Abyss, these Beacons will empower nearby monsters with corruption. Slaying all of these corrupted monsters will power up the Beacon – lighting up one of the six crystals at its base.
Once you’ve lit them up by doing this six times, a portal to the Temple will appear, allowing you to begin your exploration.
You can also access the Temple via the Temple icon on any Waypoint.
Vaal Beacons
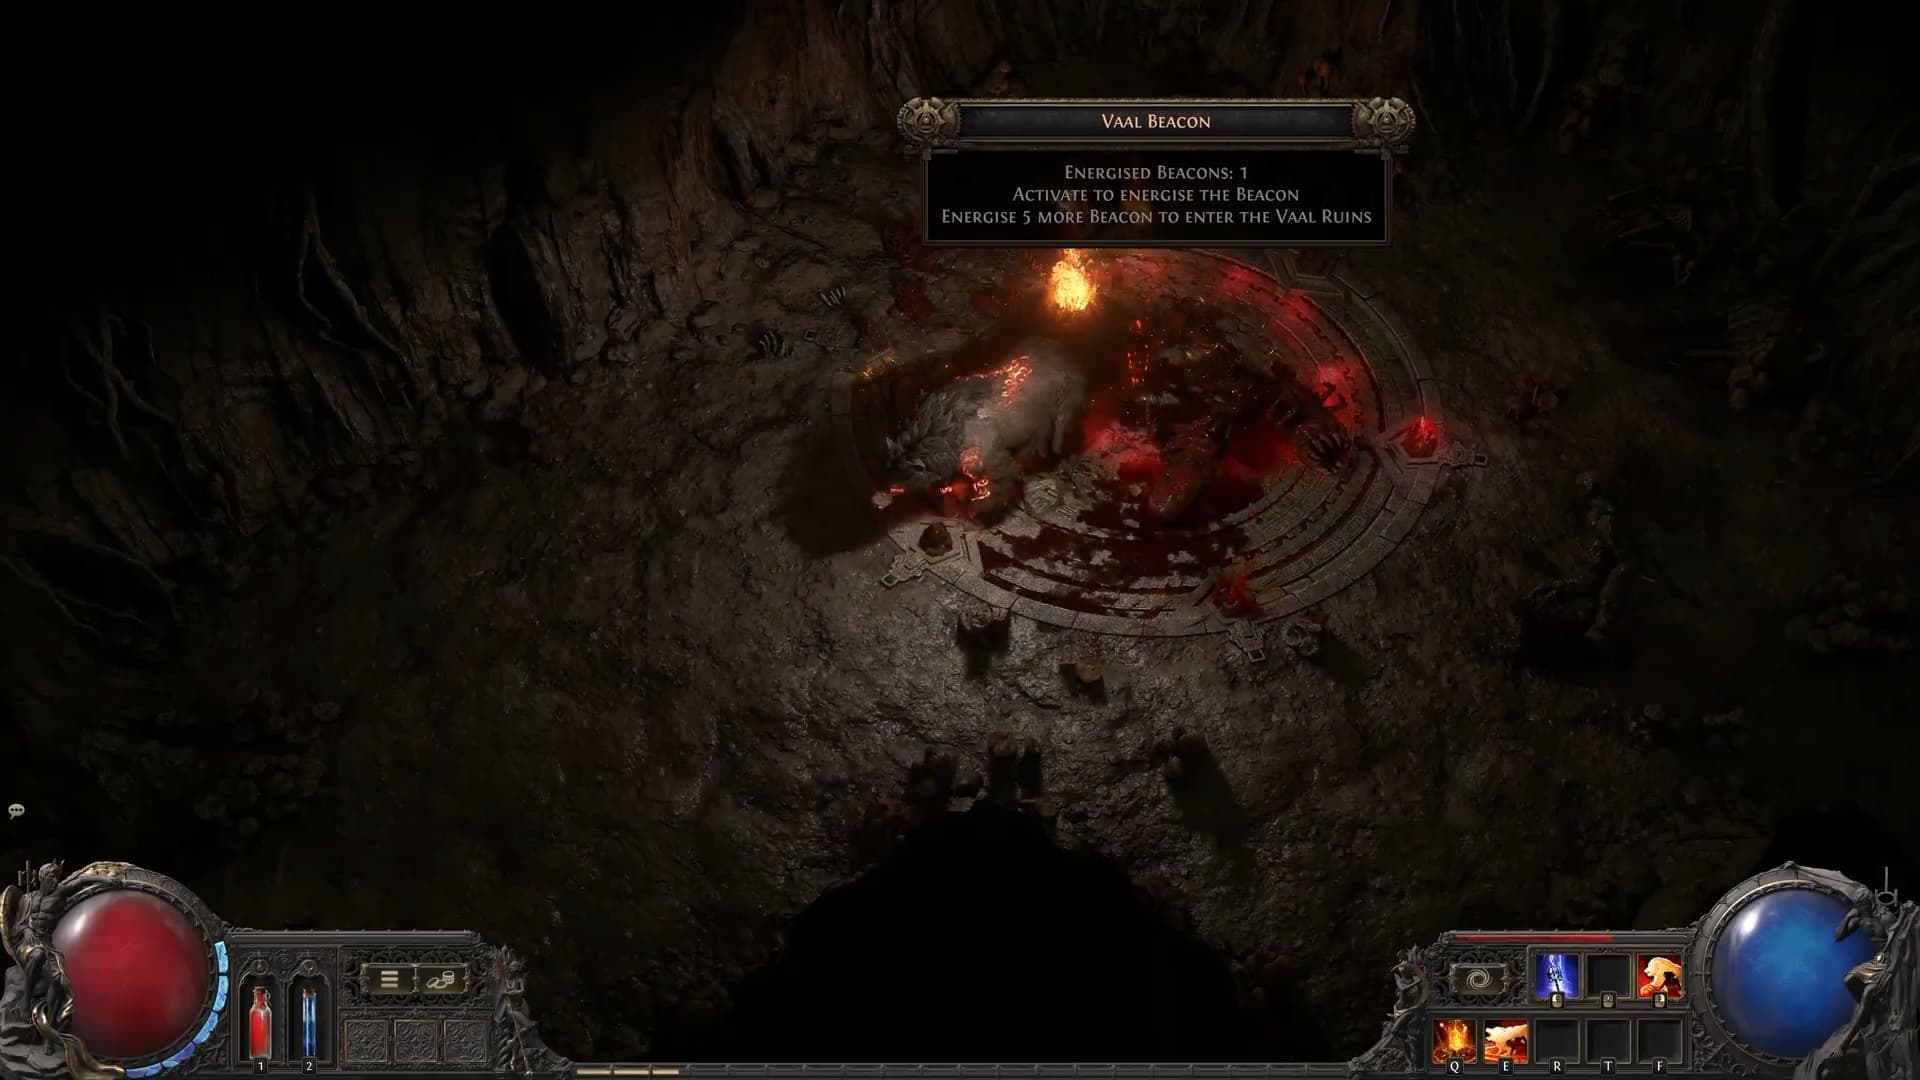
Vaal Beacons can be located on the minimap by a triangular Vaal Temple icon, and completion status in maps is also shown in the map mechanic UI with the same icon.
In addition to corrupting a few packs of nearby monsters, Vaal Beacons will sometimes spawn additional monsters. This usually comes in the form of spawning additional waves of monsters once you’ve killed all the corrupted monsters – similar to a strongbox.
Occasionally, though, the entire Beacon will raise up with a Unique monster on it for you to kill – dropping a pile of loot when you do!
Once you’ve killed all of the monsters, be sure to step onto the Vaal Beacon in order to activate it – it won’t count as complete until you do!
At endgame, you can stack up to 10 temples at a time before entering and running your Temple, allowing you to just grind out Waystones, and run your Temples at your leisure!
The Two Temples
For Acts 1-3 of the campaign, the Temple you explore will be different than at endgame. In these Acts, you will explore the Temple in the present, with limited room variety, toned-down crafting rewards, and no Pinnacle Bosses available.
Once you reach Act 4, however, you will be able to explore the Temple in the Past, and the full breadth of rewards and challenges will be available to you.
Running the Temple
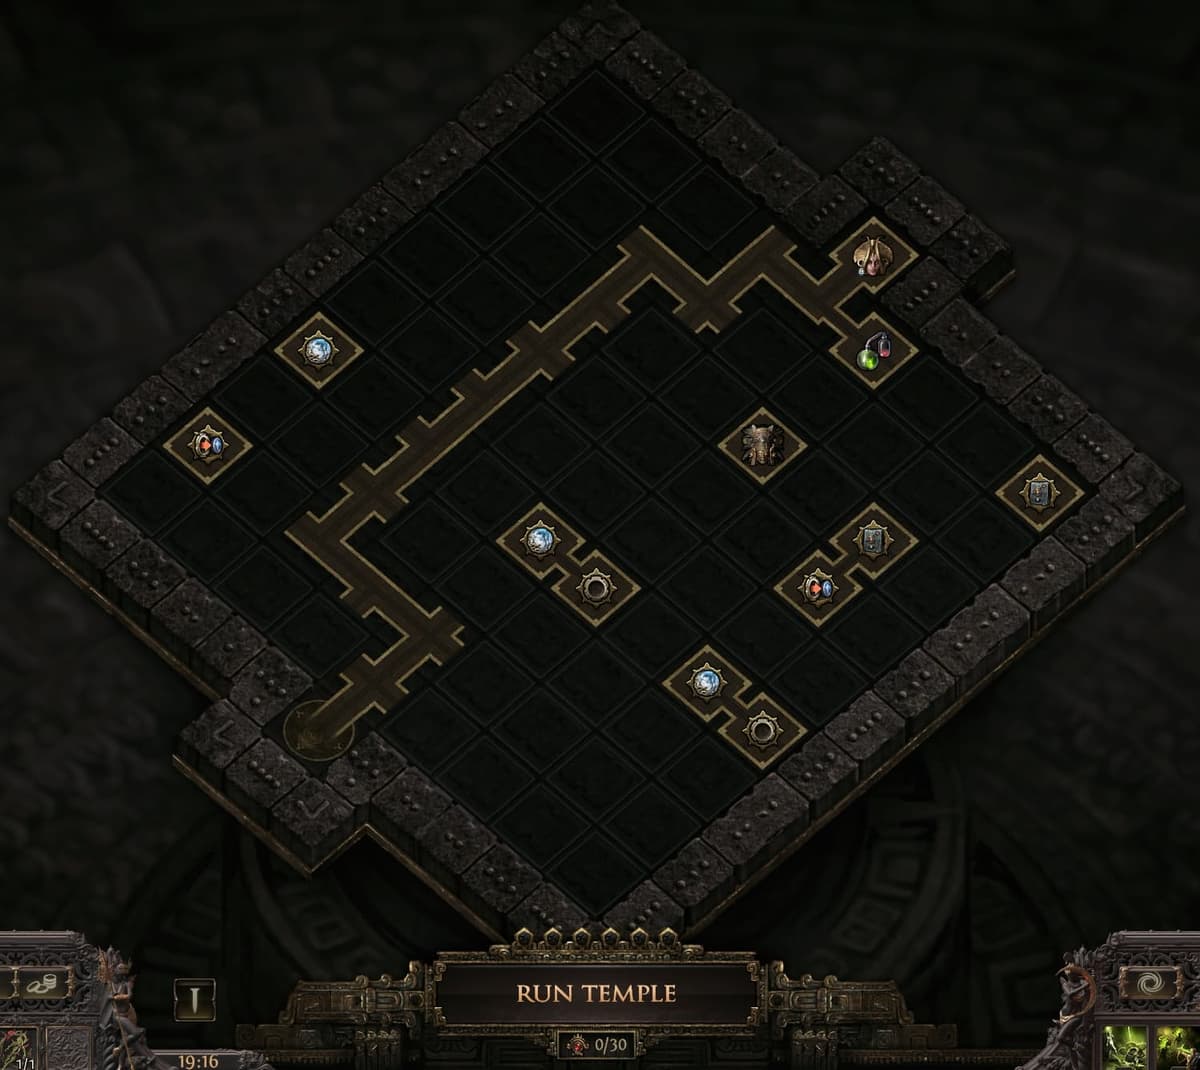
Once you’ve placed your Rooms, you can Run the Temple. The Paths between Rooms will be occupied with a smattering of monsters and chests… but the majority of the rewards will come from your placed Rooms.
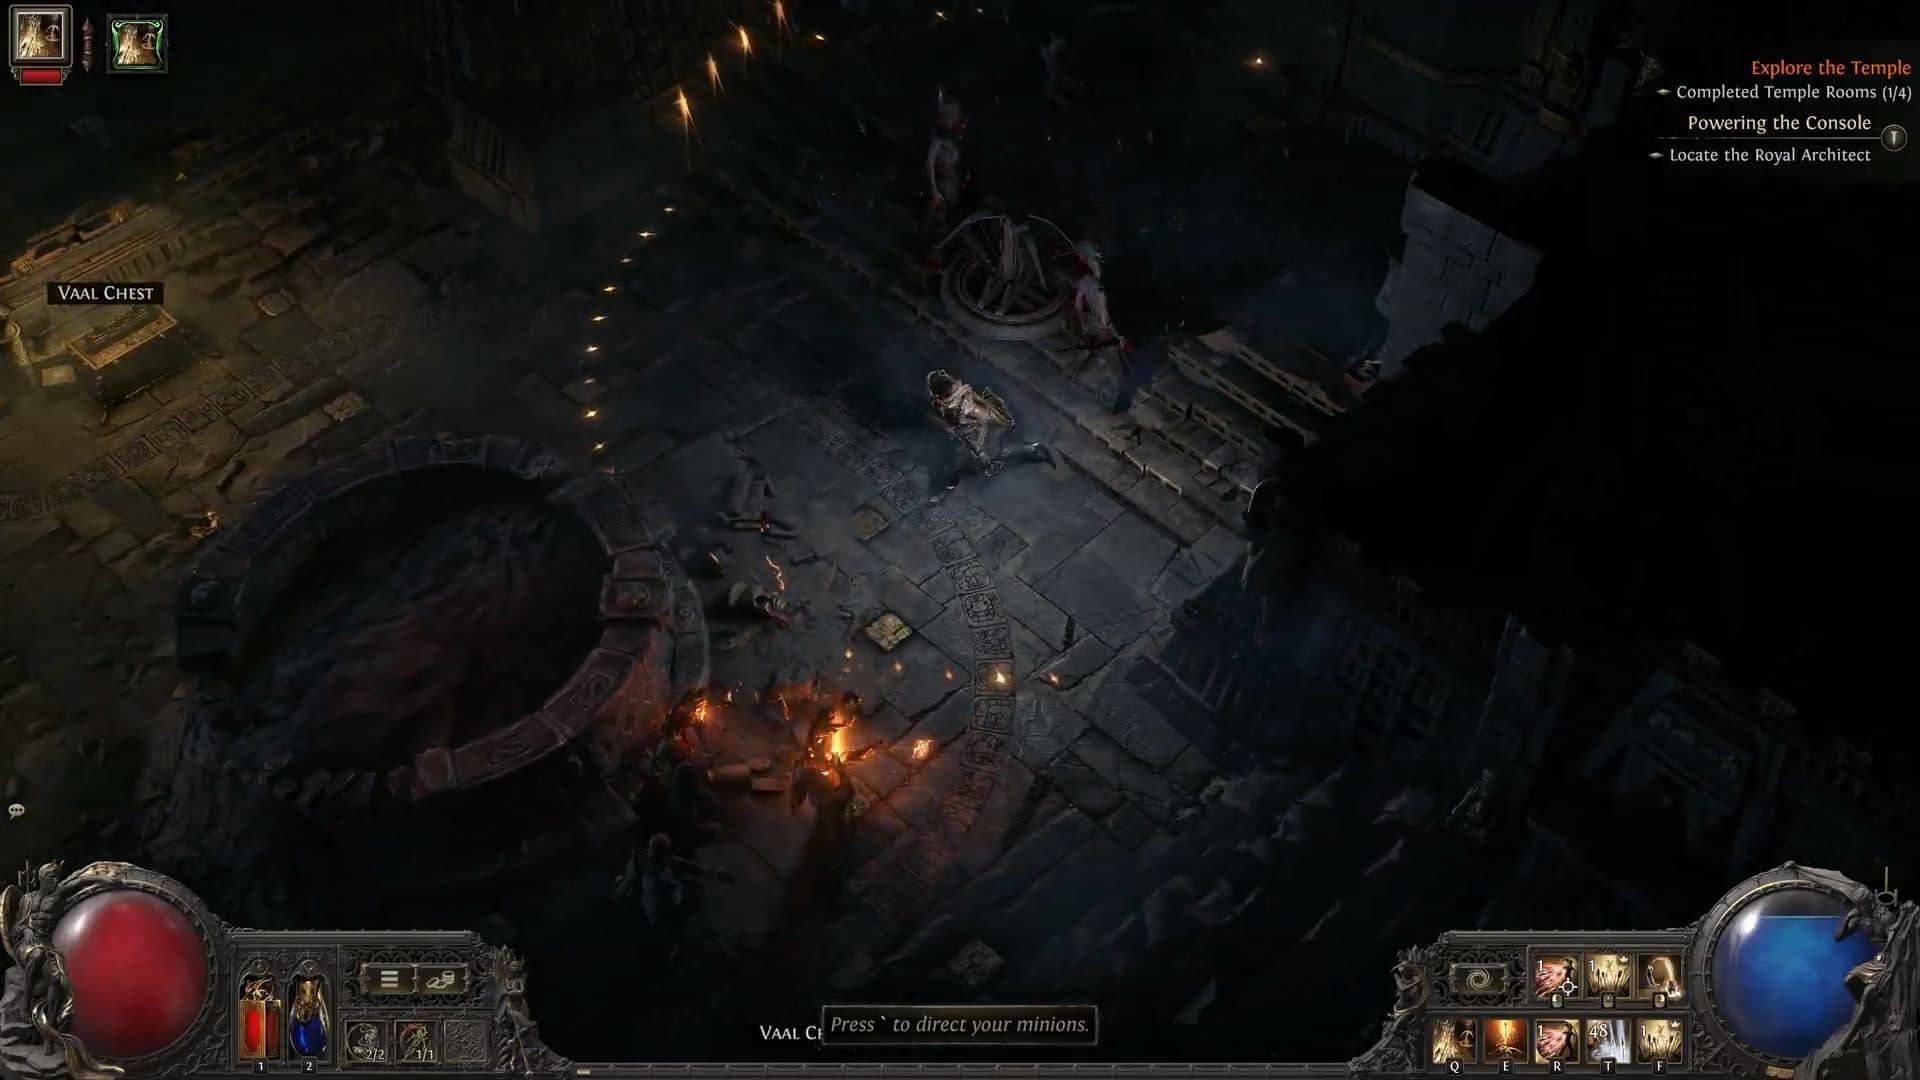
Once you enter a Room, you will be unable to leave that room until you kill all of the monsters inside it.
Once you’ve cleared a Room, any crafting tables in that room will unlock, and you’ll be able to craft or itemize them before moving on to the next Room.
Portals and Checkpoints
You can Portal out of the Temple at any time, however you’ll have to return at the entrance of the Temple instead of your Portal location.
Make use of the checkpoints to get back quickly if you need to leave to access your Stash!
Closing the Temple
Once you’re done Running the Temple, you need to Close the Temple to finish your run.
Closing the Temple causes the Temple to Decay, destroying a number of rooms at random. On a normal Temple Run, this will only be a few rooms. However, if you accessed the Architect or Atziri rooms, a sizable chunk of your Temple will Decay!
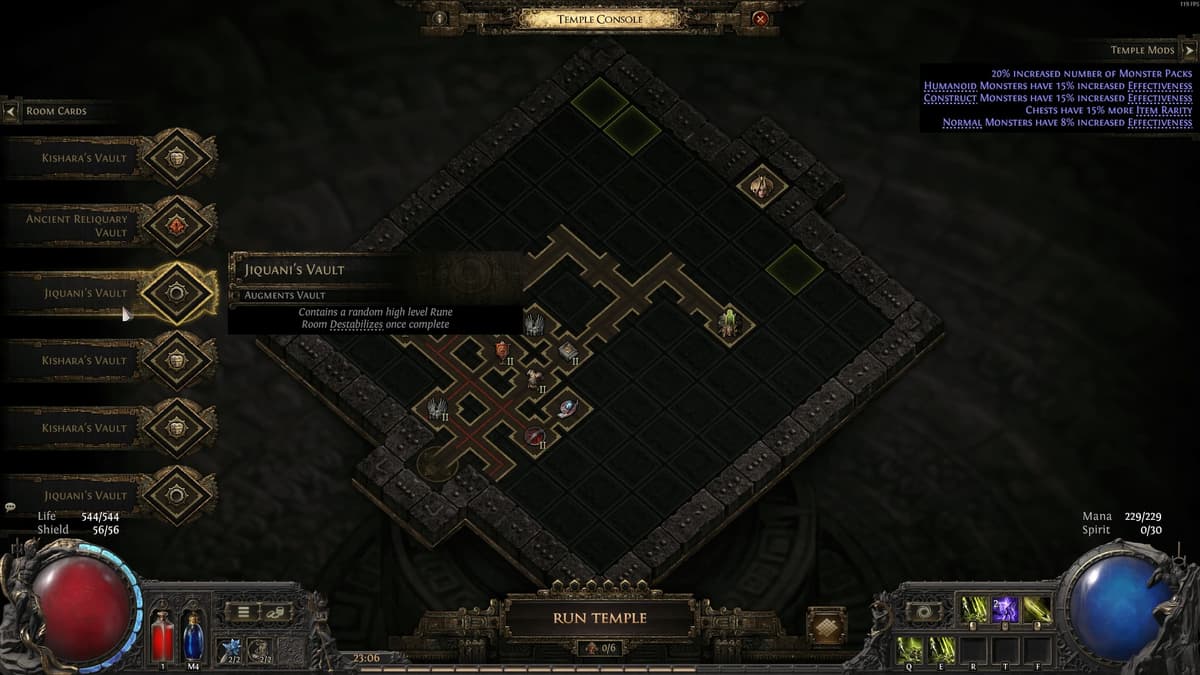
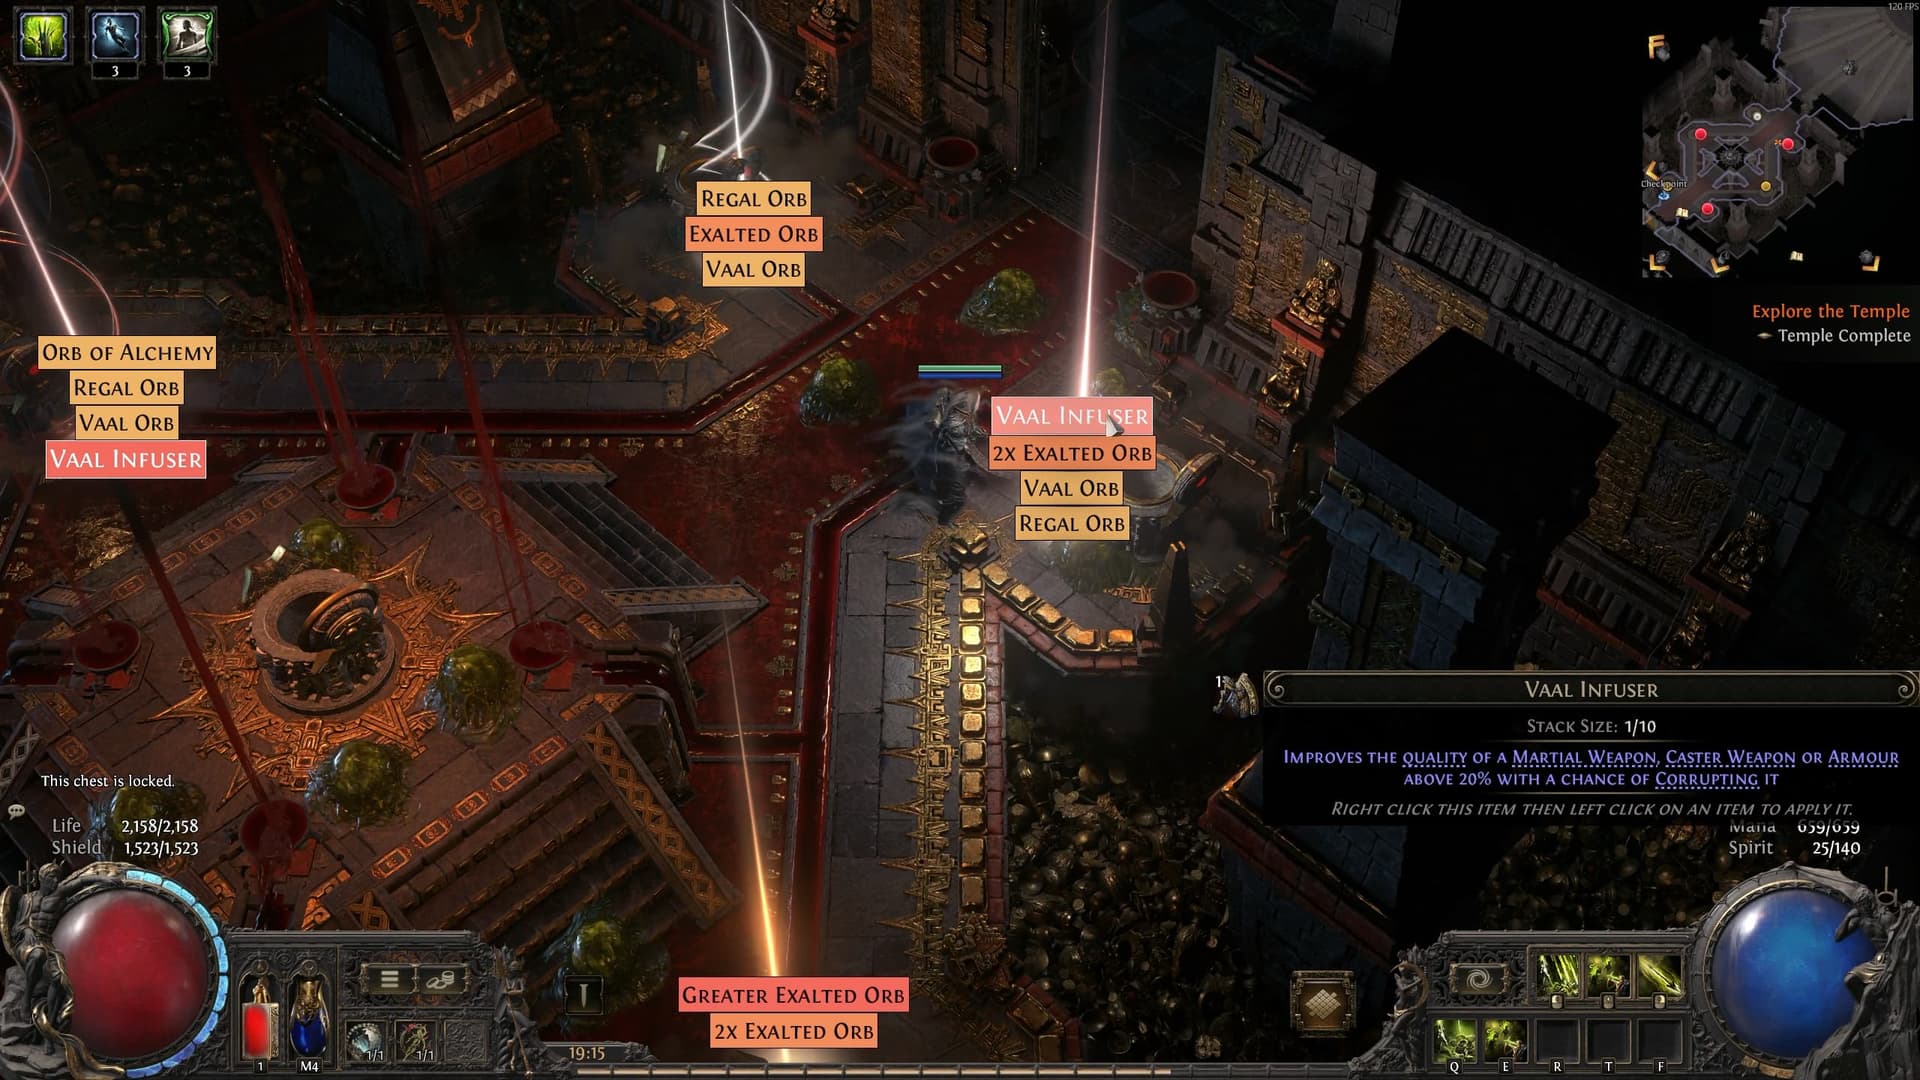
Building the Temple
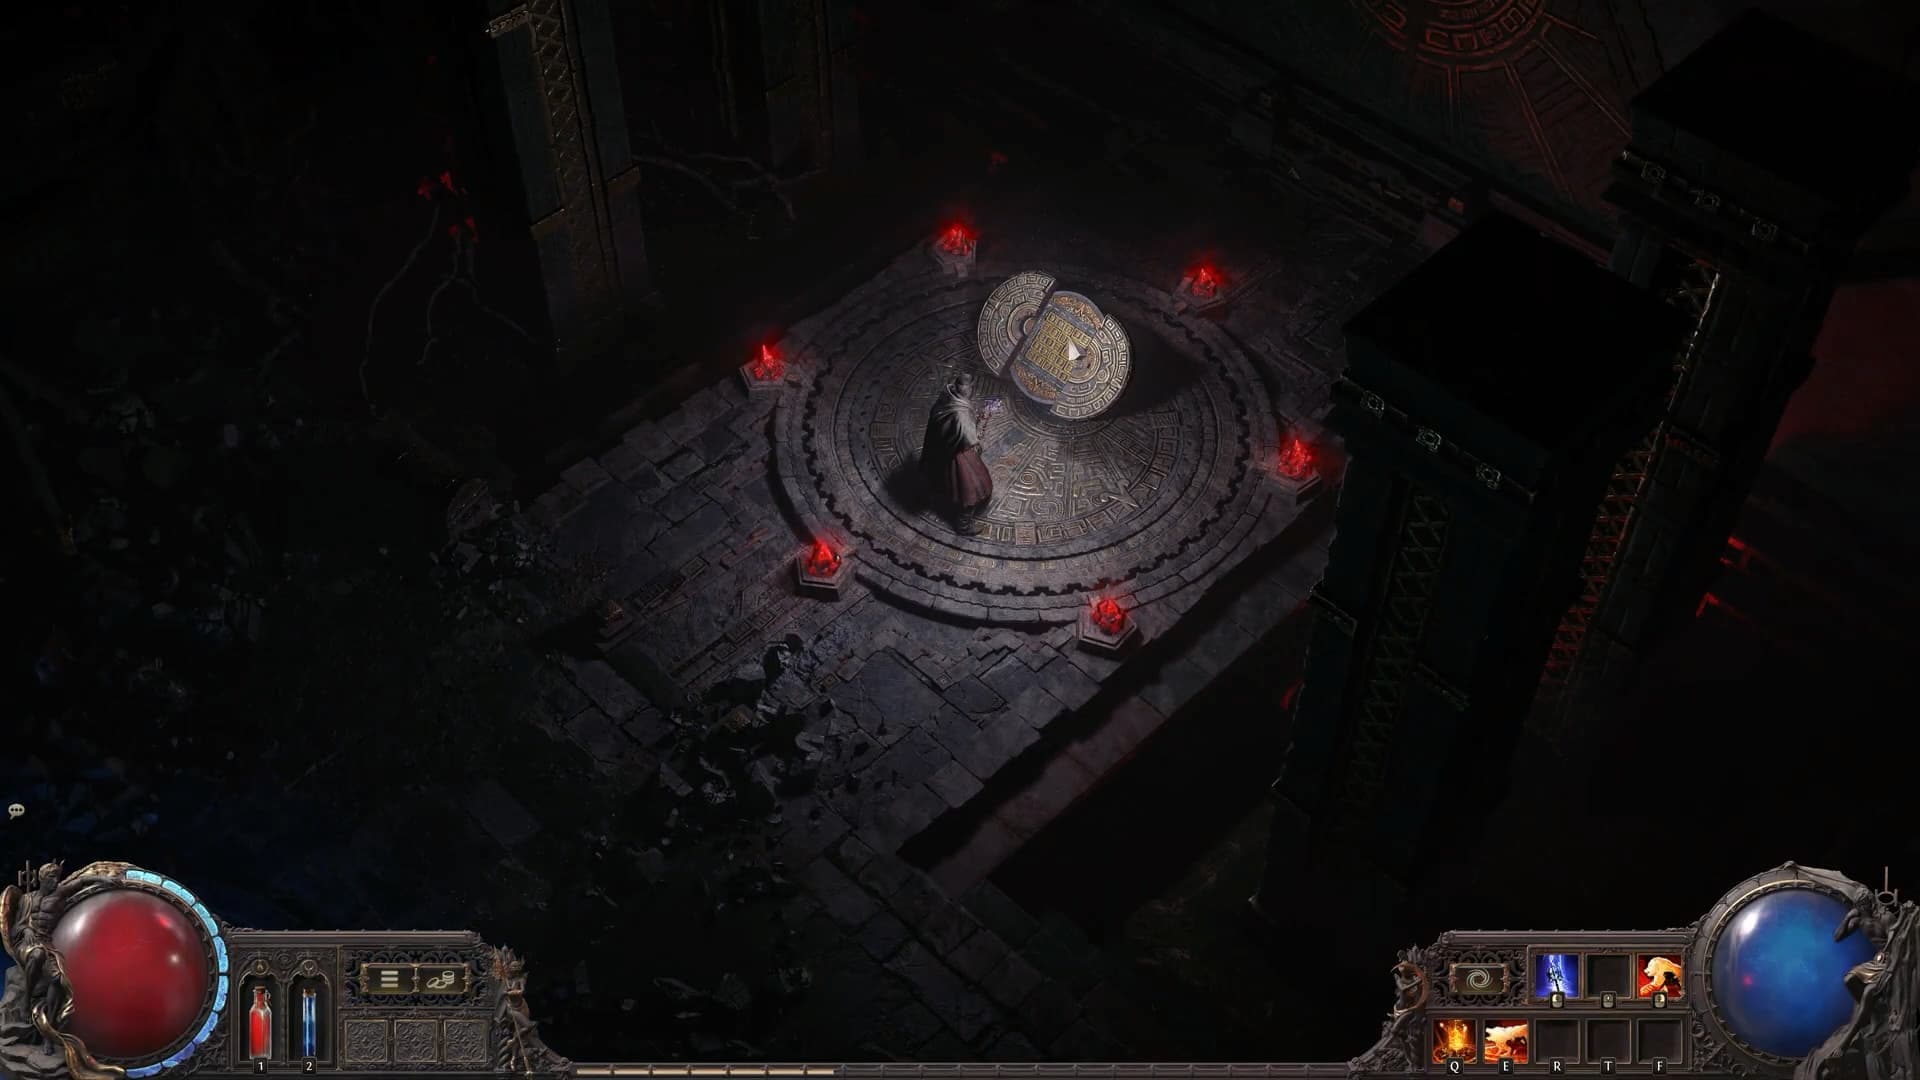
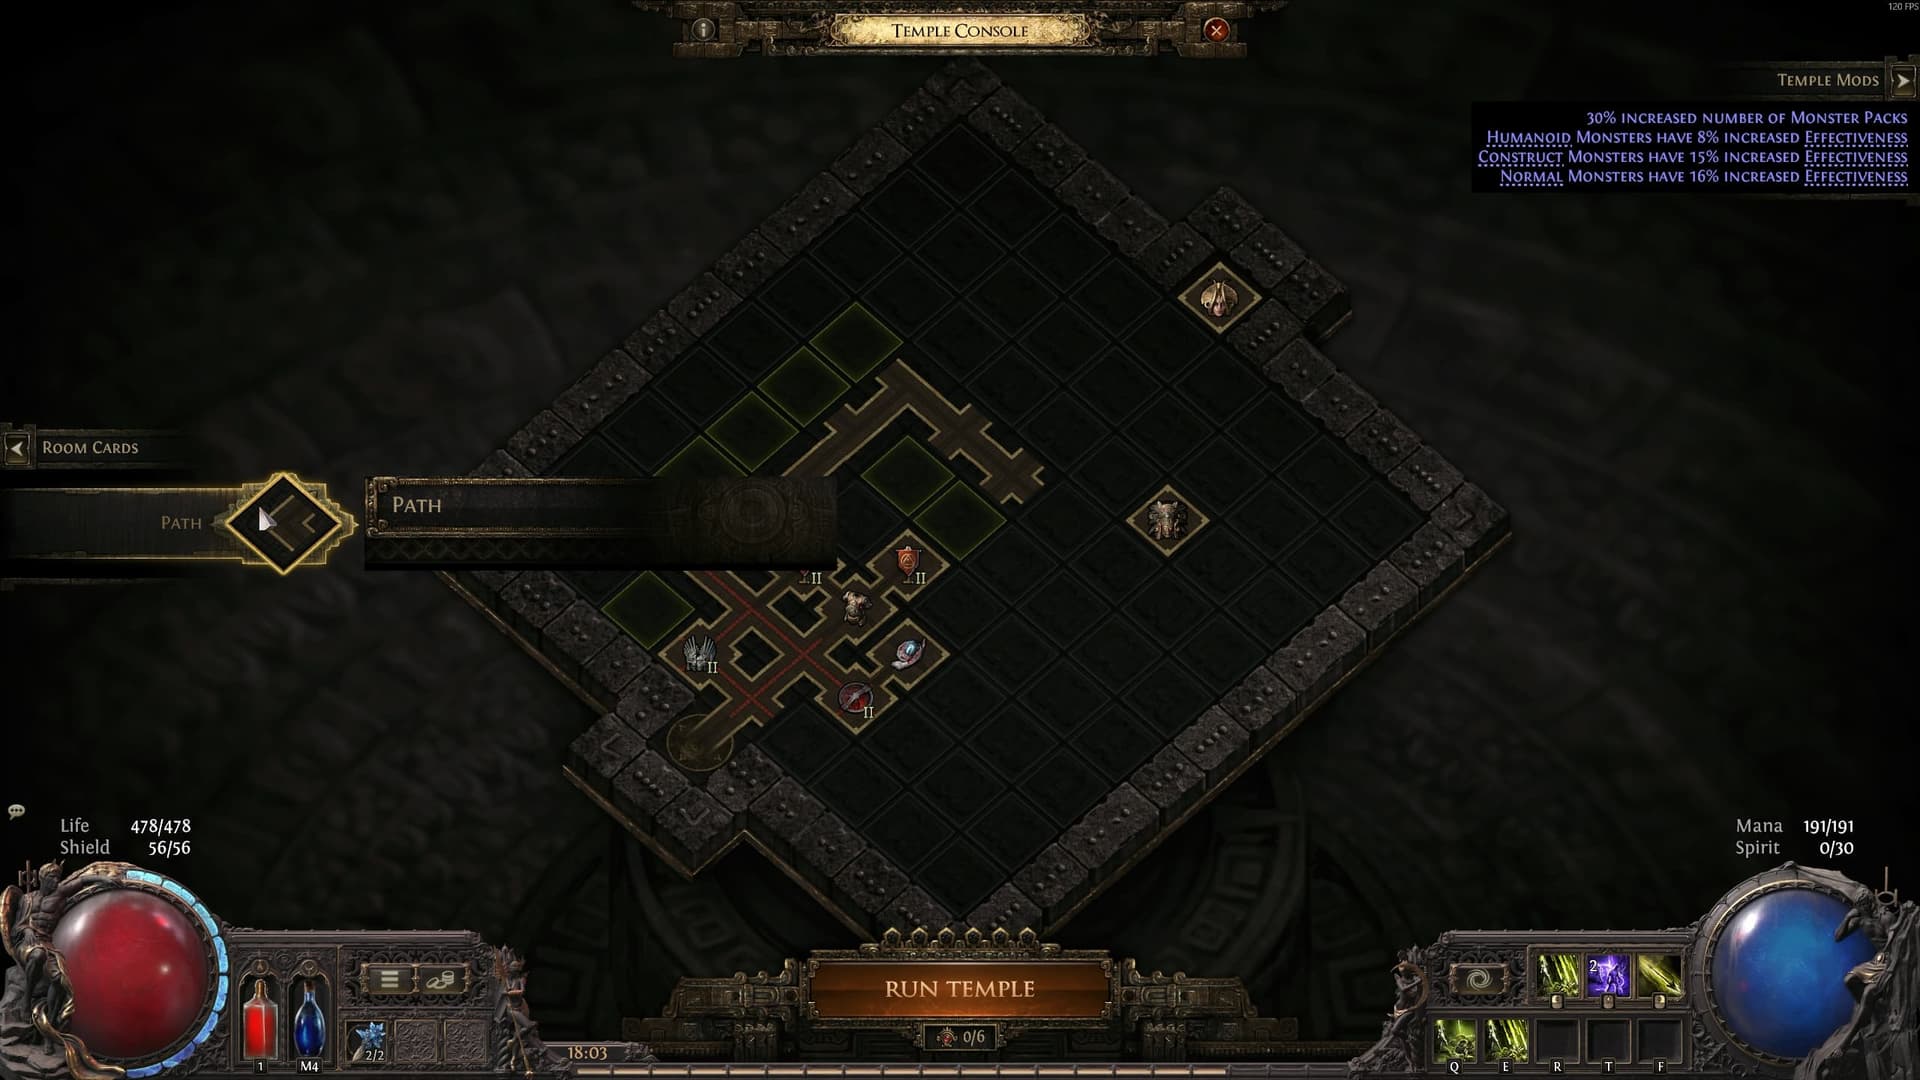
When you access the Temple, you’ll start in an antechamber with a Stash and the Temple Console. Using this console allows you to view and modify the Temple layout.
This is effectively you building the zone you’re about to run through and kill monsters in. Each room represents different types of monsters, rewards, and even modifiers that apply to the entire Temple!
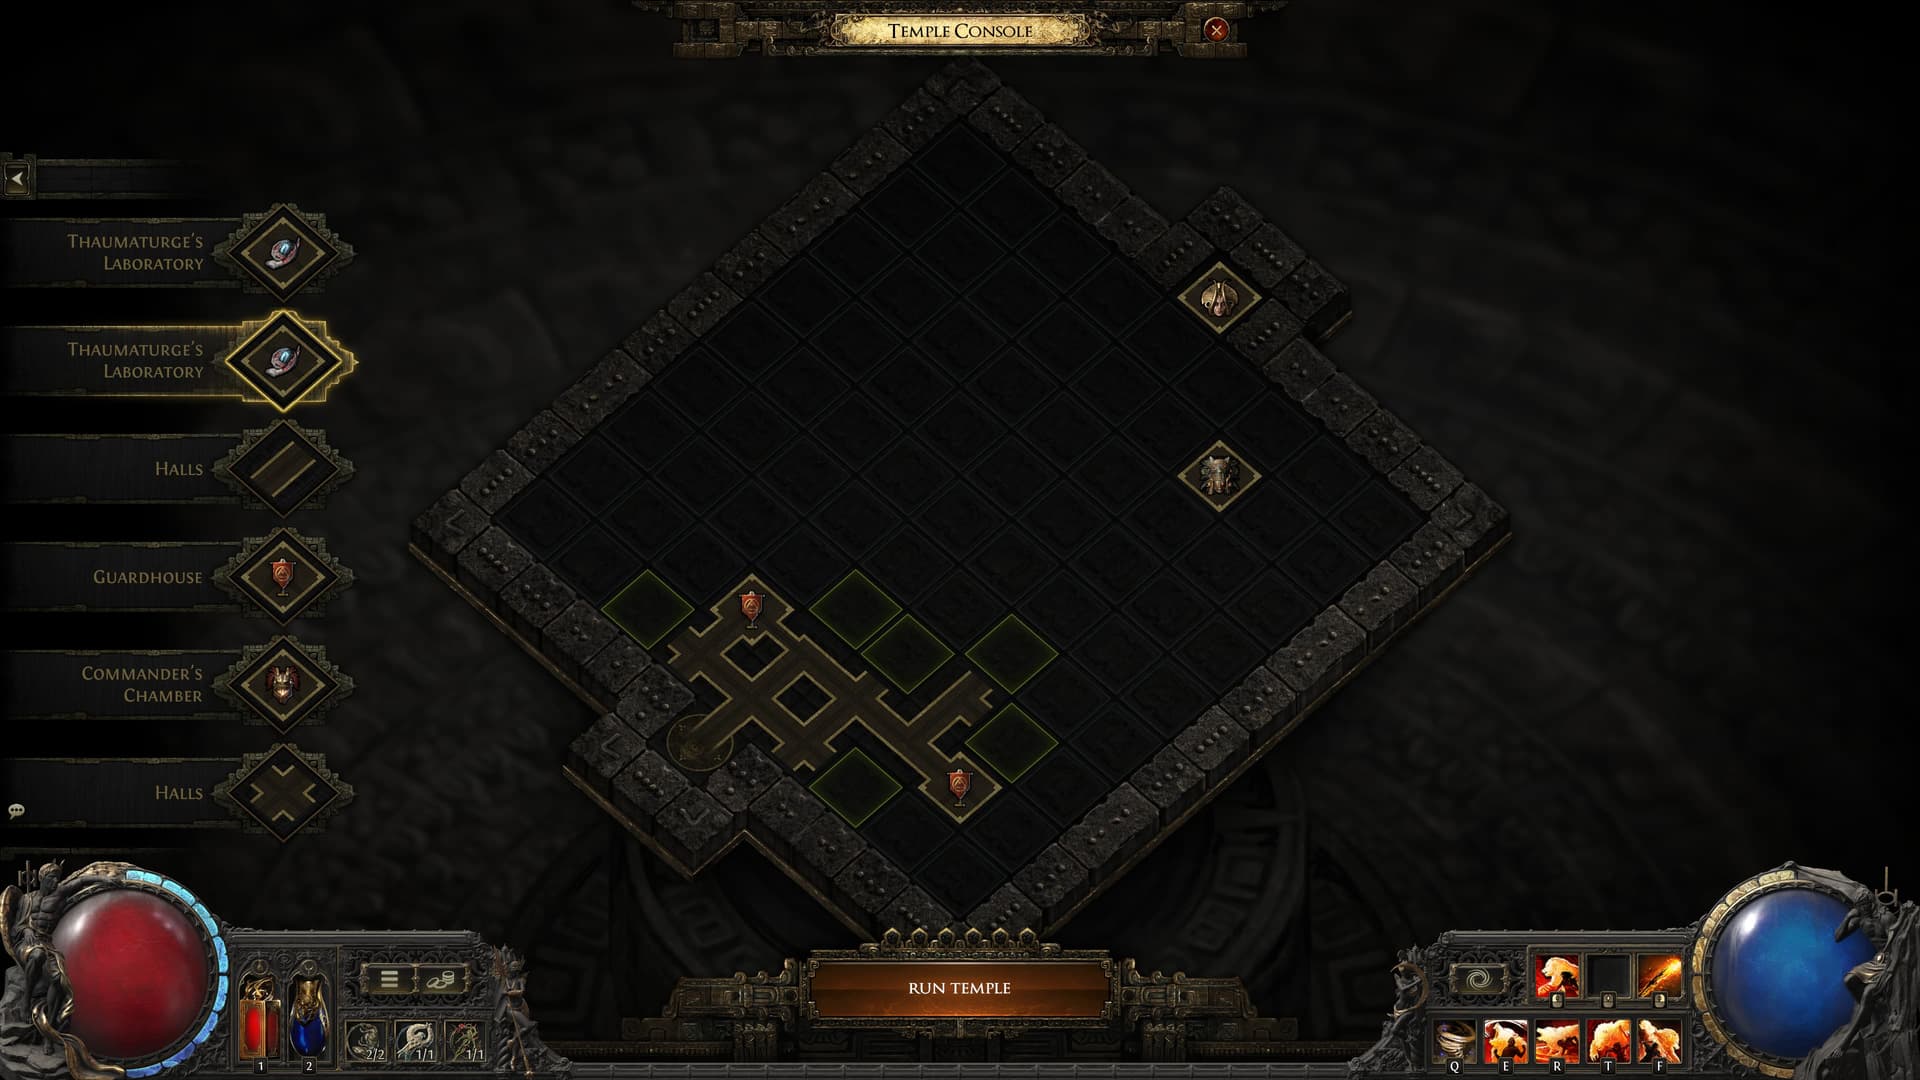
Each time you access the Temple, you’ll be given six Room Cards you can place on this grid. These Rooms include Paths that allow you to travel throughout the temple, and a variety of Named Rooms that contain monsters, Bosses, rewards, or modify the Temple in various ways!
You’ll want to optimize your Temple for the most valuable rewards, while building paths to the reward rooms and Bosses you’re trying to reach!
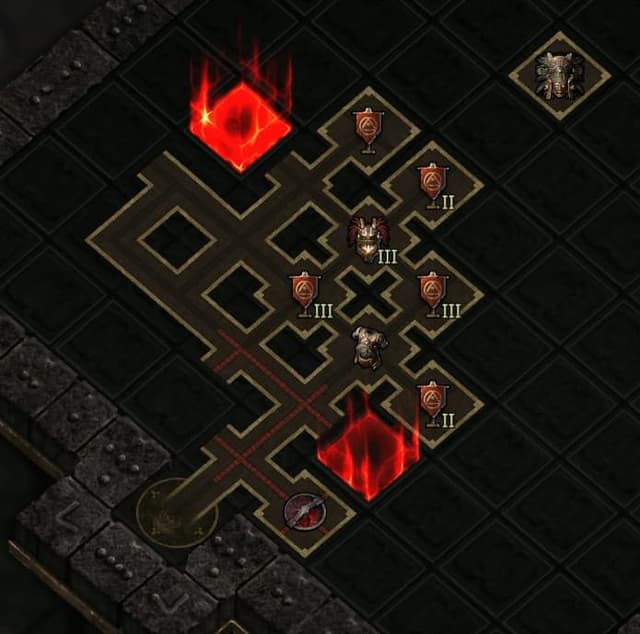
Upgrading Rooms
While Rooms inherently add monsters and/or rewards to the Temple, the very best rewards come from higher Tier rooms. Each Room has a modifier that applies to the entire temple, and these modifiers become incredibly powerful at Tier 3!
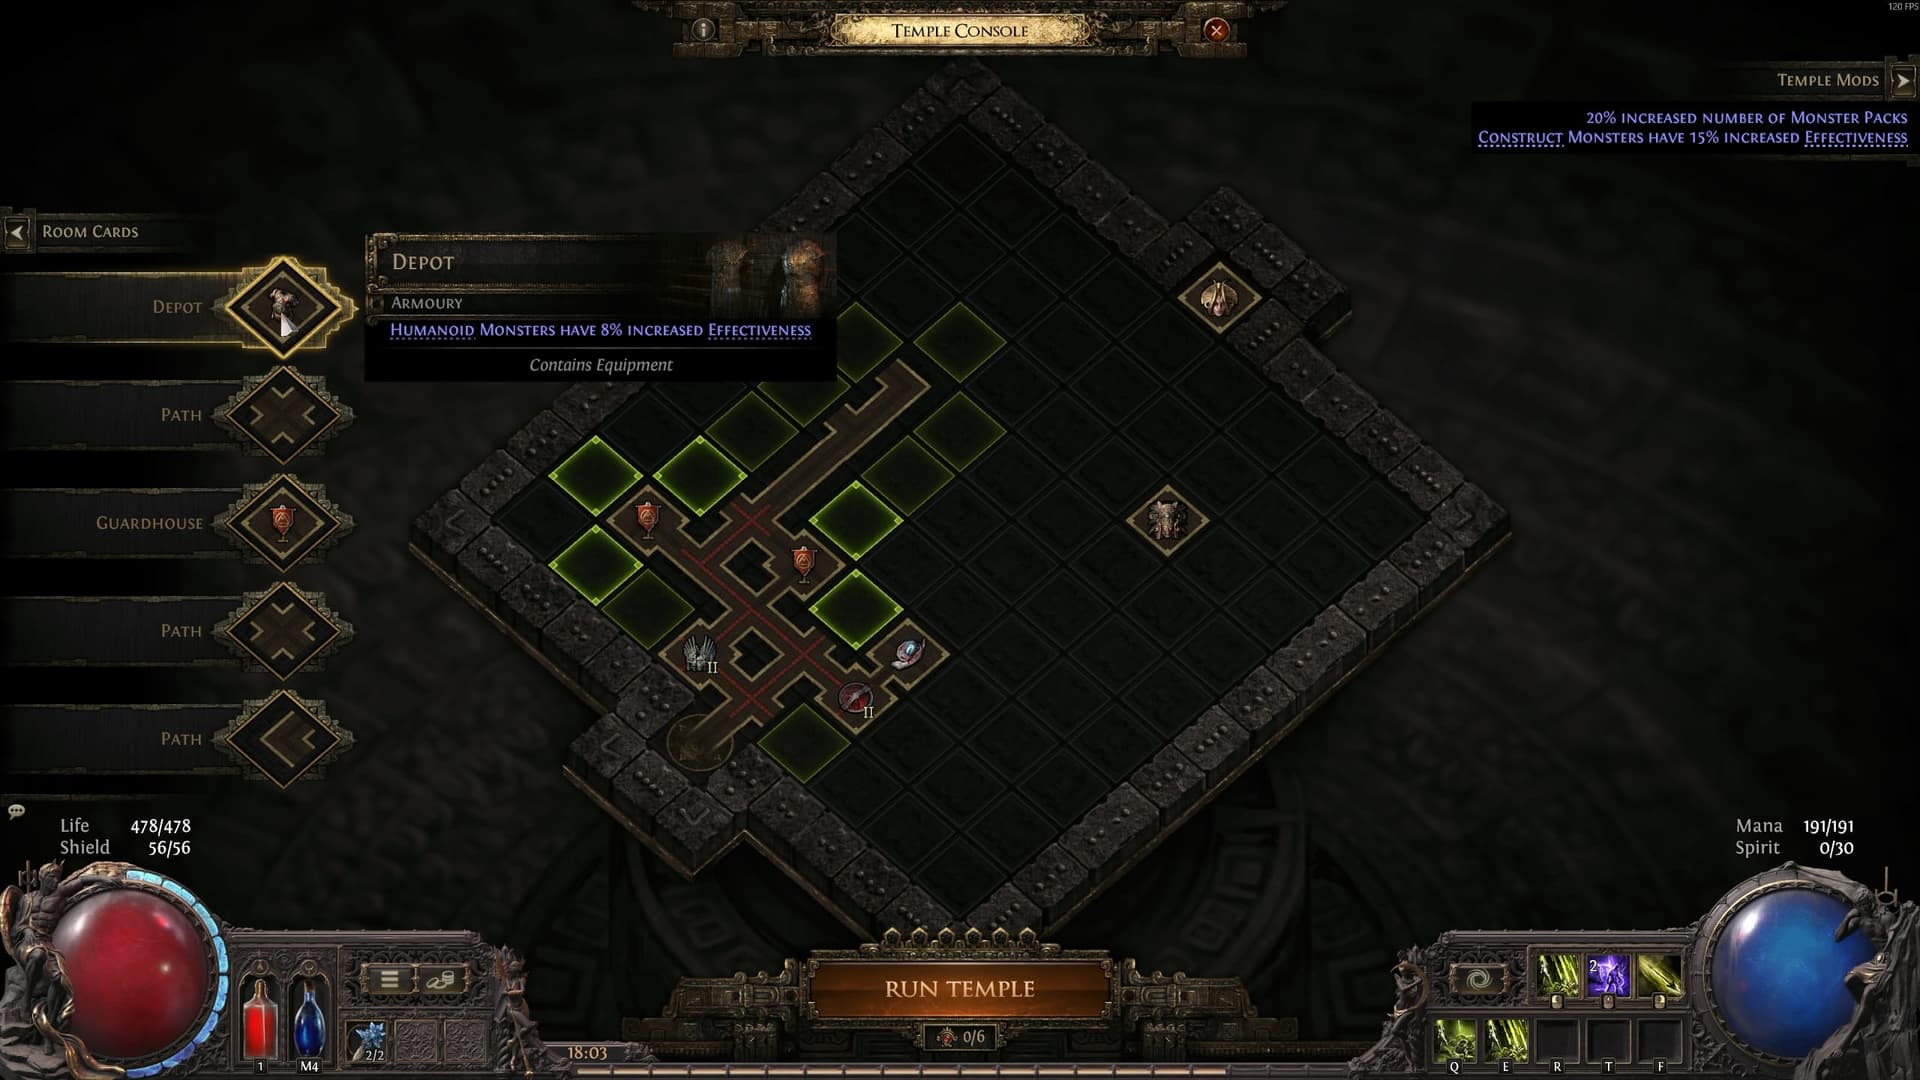
Each non-Hall room can have its Tier upgraded if its conditions are met. These usually involve having specific Rooms adjacent to them.
When placing rooms, locations that will cause a Room to be upgraded will be highlighted in bright green, making it easy to tell what your best options are.
Room Card Placement Rules
Room Card Placement is governed by a few simple rules.
- Paths can only be placed if they connect to another path. You can’t have Paths leading off of named Rooms, so be careful!
- Paths can only be placed next to another Path if the Path Room Card you are placing connects in that direction – they DO NOT both need to connect.
- Named rooms can only be placed next to Paths, or next to rooms that they upgrade (this will connect those rooms). Paths do NOT have to have an opening in the direction of the Named Room you wish to place.
Special Room Cards
Some Rooms will grant special Room Cards that do things other than placing Rooms – such as the Sacrificial Chamber, which grants you the ability to sacrifice other rooms to upgrade its tier.

Use these Special Room Cards wisely, to sculpt your Temple!
Temple Decay
Each Time you close the Temple after Running it, the Temple will Decay – destroying several Rooms at random. This random decay can absolutely ruin your carefully constructed Temple, if you’re not careful!
This Decay does not affect unaccessed Reward Rooms placed by Xipocado’s Console, and will preserve Paths leading to undecayed Rooms – it will never leave undecayed Rooms stranded.
Preventing Path Decay
By building your Temple in a very specific way, you can protect your main Path Rooms from decaying – even when you fight the Architect or Atziri!
The way to do this is to take advantage of the fact that Decay will never leave stranded Rooms. Simply build a long slightly-winding path to Atziri… and then build all of your Rooms so that they’re connected to the end of the main path, and not the beginning.
When your Temple Decays, as long as even a single Room connected to the end of the path doesn’t decay, then the entire path will be preserved – giving you a huge leg up in rebuilding your Temple!
Properly preventing your main path from decaying is key to farming the Architect and Atziri in far fewer Temple Runs.
Medallions
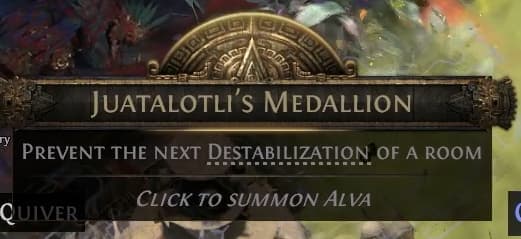
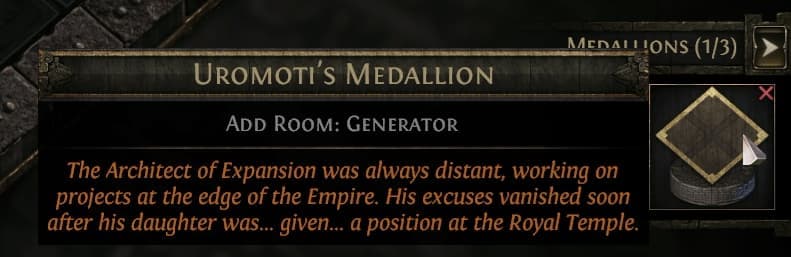
When you kill the “boss” Rare or Unique monster in a Room, it has a chance to drop a Medallion you can pick up. These Medallions act as extra Room Cards you can use at the Temple Console. Some of these are the same as standard Room Cards… but others have special effects, like upgrading the Tier of any room, or locking rooms to prevent them from Decaying.
Medallions can be used at the Console either before or after you Run the Temple – so if you get a good Medallion while running, you can choose apply it before the Temple Decays.
Your default Medallion storage is 3, but this can be increased to a Maximum of 6.
Upgrade Medallions
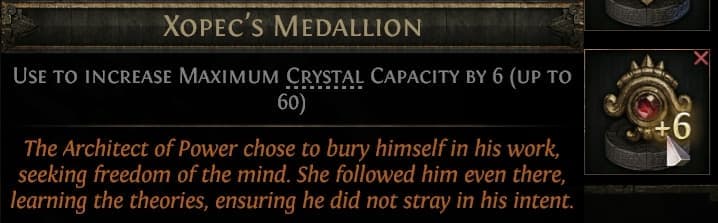
Upgrade Medallions grant permanent upgrades to your Temple. One increases your Medallion Storage by +1 (To a max of 6), and another increases your Maximum Temple Crystal Capacity by +6 (To a max of 60).
Upgrade Medallions rarely drop off Room bosses, and commonly drop off the Architect.
Zantipi’s Medallion
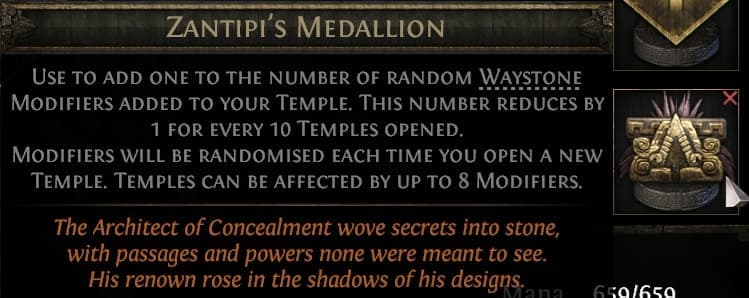
Zantipi’s Medallion is crucial for scaling the Temple into late-endgame farming. Using this medallion will add a random Waystone modifier to your temple – juicing the danger and the rewards significantly! You can add up to 8 Waystone modifiers to a Temple at a time.
Every 10 Temples you run with a Waystone Modifier active, one will be removed at random. This incentivizes stacking them up – even if you have 8 active, you only lose one modifier!

Note that once you start adding Waystone modifiers to your Temple, you have no way to remove them other than to run the Temple. If you get a dangerous modifier… it could stick around for a long, long time.
Use Zantipi’s Medallions when your character is powerful and you’re confident you can handle the dangers!
The Royal Architect
The Royal Architect is a special Boss Room that is always pre-placed in your Temple. In the Past version of the Temple, reaching this Room will allow you to fight the Royal Architect.
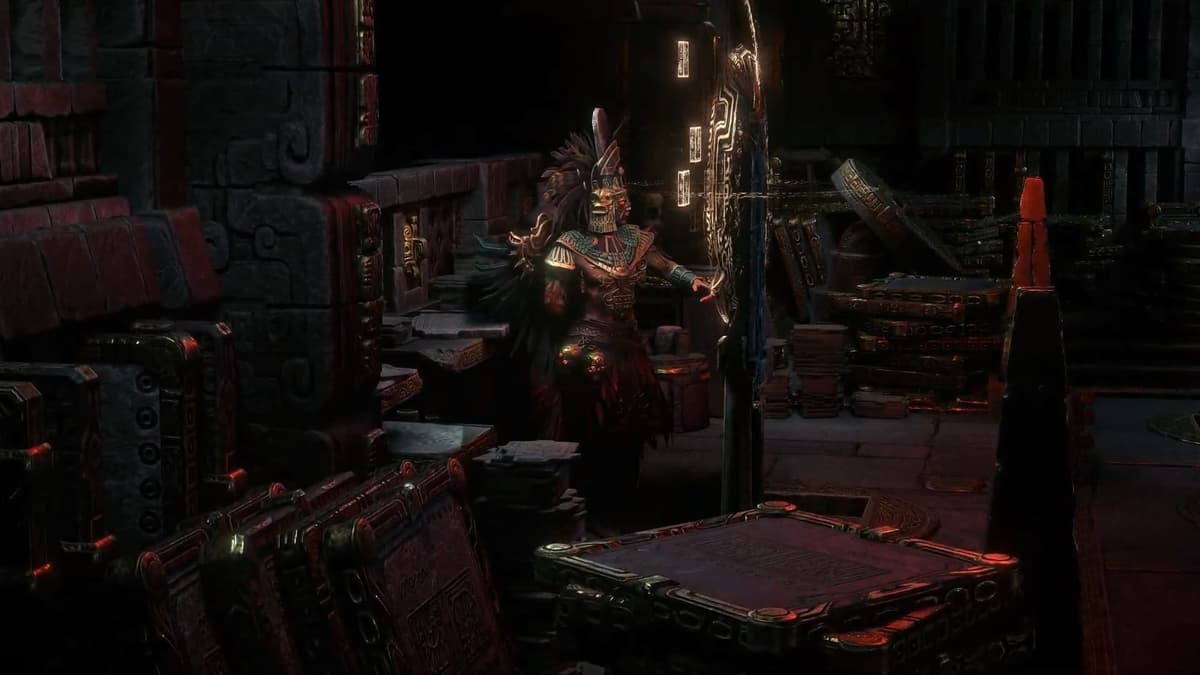
In addition to new Uniques and Lineage Supports, defeating the Royal Architect in a level 75+ Temple will grant you a Medallion that places the Royal Access Chamber, which allows you fight Atziri herself.
The Royal Architect’s Room can connect to any adjacent room – not just Paths! Make use of this to access the Architect’s room in far fewer Runs!
Xipocado’s Console
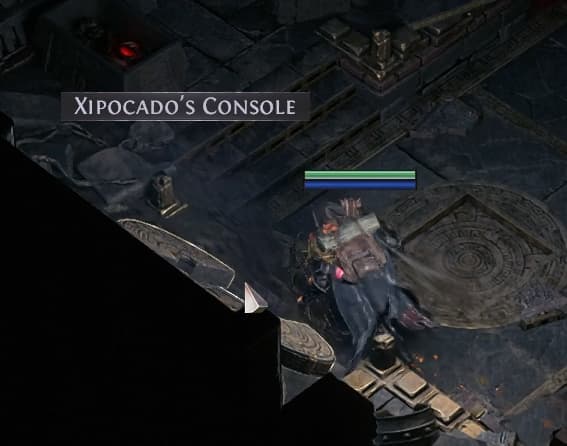
In both the Past and Present versions of the Temple, the Royal Architect’s Room also contains Xipocado’s console. This Console allows you to place exclusive, Reward Room Cards in your Temple.
These Reward Room Cards have special placement rules – requiring you to place them in specific unconnected Tiles, and then work your way towards them.
However, this comes at a cost – accessing this Room causes a portion of your Temple to decay, meaning you’ll lose out on the reward rooms you’ve built up… and have your work cut out for you to reach the Reward Rooms you just placed.
Queen Atziri
In order to access and fight Atziri, you need to connect both the Royal Access Chamber and Atziri herself at the same time.
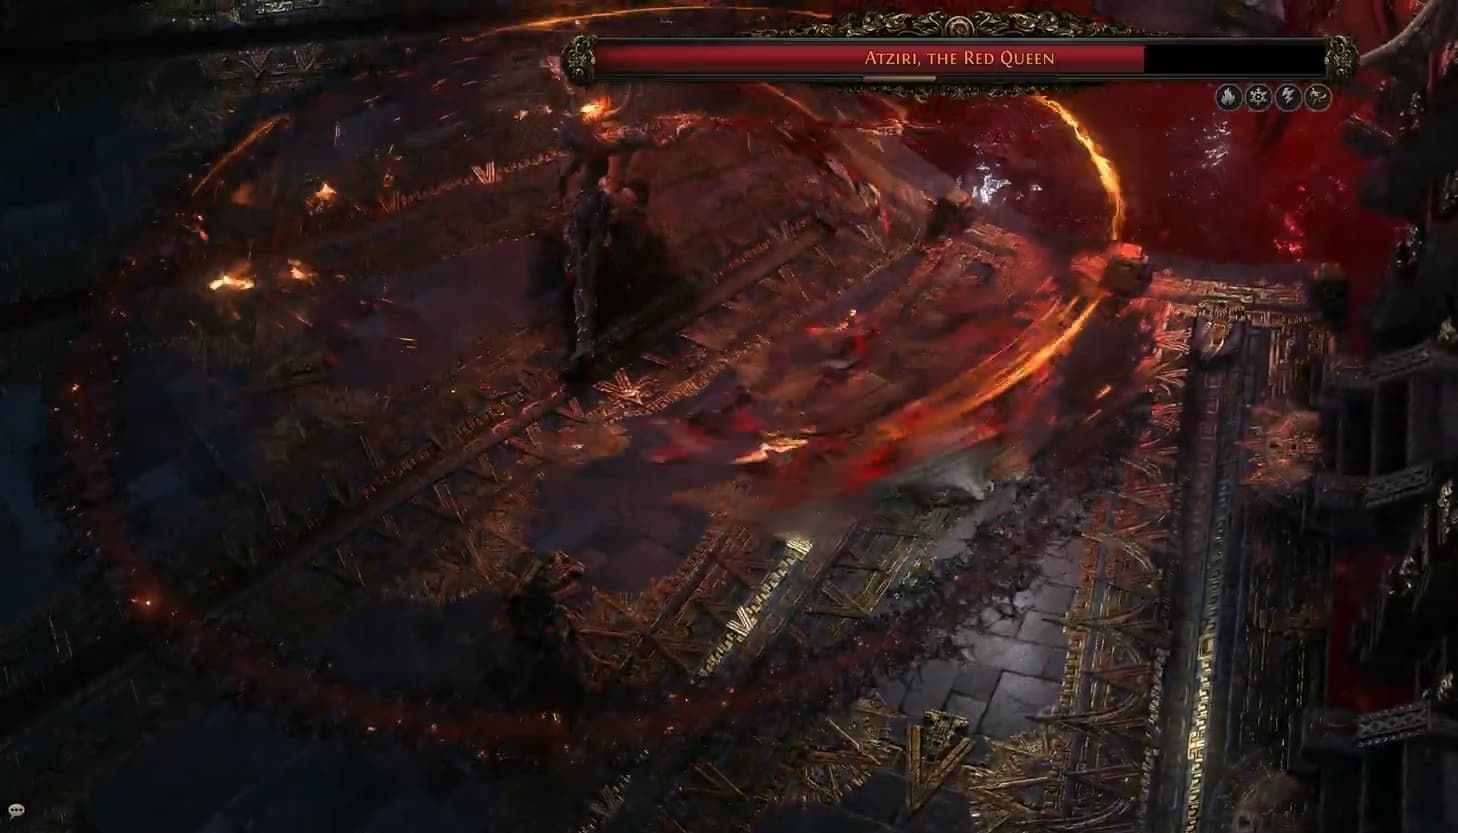
Once you’ve done so, the Royal Access Chamber will be able to unlock the door to Atziri for you to fight.
Defeating Atziri will cause your a large portion of your Temple to Decay, and you’ll need to defeat the Architect in order to access Atziri again.
Atziri’s Vault
Once you’ve defeated Atziri, picking up the Medallion she drops will allow you to open Atziri’s Vault, which contains your rewards.
These rewards can include any special Tier 3 crafting currency from the rest of the Temple, alongside an exclusive currency – the Vaal Siphoner.
Vaal Siphoner

This currency item can be used on a corrupted rare Ring or Amulet.
This adds a kill threshold to the equipment, and when that threshold is met, a random modifier will be removed, and the values of all remaining modifiers will be increased.
Tier 3 Crafting Rewards
Some Tier 3 Rooms will have crafting devices as rewards. These devices add powerful new crafting options to the game, including the ability to double corrupt items!
You don’t need to worry about bringing the item with you or finding a strange way to sell these crafting devices to other players, however. Each of these crafting devices can be itemized into a currency orb you can take with you to use later… or to sell on the Currency Exchange!
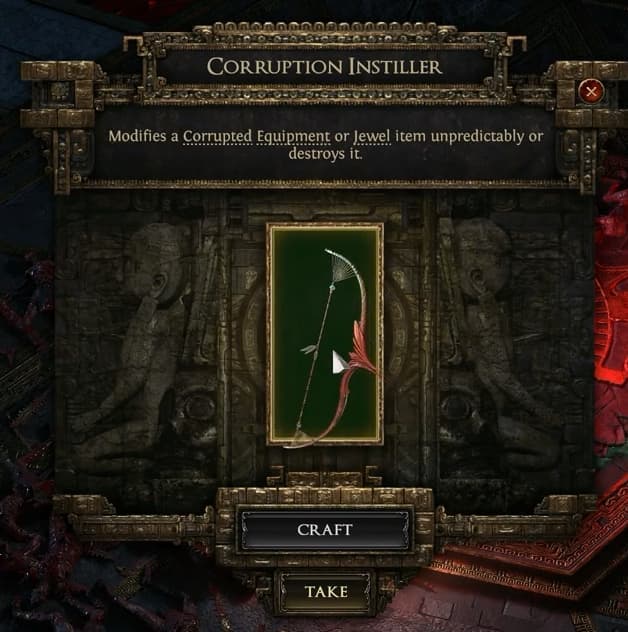
Corruption Altar
Currency Items: Architect’s Orb, Crystallized Corruption
The Corruption Altar allows you corrupt a corrupted item for a second time – causing it to become Twice Corrupted.
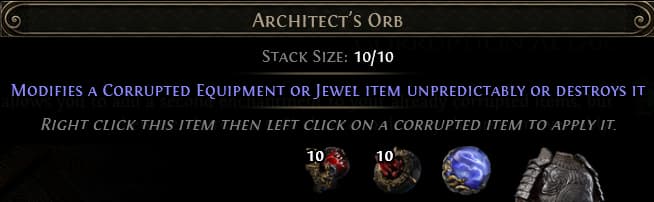
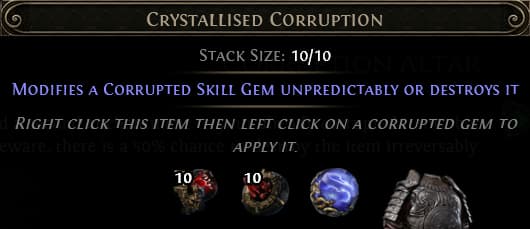
This process is incredibly dangerous – it has a 50% chance to outright destroy the item. But the upside of getting an item with two corruption outcomes is worth it, if you can afford the risk.
Transcension Device
The Transcension Device allows you to replace one of your limbs with a mechanical version. These mechanical versions grant random, passive modifiers… but are lost upon death.
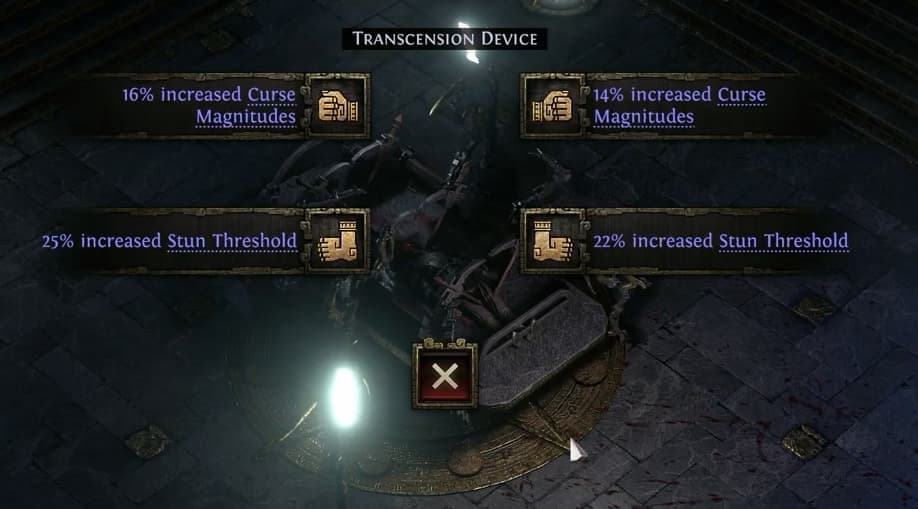
As long as you don’t die, this is just a permanent, passive boost – especially if you replace all four limbs!
Juatalotli’s Triumph
Currency Item: Vaal Cultivation Orb
This device allows you to modify corrupted Unique items. The effect depends on whether or not the Unique is Vaal-themed, or not.
For non-Vaal Uniques, the Unique is replaced with a random corrupted Unique of the same Item Class.
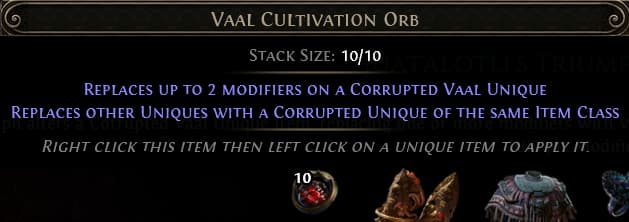
For Vaal Uniques, however… up to two modifiers are replaced with random modifiers. This process is completely random – any modifiers can be replaced, and any modifiers from the pool of available modifiers can be picked.
The pool of potential modifiers includes generic modifiers, new modifiers specific to this crafting method, and new modifiers that are Unique-specific and can only roll on specific Uniques.
Due to the incredibly random nature of this crafting method, it will be possible to create some incredibly powerful items – if you remove bad modifiers or downsides and replace them with powerful new modifiers. But… it will also be possible to create truly useless items, by removing the modifier that makes the Unique desirable in the first place!
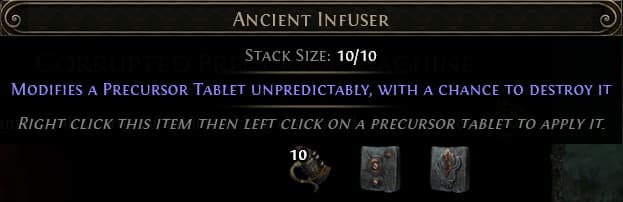
Corrupted Precursor Machine
Currency Item: Ancient Infuser
This device allows you to corrupt a Tablet. These corrupted tablets can gain additional uses… or even additional modifiers, allowing you to have tablets with more than four modifiers!
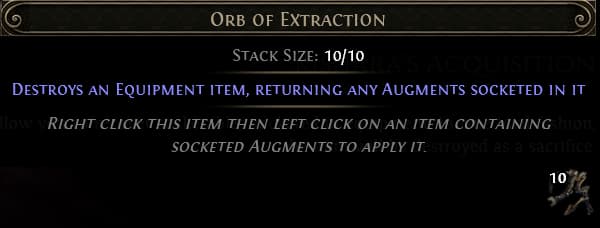
Kishara’s Acquisition
Currency Item: Orb of Extraction
This device allows you to destroy a piece of equipment, recovering the socketables inside it.
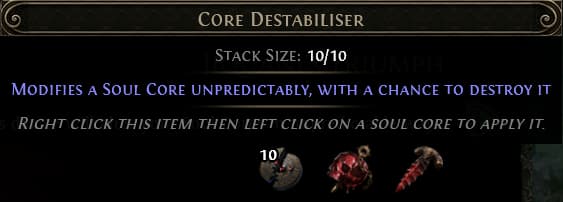
Jiquani’s Triumph
Currency Item: Core Destabiliser
This device allows you to modify Soul Cores into new types of Soul Cores. How exactly this works—and the potential outcomes—are currently unknown.