 Druid
Druid Huntress
 Mercenary
 Monk
Monk Ranger
 Sorceress
 Warrior
 Witch
Witch
Introduction
Not since the very first league of PoE2 have any builds have been capable of breaking 20k max mana… until now. The addition of the new unique wand,  Runeseeker’s Call provides a mainhand caster weapon with up to 6 rune slots that are tripled in effect. A Shaman character with Wisdom of the Maji who also benefits from Bonded modifier effects on runes not only gets 1620 flat mana from 6 Perfect Mind Runes, but also 90% increased maximum mana, an unprecedented amount of this much sought-after stat.
The spell in PoE2 that is most sensitive to maximum mana is  Mana Flare, something many players might not even recognise! This spell-tagged support gem procs when a supported spell crits a target, consuming 25% of the character’s current mana to deal that much fire damage in a radius around the target. So while other caster builds scale base damage by stacking increases to spell levels, Mana Flare scales by stacking as much mana as humanly possible. By running 100% damage taken from mana before life, this mana also becomes an absolutely enormous health pool that benefits from the naturally high regeneration of mana, making this build nearly immortal in all content.
With bossing damage in the 10s of millions and a satisfyingly punchy clear using  Eonyr’s Thunder to flood the screen with corpse explosions, the Mana Flare Shaman is a fantastic build for clearing any content in Runes of Aldur. We’ll also note that if the Legacy of Runeseeker’s Call rune is fixed to have its effect boosted by Runeseeker’s Call, which currently doesn’t work as expected, the build immediately doubles its damage and breaks 25k max mana.
Strengths and Weaknesses
- Exceptional damage that one-shots pinnacle bosses
- Extremely tanky
- Clears 200% delirium fast due to its high dps
- Slower than speedfarm builds in easier content
- Very expensive entry cost
Skill Rotation
The gameplay for this build is very simple to execute.
Mapping
When approaching enemies, cast  Entangle towards them and the auto-bomber nature of Mana Flare will do the rest, targeting packs for you as you carry on forward. You can speed up clear if required by casting
  Detonate Dead on enemy corpses. Detonate Dead has a high corpse life-based damage scaling which is not meaningfully weaker at Level 21 with zero spell level investment than at level 40. It also has a significantly larger base radius than Mana Flare that can help clear out packs, but with enough area of effect and cooldown recovery scaling for Mana Flare and Voltaic Fulmination this will hardly be necessary.
Bossing
Cast  Frost Darts at the boss to trigger our higher-damage Mana Flare. Alternately, if you’re feeling lazy, you can just afk in front of the boss and it’ll trigger Mana Flare any time it melee attacks you via our
  Arctic Armour. Your mana pool is so large and your mana regeneration so high that there isn’t really a boss in the game who can kill you!
Ascendancy
For mana stacking this league there is only one choice, Shaman. Wisdom of the Maji allows you to gain the powerful bonded bonus modifiers on runes. That means Shaman gets 90% increased maximum mana on their weapon this league that no other ascendancy can access, resulting in a maximum mana value that nobody else can match. This allows us to scale Mana Flare‘s damage well beyond what was possible in the Fate of the Vaal league, and lets us one shot most of the game’s pinnacle bosses.
Shaman also gives us a way to make meeting spirit requirements on the build trivial with Sacred Flow, providing us with 40 Spirit for each empty charm slot on our character. This lets us trivially fit in  Archmage,
  Mana Remnants, and a variety of other impactful spirit support gems without any spirit investment on our gear at all.
For the remaining points, two interesting options present themselves. At lower max mana levels, players may take Druidic Champion and Furious Wellspring, giving us a large amount of max Rage and Rage Regeneration that scales with our mana regeneration increases, allowing us to have permanently full rage even while Mana Flare is rapidly proccing while mapping. Without further rage investment, this amounts to 21% more spell damage at all times, and also allows the use of the extremely powerful support gem  Rageforged II while bossing which provides 35% more damage on single-target fights.
Once our max mana is high enough, we have enough damage to one-shot most enemies in the game without this bonus. This makes the powerful defensive synergies of Reactive Growth and Avatar of Evolution the best choice at high max mana levels. This provides 10% less elemental damage taken and 15% of physical damage taken as elemental damage at all times. It also provides boosted temporary elemental Adaptations, providing 20% less damage taken for each elemental hit type taken in the last 5 seconds, stacking up to 60%. This can even allow you to tank Arbiter of Ash explosions, and combined with the huge mana pool and mana regeneration the character already packs, makes you near invulnerable in the game’s current level of difficulty.
This is an endgame build you’ll only be able to swap into at level 84 at the very minimum, and therefore it’s expected to have all 4 ascension points by the time you start playing Mana Flare. However the build functions with just Wisdom of the Maji and Sacred Flow, so you can take those points first and pick up the rest at your leisure.
Gem Info
A full skill planner for this build is presented below. A full skill planner for this build is presented below.
Some notes on the skill setup:
 Blasphemy supported by
  Temporal Chains isn’t there to stop you from dying, and more to stop enemies from being able to hit you in the first place. Mana stackers have no ways to scale stun threshold, and light stuns can be particularly annoying to deal with. Arctic Armour is configured to prevent getting stunlocked when swarmed, resulting in any enemy who manages to hit you with a melee attack triggering a retaliatory Mana Flare that’s guaranteed to kill anything nearby.
 Atziri’s Communion is expensive but very worthwhile, allowing us to enter a permanently low-life setup which lets us pick up the Pain Attunement keystone for 30% more critical damage bonus at all times. This also allows the use of
  Execute III on single-target. This lineage support is pricey, so before acquiring one you might want to stick with the rage-based ascendancy setup allowing you to use Rageforged II on single-target.
- Frost Darts is your single-target ability, and should be associated with the primary bossing tree.
- Entangle and Detonate Dead are your mapping skills, and should be associated with the secondary mapping tree.
 Vitality II and both
  Cannibalism II gems are there to help deal with the life cost we incur on our
  Rathpith Globe from every manual cast and Mana Flare proc, recovering 5% max life on kill which supplements our 3% max life recovery from picking up Remnants to entirely offset our life costs, even in maps with the less life recovery affix. This is only necessary when running Atziri’s Communion which drastically cuts our life pool; the rest of the time the player can comfortably press a life flask every 10s or so to deal with any life costs. This is also unnecessary on the mirror-tier Rathpith upgrade with both mana cultivated mods present, but without the additional life cost affix, freeing up considerable amounts of spirit for other quality-of-life.
Skill Tree
A skill tree planner for a character level in the mid-90s is presented below.
Mana Flare as a build requires a lot of mapping support to smooth out clear, so we make full use of both weapon swap trees. For our primary tree used for bossing, we take additional crit damage bonus, scale our shock magnitude, and scale our max mana a little further with Eldritch Will.
For our secondary tree used while mapping, we stack as much increased spell area of effect and cooldown recovery are possible. We take some lightning penetration to make up for lacking  Rakiata’s Flow on Entangle, and then get a huge 26% increased cast speed for 3 points at Final Barrage to smooth out our casting while we clear.
Take enough increased crit chance nodes to cap your Mana Flare’s critical hit chance in single-target. The number of nodes you’ll require drops as your scale max mana and get more increased crit chance from your Rathpith’s mana-based scaling.
Jewels
A great choice to ease up suffix pressure on your gear, allowing you to fit more intelligence, is to use three  Grand Spectrum jewels providing elemental resistances. You’ll also want one rare Sapphire jewel with increased effect of suffix modifiers and % damage taken from mana before life to cap your Mind Over Matter effect without the keystone, leaving your considerable mana recovery fully intact.
From then out, crit damage bonus stacking on Sapphires can be very powerful, as is increased ailment magnitude to scale up shock. You can also try to more aggressively stack intelligence with % increased intelligence Sapphires.
No  Prism of Belief or
  Heart of the Well jewels are particularly impactful on this build, allowing you to make some minor savings in the jewel department.
Gearing
We use a unique wand and focus in this setup. We’ve already mentioned about how powerful Runeseeker’s Call is for this build, and it is not recommended to run Mana Flare without one.
For the focus, a cultivated Rathpith Globe with the increased spell damage per 100 max mana and the increased crit chance per 100 max mana cultivations is absolutely necessary for the build to function. Versions of this item without the life cost affix are some of the most expensive items in the game at present, costing a mirror or more. Thankfully, this build has some easy ways to deal with the additional life cost allowing us to use a far cheaper version with the life cost affix intact.
Finally, we forgo the extremely powerful  Mageblood and
  Headhunter options here to instead use a
  Darkness Enthroned. We require one that treats socketed augment items as if they were socketed in the helm, and require hitting the breakpoint of 100% increased effect of socketed augment items. This allows us to use a Jiquani’s Thesis as our ancient augment, boosted to provide 1 flat mana per 1 item energy shield on our equipped helm. This can amount to well over 600 flat mana when paired with a powerful Ancestral Tiara. Then in the other augment slot we can run a Soul Core of Zalatl to give us 6% increased maximum mana. This provides a huge boost to maximum mana and often will amount to 30% more damage over using another belt option. Note that this item means you really don’t want T1 flat mana on your helm prefixes, you want to stack ES on the helm as much as possible!
A very wealthy player may opt to sacrifice some maximum mana and use a Mageblood with increased critical hit chance, elemental resistances, skill speed, and movement speed. This would allow the build to drop the elemental resistance Grand Spectrum jewels and pick up 3 powerful rare sapphires instead, boosting the build’s critical damage bonus to make up for losing so much max mana while making the build considerably faster for mapping.
Stat Priorities
Few builds want to stack mana at all costs like Mana Flare. Thankfully we get to neglect spell levels entirely as they do nothing for Mana Flare’s damage! This makes gearing for the build somewhat unique even among mana stackers. As a rough priority ordering:
- Cap your elemental resistances. Grand Spectrum providing elemental resistance per socketed Grand Spectrum jewel are thankfully very cheap, and a great way to cap elemental resistances which can free up more suffixes for intelligence.
- Then stack as much mana and energy shield as is possible. The energy shield gets converted to flat mana using Eldritch Battery.
- Get high tiers of mana regeneration on your rings and amulet. This is absolutely necessary to ensure we can meet the incredibly high mana expenditure of the build, and helps us feel incredibly tanky in all content.
- You don’t really need to worry about chaos damage in this setup. In PoE2 chaos damage inflicted upon the player is much lower than for elemental damage, and is balanced around players with 4-6k life being able to handle chaos hits with 75% chaos resistance. With 20k max mana and 7k+ regeneration per second, even at 0% chaos resistance you can endlessly eat chaos explosions from ritual plants or strongboxes and your current mana will barely move.
A full breakdown of priorities per slot are presented below. As a high-budget endgame build many of the listed affixes are very much considered mandatory!
| Slot | Item/Base | Prefix | Suffix | Augments |
| Mainhand | Runeseeker’s Call | – 6 sockets preferable but not necessary – mana regeneration Runemastered base strongly desirable. These are usually cheaper than other bases. | – Legacy of Runeseeker’s Call (luxury 6-socket option, likely bugged) – Perfect Mind Runes | |
Offhand | Rathpith Globe | – cultivated increased spell damage per 100 max mana – cultivated increased spell crit chance per 100 max mana – life cost cultivated off is a luxury | – Owl Idols | |
| Helm | Ancestral Tiara | – % increased energy shield – +X to energy shield – hybrid % increased energy shield/mana | – intelligence – critical hit chance – elemental resistances | – Perfect Iron Runes |
| Body | Vile Robe | – % increased maximum mana (Soul Modifier) – % increased energy shield – +X to energy shield | – intelligence – elemental resistances | – 1 x Medved’s Tending – 1 x Greatwolf’s Rune of Willpower – Perfect Iron Runes |
| Gloves | Sirenscale Gloves | – % increased energy shield – +X to energy shield – +X to maximum mana | – 60% increased effect of socketed augment items – intelligence – +X% to critical damage bonus – dexterity – elemental resistances | – Perfect Mind Runes |
| Boots | Sekhema Sandles | – % increased movement speed – % increased energy shield – +X to energy shield – +X to maximum mana | – 60% increased effect of socketed augment items – intelligence – elemental resistances | – Farrul’s Rune of the Chase – Perfect Mind Runes |
| Belt | Darkness Enthroned | – 100% increased effect of socketed augment items – This item gains bonuses from socketed augment items as if it was a Helmet | – Jiquani’s Thesis – Soul Core of Zalatl | |
| Ring 1 | Mnemonic Ring | – +X to maximum mana – % increased maximum mana – % damage taken from mana before life | – % increased mana regeneration – intelligence – elemental resistances | |
| Ring 2 |  Kalandra’s Touch Kalandra’s Touch | |||
| Amulet (anoint Mental Perseverance) | Corona Amulet | – +X to maximum mana – % increased maximum mana – +X to maximum energy shield | – % damage taken from mana before life – % increased mana regeneration – attributes – elemental resistances – crit damage/crit chance | – Soul Core of Zalatl |
Some notes on crafting gear:
- 3-socket boots and gloves with 60% increased effect of socketed items are incredibly powerful, allowing us to stack a huge amount of flat mana with Perfect Mind Runes and their powerful bonded effects. This also lets Farrul’s Rune of the Chase give your boots an additional 8% movement speed and 16% increased cooldown recovery rate via the bonded modifier, which is great for mapping. The removal of the Omen of Corruption this patch means 3-socket versions of these are very much chase items, with only a 1/4 chance to hit the outcome on your Vaal orb, and with a 1/4 chance to brick the item entirely, so only do this if you have backup items ready to go!
- It’s recommended to buy two-socket exceptional boot and glove bases while attempting these crafts. The glove bases are reasonably cheap at 10-12d per attempt, and the boot bases are cheap if you’re willing to settle lower than ilvl 82 on the base and forego T1 % increased movement speed.
- For boot prefixes, T1 flat ES and T1 % increased ES slightly beats out T1 % increased ES and T1 flat mana, but not by enough for you to recraft prefixes if you hit the latter; especially with a risky Vaal orb waiting at the end of the craft.
- The ring craft requires you to ideally fracture T1 increased mana regeneration on a high level Mnemonic Ring base, and then use Breach essence to quality the item to 40%. Then you’re chaos spamming on two mods until you hit T1 mana, at which point you can suffix exalt and use an Omen of Crystallisation to ensure the new suffix mod is replaced by a Perfect Essence of the Mind to give you the % increased max mana prefix mod. Then you have to use the new Altered Collarbone desecration currency with an Omen of Sinistral Necromancy to desecrate a prefix, and use an Omen of Abyssal Echoes to give you a reroll when you unveil. You’re hoping to hit the Breach Otherworldly prefix % damage taken from mana before life. This can be expensive and very luck-based. I required 13 Omens of Light to reset my desecration before I hit this, others I’ve spoken to hit in 2-3 attempts! At this point the prefixes are mercifully complete. Then to finish you can Perfect Exalted Orb slam with Omen of Greater Exaltation and suffix annul with the mana regeneration safely fractured until you’re happy with your suffixes. This is very expensive so buy a Kalandra’s Touch to reflect the well-earned result.
- The amulet craft is best done by fracturing % max mana as this has the lowest mod weight of any target mod by a long way. After this, we similarly quality to 40% using Essence of the Breach. then you can chaos spam until you hit high tier flat mana or mana regeneration and use prefix/suffix exaltation omens with greater exaltation orbs to target the other, annulling back to one mod to repeat the chaos spam as necessary. Once happy with your prefixes and you have T1/T2 mana regeneration, you can suffix desecrate with an Omen of the Blackblooded to guarantee a Kurgal-tagged mod per reroll window at the Well of Souls. % damage taken from mana before life is a Kurgal mod so this almost guarantees you’ll hit your target in just a few attempts. Note that for the ring craft, the Breach Otherworldly prefix desecration target is not Kurgal tagged, so do not use the Omen of the Blackblooded when crafting your ring!
A note on Legacy of Runeseeker’s Call
The Legacy of Runeseeker’s Call is a rune that can be acquired by slotting the Legacy of Aldur rune into an uncorrupted Runeseeker’s Call, destroying the wand but producing a rune that gives a player 75% increased effect of socketed items when slotted into a wand, with a bonded modifier giving 100 flat mana. This can be used in another Runeseeker’s Call wand to in theory produce an incredible stat-stick for a mana stacker with 425% increased effect of socketed items, but this interaction appears bugged at present.
When socketed into a Runeseeker’s call, the 75% increased effect of socketed items is not boosted by the 200% increased effect of socketed items on the wand itself, resulting in an interaction that is extremely weak.
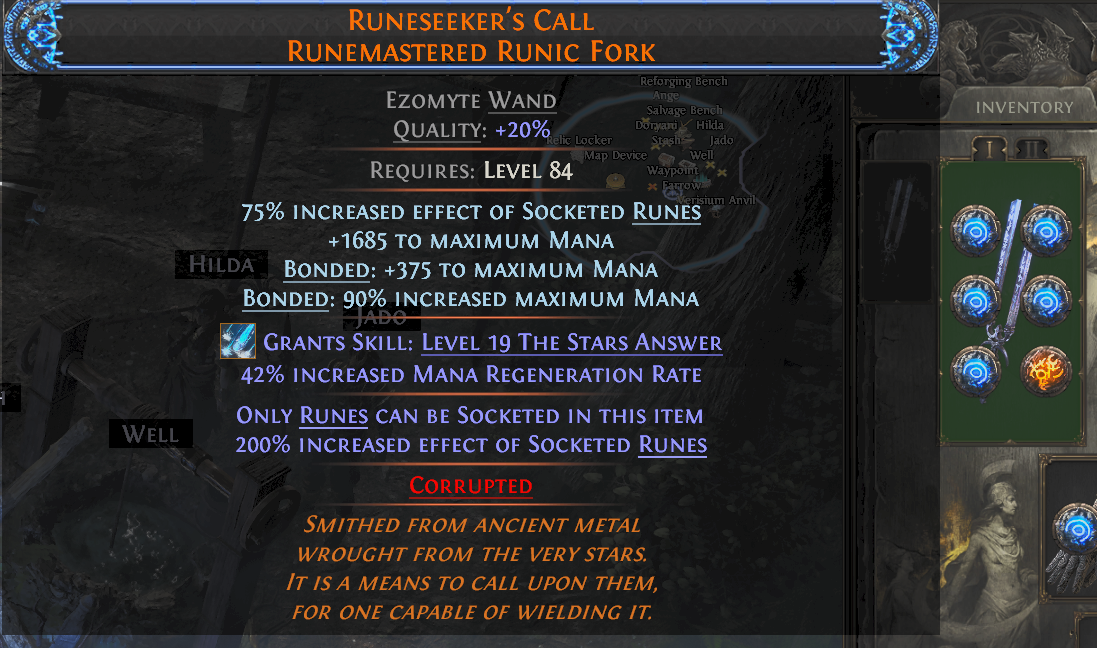
For context, a non-shaman with 6 Perfect Mind runes gets 1620 flat mana, while with 5 Perfect Mind runes and Legacy of Runseeker’s Call they get 1685, only 65 flat mana more! When this is competing with Legacy of Lifesprig which in this wand gives a player +6 to level of all spell skills, there’s a very good case for arguing this interaction is currently bugged.
Even with the bug, it’s still the best-in-slot weapon setup for a Mana Flare shaman because the bonded modifier is boosted by 275% like the other stats on the weapon, giving +375 flat mana for a total of 440 flat mana more than 6 Perfect Mind runes (the 90% increased max mana remains the same due to rounding breakpoints on the individual runes). However, due to the extremely expensive price attached to both Runeseeker’s Call wands and the Legacy of Aldur rune itself, this is hard to recommend for any but the most min-max of players.
If this is confirmed to be a bug and fixed in a future patch, this guide will be updated to reflect the change. Such a fix would immediately give this build another 5-6k maximum mana and quite literally double our damage!
Charms and Flasks
If you have some spirit to spare, especially with a mirror-tier Rathpith Globe without the additional life cost affix, you can give up some spirit from Sacred Flow and wear some powerful charms to smooth out mapping clear. In particular a Stone Charm and a Thawing Charm can prevent stuns and freezes respectively. Neither are dangerous to the build but will slow you down occasionally while in maps.
Finally for flasks, any generically strong life flask will work for the build, and a  Lavianga’s Spirits provides a very minor boost to mana recovery. No mana flask is particularly impactful for the build, so don’t break the bank on this purchase!
Build Mechanics
For the inquisitive player, we’ll list some theorycrafting behind the build and how we scale the damage of this oft-neglected support gem to reach the tens of millions!
Damage scaling
Mana Flare damage scales with current mana, which means we’ll be scaling a huge amount of max mana on our character. Thankfully, doing so also scales our damage in several very powerful ways. The first of these is Archmage, which provides 4% damage as extra lightning damage per 100 max mana. For us this means over 800% damage as extra lightning, a level most builds can only dream of. This also makes most of our damage lightning, giving us access to shock on single-target fights and further scaling our damage.
The second is scaling increased spell damage via both the Arcane Blossom tree notable and a cultivated Rathpith Globe, providing our spells 3% and 6% increased damage per 100 max mana respectively. at 20k max mana this amounts to 1800% increased damage, far more than most builds are capable of stacking.
The eagle-eyed may have spotted that Mana Flare can only be procced upon a critical hit, so for this build to feel smooth we’ll ideally need to crap our critical hit chance, also further scaling Mana Flare’s damage. A cultivated Rathpith can also provide 3% increased crit chance per 100 max mana, amounting to 600% increased crit chance from mana scaling alone, which with  Pinpoint Critical is enough to almost cap our crit chance with any possible Mana Flare delivery spell in the game, along with ensuring Mana Flare itself crits inflicting devastating damage.
So to recap, each 100 max mana gives us:
- 25 base damage for Mana Flare
- 4% damage as extra lightning damage
- 9% increased spell damage
- 3% increased critical hit chance
That’s 4 separate damage axes scaling purely from max mana, so the returns on stacking more mana have a runaway effect. Shown below is the damage of a single-target setup mana flare with respect to character max mana.

By the time we hit 20k mana we’re one-shotting most pinnacle bosses, while two-shotting Xesht and The Bodach. Even while we sacrifice some damage for quality-of-life on our mapping setup, you’ll be one-shotting the vast majority of foes in the game, and all without stacking a single spell level on your gear!
Mapping Setup
Mana Flare has a one second cooldown and a 2 meter radius by default, which is fairly low for an AoE spell. Because our damage is so high compared to most spell builds, we’re at liberty to stack a huge amount of cooldown reduction and increased area of effect on the passive tree. This gets Mana Flare’s radius up to 3.2m and its cooldown below half a second, greatly improving the fluidity of clear.
We speed things up with a little-used and cheap lineage support gem, Eonyr’s Thunder. Through our extremely high damage as extra lightning, most of the hit damage of Mana Flare becomes lightning, enabling us to instantly electrocute any non-unique target in the game with a single Mana Flare proc. Each detonation sends electrocuted corpses flying in each direction which prime and shortly thereafter explode triggering Voltaic Fulmination, greatly expanding our effective Mana Flare kill zone per proc.
Our delivery spell of choice for Mana Flare is Entangle, which with all our AoE scaling covers a huge part of the screen in a single cast, creating a persistent field of lashing vines which rapidly hit enemies caught within it, allowing Mana Flare and Voltaic Fulmination to detonate through packs on cooldown.
Mana Recovery
It’s safe to say that no build in PoE2 burns mana like this one. Each Mana Flare proc incurs additional max-mana based costs from Archmage, doubled by Eldritch Battery, while also consuming 25% of current mana. From full mana at 20k that’s easily 6-7k mana consumed per proc depending on your mana-cost efficiency, that can happen as much as twice per second. That’s more mana burned in a few seconds than many builds manage in an entire map. As such we’ll need some pretty spectacular recovery.
We start by scaling increased mana regeneration wherever possible. With 40% quality now possible on jewelry via the Essence of the Breach, we can get almost 300% increased mana regeneration rate from our rings and amulet alone. The  Clarity II support gem provides another 50%, with considerably more possible to pick up on the tree. As a crit build, we can also easily maintain Arcane Surge, providing 20% more mana regeneration rate, which is further scaled by increased effect of Arcane Surge passives. This provides around 7-8k mana regeneration per second, getting us a good part of the way to meeting our spend.
While mapping we make use of Mana Remnants to also facilitate recovery. Relative to our huge mana pool, the 450 or so flat mana these return isn’t particularly impactful, but it lets us stack  Khatal’s Rejuvenation for more invaluable CDR on Mana Flare and letting it proc more often.
Finally, we take the Efficient Killing cluster which recovers 4% of our maximum mana on each kill. Given Mana Flare’s AoE nature, this can sometimes single-handedly top us off following a detonation on a dense pack. Through these recovery measures combined, you’ll find your mana is rarely far from full while mapping, and on single-target we can sustain the cost of our Mana Flare procs as fast as we can cast Frost Darts to deliver them!
Changelog
- June 15th, 2026 – Mana Flare Shaman Endgame Build Guide first added.
