 Druid
Druid Oracle
 Shaman
 Huntress
 Amazon
 Ritualist
 Spirit Walker
 Mercenary
 Gemling Legionnaire
 Tactician
 Witchhunter
 Monk
Monk Acolyte of Chayula
 Invoker
 Martial Artist
 Ranger
 Deadeye
 Pathfinder
 Sorceress
 Chronomancer
 Stormweaver
 Disciple of Varashta
 Warrior
 Smith of Kitava
 Titan
Titan Warbringer
 Witch
Witch Blood Mage
 Infernalist
 Lich
Lich Abyssal Lich
Due to the latest balancing changes, we do not recommend playing this build anymore, as it does not meet the high standards we apply to our guides in terms of fun and performance. We are leaving it up as a reference and it might be revived in a later patch.
Introduction
This build takes one of the least played ascendancies in the game and one of the least played uniques,  Indigon, to create something powerful and fast—Incindigon! Gemling Legionnaire’s excellent Gem Studded helps us stay mobile while channeling
  Incinerate, and Neurological Implants keeps our spell levels high for huge outgoing damage.
Our AoE ignites generate energy for  Cast on Elemental Ailment, which auto-casts
  Arc to bank Incinerate fuel and also inflict devastating shocks capable of breaking 70% magnitude. This leads to a one-button clear, and a unique build that clears all content and has a fun time doing so!
If the Scarab of Risk from PoE1 existed in PoE2, this build would happily run it, not being bricked by a single map modifier in the endgame and bringing a huge quality of life to farming sessions.
While Incindigon is not a league starter, requiring some modest initial investment, it shares some gear with my Ignite Chronomancer build which is a great league starter, letting you make a smooth transition.
Strengths and Weaknesses
- Easy, one-button playstyle.
- High movement speed.
- High Spirit requirements.
- Gem Studded can be fiddly to balance.
- While tanky enough, hard to drive up health pool.
Build Mechanics
While Incindigon is very simple to play, it’s a little harder to explain! The build takes a lot of Keystone passives, coupled with many moving parts. It’s worth understanding these to know what changes you’ll want to make as you navigate the leveling and gearing curves.
Incinerate
We’ll start with Incinerate, probably the simplest piece of the puzzle. It’s a channeled fire spell with high base damage that “ignites as though dealing” a fire hit. As it gains stages, it gets a huge more damage modifier, which together with some common damage supports can easily break 1000% more damage at full stacks.
Incinerate doesn’t use mana and instead has its own resource, Fuel, which is accumulated as you spend mana on other skills. This nominally limits the time you can channel Incinerate for without interrupting your channel, losing stacks, and casting other spells. As a channeled spell, the player will incur an especially heavy movement speed penalty from using skills; problems for many builds, but Incindigon gets around both.
Indigon and Partial Mind Over Matter
More damage is just one part of solving damage. Every build needs to get sources of increased damage modifiers that collectively sum and multiply with more damage mods and others like crit etc. One of the highest sources of increased damage in the game is the Indigon unique helm; Indigon stacks increased spell damage based on mana spent in the last 4 seconds, but in return increases the mana cost of all skills dramatically, and disables all mana recovery other than regeneration.
These two downsides make spamming mana-costing skills prohibitive with Indigon, making it one of the least used items in the game at present. Many builds using it opt for an approach that uses weapon implicit spells that cost no mana, spamming those and dumping mana every 4s with a regular skill. However, Indigon fits perfectly with Incinerate’s fuel mechanics. Incinerate doesn’t cost mana, and its fuel cost does not scale with the ramping mana cost incurred by Indigon.
Incinerate’s damage is also dynamic with respect to increases and reductions to spell power, meaning you can use a meta skill to dump mana as you channel Incinerate and still benefit from the ramping Indigon damage. Fuel generation scaling with mana spend also means Indigon’s increased mana expenditures become a positive, letting us easily maintain fuel.
To really get the most out of Indigon, we take the Eldritch Battery Keystone to convert all Energy Shield to mana, and then wear pure Energy Shield armor pieces. This gives us a very high base mana regeneration which is enhanced further through heavy investment in % increased mana regeneration. This lets us drive up the recent mana spend and corresponding spell power increase to break 1000% increased damage from Indigon in a late endgame setup, and even hit 700% increased in the starter version.
On top of this, we stack damage taken from life before mana to allow us to defensively benefit from this huge mana pool. Because Cast on Elemental Ailment will frequently dump mana we also want investment in life to not be too squishy in situations where we’ve just spent a ton of mana, so hitting around 70% damage taken from mana before life is more than enough for the build’s defenses to function.
Cast on Elemental Ailment Arc
Incinerate is a great energy generator for Cast on Elemental Ailment, meaning we can slot something here to spend mana to dump fuel. Some Incinerate builds commonly slot curses here that don’t really serve a function other than being a good mana dump.
However, our Indigon-based increased damage scaling all spells means we can choose pretty much any spell here and have it remain effective. As such we choose Arc for its 50% more Shock Magnitude. This is a build that already stacks heavy Ailment Magnitude, which also scales the magnitude of Shocks we inflict. As such, we can break 70% magnitude Shocks, rivaling or even exceeding some Stormweaver double-shock setups!
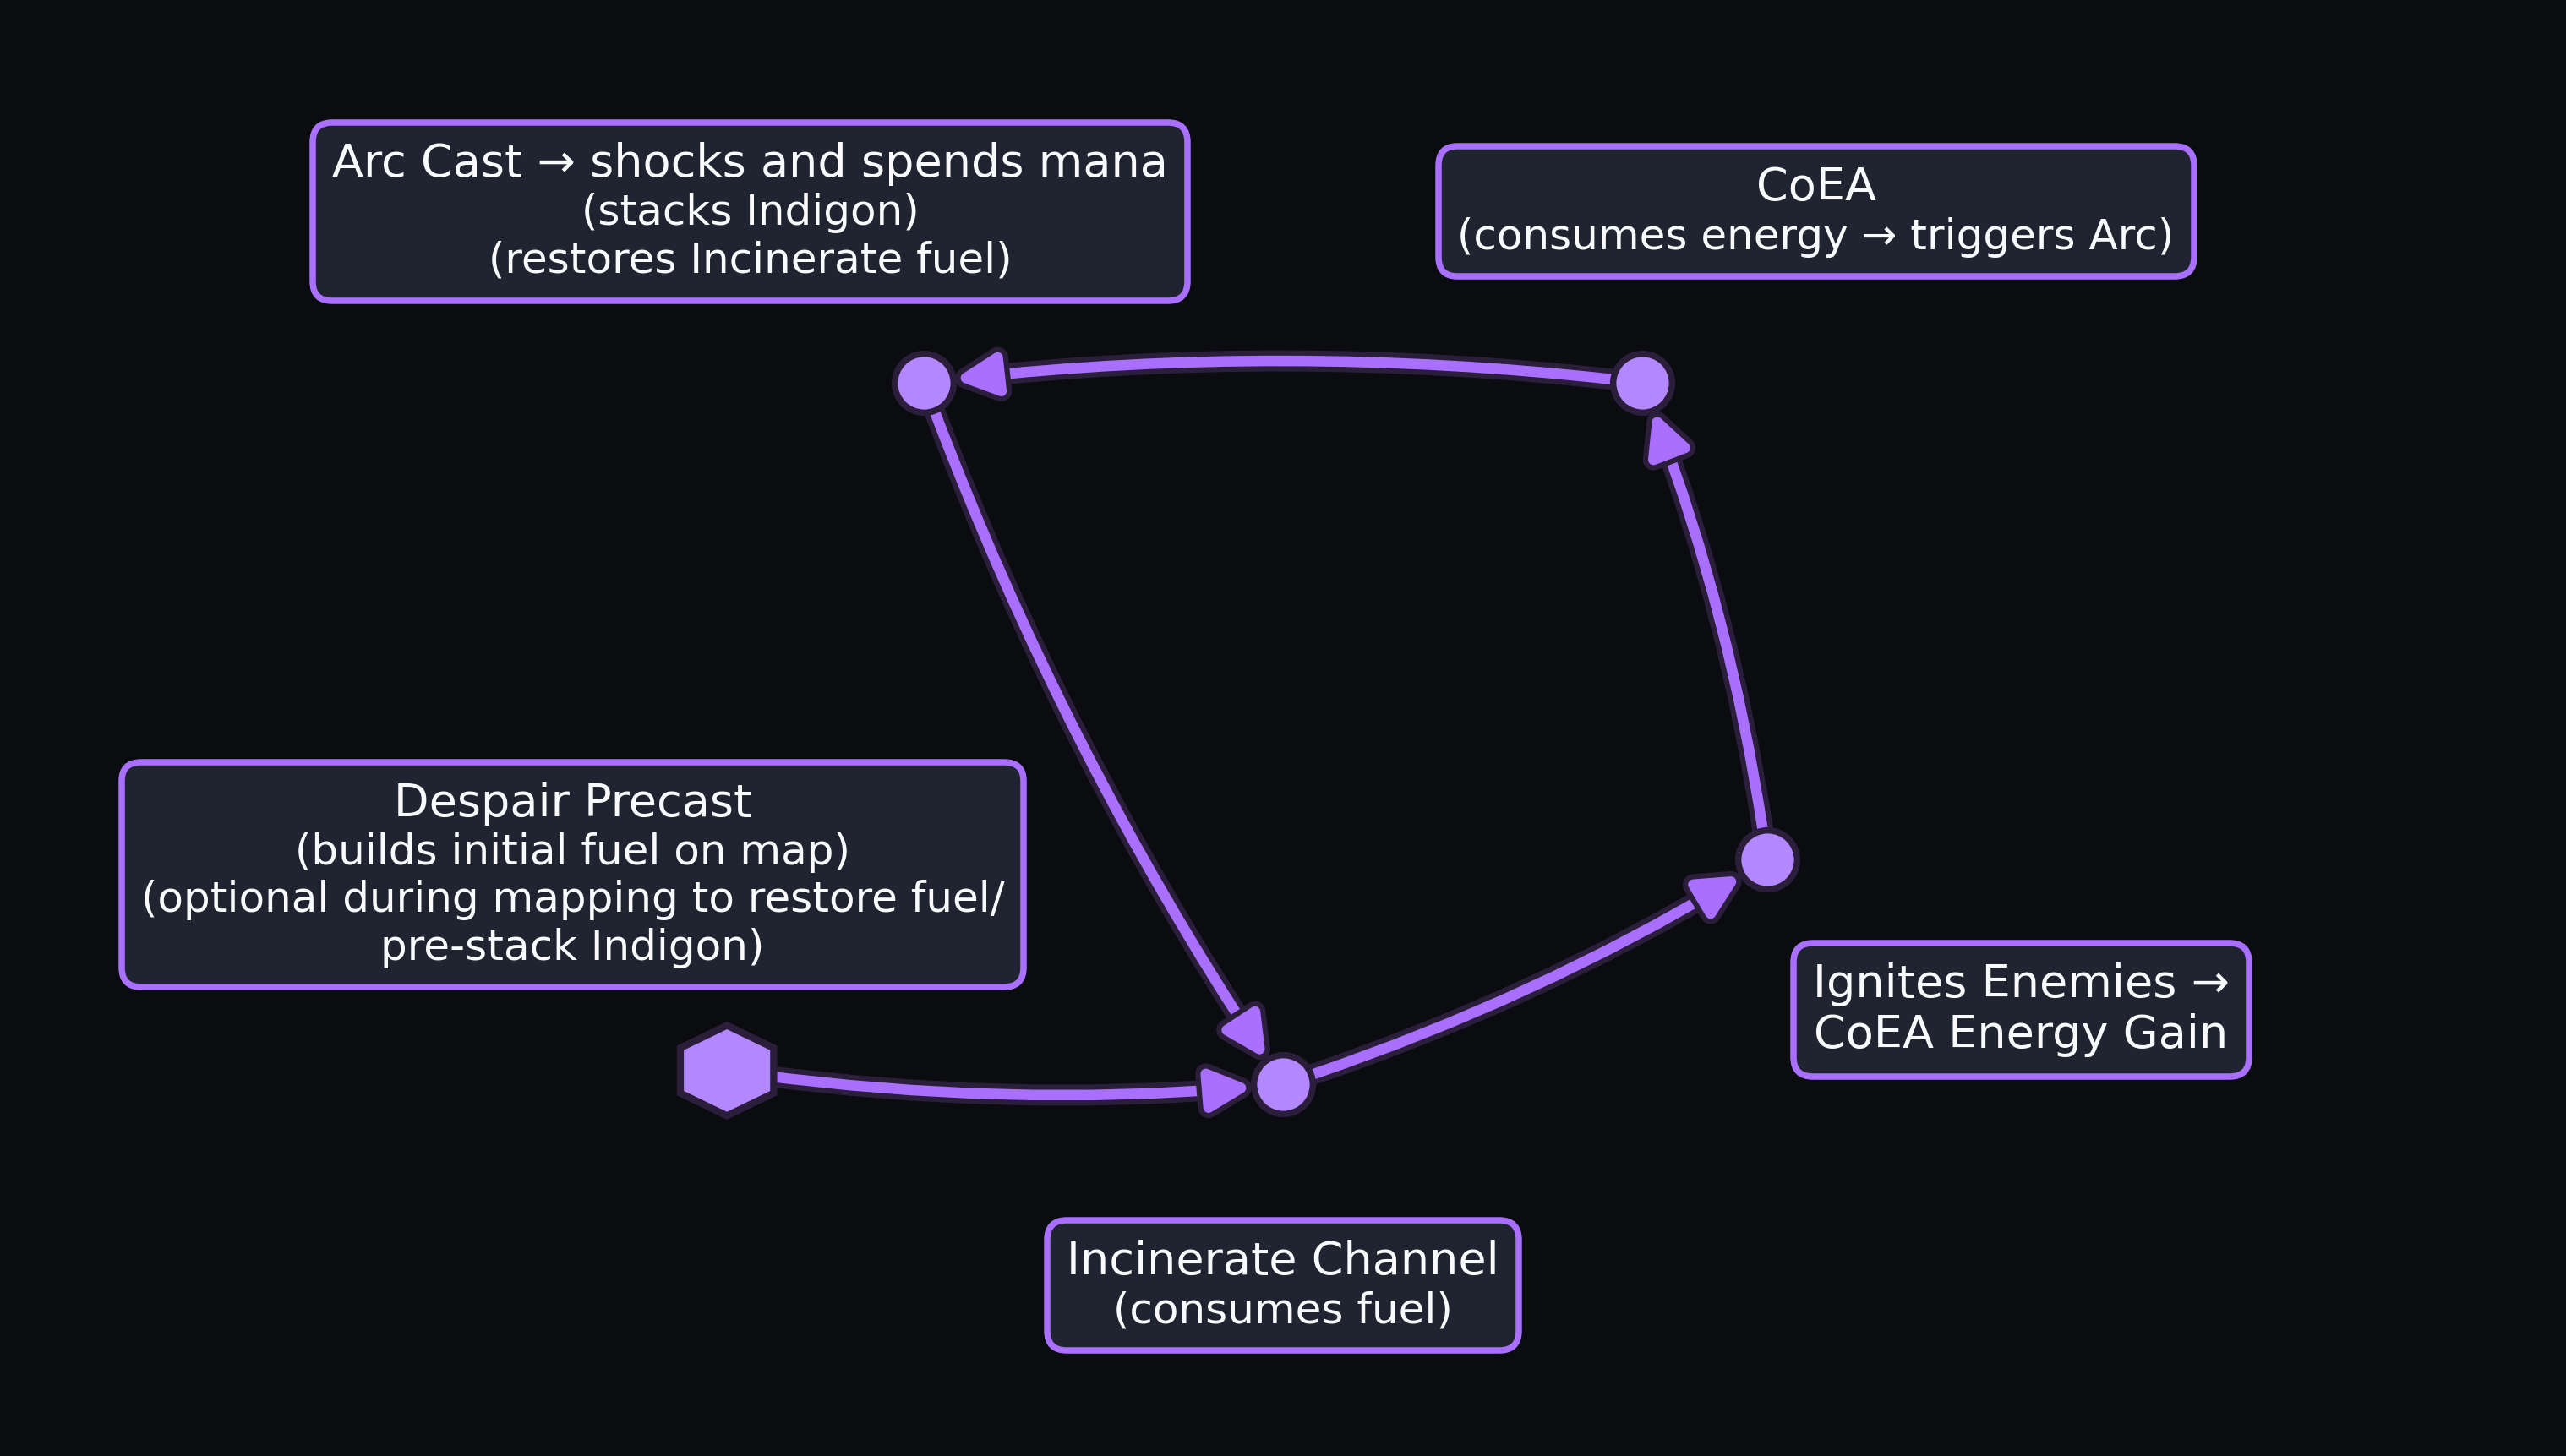
Incindigon Cycle
Once you have some initial fuel from a  Despair mana dump on entering a map, your fuel self-sustains. The cycle keeps enemies shocked, builds fuel for you, and ramps your Indigon damage and mana spend so once you’re powered up, staying that way is easy.
Blackflame Covenant
Even though we scale all spell schools indiscriminately, we eventually take Blackflame Covenant to convert our Fire Spells and Ignites into Chaos Damage. We do this because foes generally have lower Chaos Resistance than Fire Resistance, and while a map affix for increased enemy Elemental Resistance exists, no counterpart exists for Chaos Resistance.
As a bonus, we get to benefit from the Wither debuff via  Withering Presence, which boosts all Chaos Damage taken on the target. When fully stacked to 50%, this is additive with the 70% Shock effect to give us a total of 120% more damage dealt via target modifiers!
There is one item requirement for taking Blackflame, a copy of ![]() Rakiata’s Flow. This is because prior to going Blackflame you’ll run an
Rakiata’s Flow. This is because prior to going Blackflame you’ll run an  Elemental Weakness and Exposure setup so that both your Incinerate’s Fire Damage and Arc both penetrate the resistances of tough bosses. Once you get Blackflame, you swap to a Despair setup which leaves your Arc having to deal with boss elemental resistances. Rakiata’s fully negates any resistance-based defensive layering, turning a high lightning resistance into a weakness for enemies and ensuring that shock application is consistent.
Staying mobile while channeling
While we have the option to reduce the movement speed penalty with Farrul’s Rune of Grace, doing so means foregoing Farrul’s Rune of the Chase for more movement speed which is useful in all contexts, including when not channeling. Chase runes over Grace runes always result in a greater movement speed while channeling up to about 320% movement speed which isn’t at all currently attainable for any build in the game.
Instead, we rely on two main sources of less movement speed penalty from skills. The first is Gem Studded, which when configured properly gives 40% less movement penalty and also provides crit immunity for the build. Since we have so much damage in the build, we can run multiple support gems for Incinerate, even while bossing, and still melt any target in the game with ease. As such we run  Mobility for a further 25% less penalty. Together with the 10% reduced movement penalty that boots can roll as a desecration suffix, we can reduce the penalty to 40% of its regular value, or a global movement speed reduction of just over 20%.
In an optimised endgame setup this translates to having a regular movement speed of 195% assuming 30% increased movement speed boots, and 155% movement speed while channeling incinerate instead of the usual 97% we’d expect without any penalty reduction (the speed that other fast builds neglecting this stat will be forced down to while they’re spamming skills). As far as builds outside of  Rhoa Mount go, it doesn’t really get much faster than this!
To stop our channels ever being interrupted, we run the excellent mana-stacker ring  Dream Fragments that makes us entirely immune to Chill and Freeze. Then we take the Keystone Unwavering Stance to prevent us from ever being light stunned. While losing the ability to sprint hurts a little, the quality of life for never having your Incinerate interrupted is easily worth the trade-off.
Elemental Infusions
Both Incinerate and Arc have very powerful Elemental Infusions we want to support. Incinerate when Fire-Infused leaves Ignited Ground everywhere, helping to overcome Incinerate’s shorter ignite duration and making sure any pursuing foes are taken care of. Arc has a Lightning Infusion that triples its damage and makes it chain to five extra targets, letting it sometimes single-handedly clear out distant packs and making its Shock effect more consistent.
We use the persistent buff  Siphon Elements to generate infusions whenever we Ignite or Shock enemies. Our Incinerate produces a large number of Fire Infusions, too many for us to feasibly make use of, but we don’t get so many Lightning Infusions from Arc. To get around this we take the Elemental Equilibrium Keystone to make our Elemental Infusions be of a random type, ensuring a large fraction of our Arc casts are also infused.
Defenses
As a dual life and mana stacker that only has conditional mana, and also as a build that runs Eldritch Battery and cannot scale armour or evasion, we need an alternate way to make the build tanky against multi-hit scenarios while mapping and against big hits from rare and boss enemies. Crit immunity is a really great start here, lessening the requirements on our max hit stats.
A dual-curse setup with  Blasphemy is how we make this build extremely durable while mapping and bossing. Because we have all the damage we need, we’re free to take
  Temporal Chains and
  Enfeeble to scale our avoidance and mitigation respectively. Because the build paths near so many great aura magnitude and curse magnitude clusters, we can overcome the less curse magnitude effects of Blasphemy entirely.
My current setup runs a 51% enfeeble effect, which amounts to a 35% damage reduction effect for rare enemies and 25% damage reduction for bosses. My 109% Temporal Chains has double dipping rarity-based reductions, but still keeps normal and magic enemies pinned to the 75% slow cap, while rares and unique foes are slowed by 53% and 27% respectively. Combined with the Hinder effect from the Zone of Control cluster, this makes it very hard for foes to even hit us in the first place. We round out our curse scaling with AoE investment taking our Blasphemy radius to 8m, covering the entire screen at all times.
To smooth out incoming mapping damage, some more avoidance can be great to have in challenging content like high Delirium. Normally caster builds are fairly locked into running a focus in the offhand for +3 spell skills and increased damage modifiers to meet damage requirements, but our damage is so high we can drop a focus entirely and run a shield in our mapping setup and still break 1-million Ignite DPS, more than enough to quickly burn down any non-boss enemy.
We take three easily situated block clusters that also give life on hit to help sustain while mapping, giving us a total block chance of 52% in the final setup. This is more than enough avoidance when combined with Temporal Chains for the build to feel exceptionally tanky and smooth when mapping, even in situations where our mana is being rapidly spent and regenerated and we can only rely on our life pool for unconditional health.
Skill Rotation
Thankfully after all the build mechanics to explain, this section is far simpler!
Map Clearing
When you first enter a map, you’ll have no fuel. So cast a quick Despair or two which with your Indigon scaling and Eldritch Battery scaling will entirely fill your fuel. From that point you just hold down Incinerate whenever enemies are near. Despite your movement speed penalty reduction you’re still a good bit faster when not channeling, so only cast Incinerate when you’re burning down enemies; your ramp is fast enough and your damage generically high enough that you’ll still melt everything quickly!
Bossing
If the boss has a spawn animation, pre-cast your  Cursed Ground-supported Despair under the target, swap weapons to your high dps secondary set, and begin channeling Incinerate while they spawn. By the time the boss is active they’re cursed, taking a fully charged Incinerate, and your Cast on Elemental Ailment will rapidly Shock them with Arc, dumping mana and ramping Indigon. The result is a very fast boss kill before the target has a chance to react.
Gameplay Tips
- Keep an eye on your Fire Infusions; if you’re ever channeling an Incinerate cast that’s not fire infused, but you’ve since picked up a Fire Infusion, you should re-channel Incinerate to leave Ignited Ground that speeds up your clear.
- If you’re on the low-investment version of the build where you can’t have your defensive curses up during bossing, you can sit in your primary weapon set to slow the enemy with Temporal Chains and Enfeeble to wait for an opening. This is especially relevant against bosses that rush you immediately like Zekoa. On the high investment version of the build you maintain curses on your secondary set so he’ll never catch you, even as you channel Incinerate in his face!
- Note that the above only applies to one or two bosses in the game, most have a spawn-in animation that lets you do your brief setup in safety, killing the boss before they can reply.
- If you ever find yourself in a tricky spot, you can use your Cold-Infused
 Ice Nova as a pseudo-guard skill to push back and Chill or even Freeze surrounding foes.
Video Guide
Ascendancy
While Gemling Legionnaire is the second-least played ascendancy in the game, it brings some great things to the table. The core choices will always be:
- Gem Studded: Provides 40% less movement speed penalty from using skills, and crit immunity. Huge value even when we deliberately avoid benefiting from the 30% less cost of skills so our Indigon ramps more quickly.
- Crystalline Potential: 10% extra quality on all your skill gems is an incremental gain, but one across the board offensively and defensively. It also makes your spirit requirements a little lower by reducing the spirit cost of Blasphemy.
After this the choices are somewhat flexible. You can choose between:
- Neurological Implants provides a flat +2 skill levels to any skill gem that has an intelligence requirement. Every single skill we use has such a requirement making this node effectively +2 to the level of all skills. At any relevant point in the skill level curve this amounts to about 33% more base damage, a considerable boon. It also makes your defensive curses a little stronger.
- Adaptive Capability lets you satisfy the requirements of skill gems with your lowest stat. This matters particularly for support gems; Strength and Intelligence are great attributes for the build, but Dex is a totally dead stat. We also usually need to run about 10-15 Dexterity support gems for our Gem Studded/Gem Enthusiast requirements. While not substantial, this node effectively lets you neglect Dexterity entirely and stack up to another 150 life or mana. It’s also a great quality of life improvement for balancing support gems.
- Enhanced Effectiveness is an interesting choice for a variant of this build that focuses more on driving up our Strength and Intelligence to get a higher life and mana pool. This could be relevant at very high investment where damage has long since stopped being a concern, but having more EHP is desirable.
- Integrated Efficiency doesn’t have fantastic bonuses for red and green support gems, but the 20% increased Critical Hit Chance per Connected blue support gem could be very powerful in some Incinerate setups, letting us more easily scale critical strike damage.
I would recommend at present running:
- Gem Studded
- Adaptive Capability
- Crystalline Potential
- Neurological Implants
Gem Info
Below you will find a planner with the breakdown of gems you need that play an active roll in your setup. Here are some additional pointers.
 Considered Casting doesn’t impact the stage duration of Incinerate, so unlike previous leagues you can safely run this for an almost free 35% more damage.
 Eternal Flame II is great for Incinerate, helping make up for the 50% less Ignite Duration on the skill. A longer Ignite duration means that your high-rolls on base damage and your crit ticks burn longer, and works out to be about 15-20% more damage on average. The real power of this support, however, comes from its effect on Cast on Elemental Ailment‘s energy generation which is based on the total Ignite damage, not the Ignite dps; this support gem therefore doubles your energy generation while mapping.
- If you have the high investment version of the build that maintains Blasphemy on bosses, you’ll need
 Atziri’s Allure supporting your Despair and ideally some reduced effect of curses on you from the passive tree, especially if facing bosses that deal Chaos Damage. If you’re still running the
  Prism Guardian variant that ties your Spirit to your offhand and drops Blasphemy on your boss swap, slot Mobility here instead.
Dummy Supports for Gem Studded/Enthusiast
This isn’t the end of the story, however, as we need to fulfill the requirements for our configuration of Gem Studded and Gem Enthusiast. We require:
- 10 of each color support gem for our amulet-anointed Gem Enthusiast.
- An equal number of red and green gems, more numerous than blue gems for Gem Studded.
Because most of the good support gems for a caster setup are blue, this can mean needing 13-15 red/green support gems socketed in total. How you get this is up to you, and we can slot useful red/green gems like  Stoicism II or Mobility in our primary skills to help lessen the total number of blue gems we socket while keeping them above 10 total. You have several spare skill gem slots to socket dummy spells that can support arbitrary gem configurations to help you reach this target.
One finer point is that when you’re slotting dummy red/green supports in your weapon implicit skills, these only count towards your gem tally when the weapon set is active, so you can’t simply rely on the summary figures at the top of your gem panel! A good trick here is ensuring your wands have equal numbers of red/green support gems plugged into their respective implicit skills so no matter what weapon set you’re using, they contribute the same amount e.g. 2 red/2 green.
Weapon Swaps
Have all active skills (Incinerate/Despair/Ice Nova) linked to both weapon swaps. You want to manually swap weapon sets for bosses.
For auras, this changes a bit depending on where you are in the gearing curve.
- Cast on Elemental Ailment always remains active in both sets
- Siphon Elements is a mapping only aura
- Withering Presence is a bossing only aura unless you’re running a scepter offhand variant of the build and can fit this in while mapping.
- Blasphemy gets run in the lower investment variant of the build only while mapping, as you can’t support it when bossing without Prism Guardian equipped. In higher investment variants you can keep Blasphemy active in both weapon sets.
Skill Tree
The below skill planner shows a complete level 100 character with all skill points allocated.
The primary tree is to be used while mapping, and picks up block clusters for more avoidance along with extra aura magnitude. The secondary tree specialises in single-target dps for bossing and focuses on scaling crit and ailment magnitude.
We note that the missing points on the primary tree require the use of a From Nothing unique jewel letting you take unconnected passives near Vaal Pact. You’d take the movement speed penalty from armour negation, the hinder/maim immunity, and all movement speed nodes in the area.
Some pointers:
- Aura and Curse Magnitude are excellent defensive scaling vectors, improving your avoidance via Temporal Chains and your mitigation via Enfeeble. The cluster at Zone of Control is great for ensuring your auras cover the whole screen and is strongly recommended.
- You need very little increased damage on the tree as Indigon already provides so much, letting us invest in other scaling avenues. The exception to this is Arcane Intensity which provides over 100% increased spell damage for two points, a great deal.
- Increased Ailment Magnitude is incredible for damage scaling, double-dipping on Ignite dps and Shock strength.
- Balancing Strength and Intelligence investment on the tree helps give your life and mana pools an extra boost. The 8 and 25 Strength nodes at Beef can provide a welcome 66 life (105 with Enhanced Effectiveness) for just two points.
- While the endgame variant of the build that runs Atziri’s Allure Despair has to take the reduced effect of curses nodes, this is not a hard requirement before then. However, Temporal Chains and Elemental Weakness curses are particularly irritating map modifiers and picking up the two curse effect reduction clusters on the demo tree slashes the effects of these by 90%, more than enough to be able to ignore those map modifiers entirely.
Gearing
Low Investment
This build has a significant Spirit requirements that can be tough to meet. The entry level variant of this build uses two cheap uniques that get dropped at higher investment.
 Cloak of Defiance is a fantastic option for meeting nearly all the build’s Mind Over Matter requirements, providing 60% with a 3-socket version using Runes of Willpower, nearly all the 70% or so we require.
- Prism Guardian provides enough extra Spirit to run all our mapping auras, letting us use the dual-defensive curse Blasphemy setup as soon as we switch to this build.
The downside of both of these pieces is their relationship with Spirit. Cloak of Defiance obviously has none, forcing us to miss out on up to 61 Spirit available as a chest prefix. Prism Guardian of course supplies Spirit, but ties it to our offhand; when we swap to our bossing focus we can no longer support Blasphemy which can make us considerably more vulnerable.
Crafting a good rare chest and amulet that give high T1 Spirit rolls along with other affixes you need can be on the expensive side, costing 30-50 divines in Rise of the Abyssal depending on crafting material prices and luck. As such, early in progression we make do with these cheap uniques, both purchasable for 1 Divine with solid corruptions or extra sockets, and live with losing Blasphemy on bosses and being tied to Spirit Guardian.
High Investment
Once you’ve secured a good amulet and robe, possibly helped out with a Spirit helmet corruption on Indigon, you can pivot your gear to the high investment version. This frees your mapping offhand for two alternate options based on preference.
- If you enjoy the shield for mapping, take
 Chernobog’s Pillar for the excellent resistance spread (particularly the 29% chaos res) and the huge 52% damage as extra fire it will give you. This is about 35% more damage over using Prism Guardian.
 - If you are very wealthy and want to map considerably faster, you can run Palm of the Dreamer for the 27% damage as extra chaos and the Gloom Shrine effect you gain, leading to corpse explosions on every enemy you kill. Despite losing the shield, this can still end up feeling very safe because everything dies in maps as soon as it’s remotely on your screen via the corpse explosions proliferating through dense packs. Additionally, the persistent buffs granted by scepter implicit skills are able to slot buff support gems like
 Clarity II and
  Cannibalism II without incurring additional spirit costs.
In either case, you can maintain your Blasphemy defenses in both weapon sets with this Spirit configuration, letting you keep Temporal Chains and Enfeeble against bosses. The endgame configuration enjoys a 27% Temporal Chains slow, 7% Hinder effect, and 25% damage reduction against bosses. Combined with your natural crit immunity, you end up being very robust in bossing situations!
Gear Affixes
We present the Low Investment version below:
| Slot | Base | Prefix | Suffix |
|---|---|---|---|
| Main Hand (Mapping) | Wand | 1. Gain % of Damage as Extra Fire Damage 2. % Increased (Spell/Chaos) Damage 3. Mana | 1. Level of All Spell Skills 2. % increased Mana Regeneration Rate/Intelligence 3. % Increased Critical Spell Damage Bonus/% increased Critical Hit Chance for Spells |
| Main Hand Swap (Bossing) | Wand | 1. Gain % of Damage as Extra Fire Damage 2. Gain % of Damage as Extra Lightning/% Increased Spell Damage/Mana | 1. Level of All Spell Skills 2. % increased chance to Shock |
| Off Hand (Mapping) | Prism Guardian | ||
| Off Hand Swap (Bossing) | Focus | 1. % increased energy shield 2. +X to maximum Energy Shield 3. Mana/% increased Spell Damage | 1. Level of All Spell Skills 2. % Increased Critical Spell Damage Bonus/ Intelligence 3. Resistances |
| Helm | Indigon | 1. Low % increased cost of skills for each 200 total mana spent recently 2. High % increased Spell Damage for each 200 total mana you have spent recently | |
| Body | Cloak of Defiance | ||
| Gloves | Energy Shield | 1. % Increased Energy Shield 2.+X Energy Shield 3.+X Maximum Life | 1. Higher budget: % increased effect of socketed items 2. Resistances 3. % Increased Critical Damage Bonus 4. % Increased Rarity of Items Found |
| Boots | Energy Shield | 1. % Increased Energy Shield 2.+X Energy Shield 3.% Increased Movement Speed | 1. Higher budget: % increased effect of socketed items 2. % reduced Movement Speed Penalty from using Skills while moving 3. Resistances 4. % Increased Rarity of Items Found |
| Belt |  Darkness Enthroned Darkness Enthroned | 1. This item gains bonuses from Socketed Items as though it was Boots | 1. high % Increased effect of Socketed Items |
| Ring 1 | Resistance/Breach Ring | 1.+X to Maximum Life 2. % Increased Mana 3. +X to Maximum Mana | 1. Resistances 2. % Increased Rarity of Items Found |
| Ring 2 | Dream Fragments | ||
| Amulet | Life/ES Amulet INSTILL: Gem Enthusiast | 1. +X to Spirit 2.+X to Maximum Mana/% increased Maximum Mana 3.+X to Maximum Life/% increased Maximum Life | 1. Level of All Spell Skills 2. % of Damage is taken from Mana before Life 3. % Mana Regeneration Rate 4. % increased rarity of items found 5. % Increased Critical Damage Bonus/% increased Critical Hit Chance |
For Darkness Enthroned we slot Farrul’s Rune of the Chase for the extra movement speed, but can also slot Farrul’s Rune of Grace at lower investment. A  Headhunter can also be run here on a higher budget if you enjoy its playstyle.
Socketables
This table shows the best socketable items to place into each slot.
| Slot | Socketable |
|---|---|
| Main Hand | Assandra’s Rune of Wisdom (Expensive)/Fenumus’ Rune of Agony (Budget) |
| Off Hand (mapping) | Ox Talisman |
| Off Hand (bossing) | Resistance/ES Runes |
| Helm | Soul Core of Zalatl/Resistance |
| Body Armour | The Greatwolf’s Rune of Willpower/Resistance |
| Gloves | Courtesan Mannan’s Rune of Cruelty |
| Boots | Farrul’s Rune of the Chase (Expensive)/Farrul’s Rune of Grace (Budget) |
| Belt | Farrul’s Rune of the Chase (Expensive)/Farrul’s Rune of Grace (Budget) |
Corruptions
This table shows the best corruption and sanctification outcomes to aim for. Some of these are far more attainable than others!
| Slot | Corruption/Sanctification Effect |
|---|---|
| Main Hand | 1. +1 to Level of Spell Skills via sanctification 2. +1 Socket (for extra Rune of Wisdom) 3. +1 to Level of All Fire Spell Skills enchant |
| Off Hand | 1. +1 to Level of Spell Skills via sanctification 2. +1 socket 3. % Increased Energy Shield enchant 4. % Increased Spell Damage enchant |
| Helm | 1. +1 socket 2. +X Spirit (depends on spirit requirements) 3. better indigon spell dmg/mana cost rolls |
| Body Armour | 1. +1 socket 2. % additional Physical Damage Reduction 3. % to Chaos resistance |
| Gloves | 1. +1 socket |
| Boots | 1. +1 socket 2. % increased Movement Speed enchant |
| Belt | 1. Higher roll on % Increased Effect of Socketed Items 2. % to Elemental Resistance enchant |
| Rings | 1. % to Chaos Resistance enchant 2.% to all Elemental Resistances enchant 3. % Increased Damage enchant |
| Amulet | 1. +1 to Level of Spell Skills and other good rolls via sanctification 2. +1 to Level of all Skills 3. +1 to Level of all Fire Spell Skills 4. % to all Elemental Resistances enchant 5. % increased Rarity enchant |
Jewels
This build paths around the outside of the tree and therefore gets considerable access to jewel sockets. Thankfully, Sapphire jewels are extremely powerful for this build. The non-negotiable affixes are:
- % increased Ignite Magnitude
- % increased Ailment Magnitude
- % increased Mana Regeneration Rate
The last suffix is a flex point. You’ll want a single jewel with Gain 2% of Maximum Life on Kill to help your life sustain while mapping. Then Critical Hit Chance and Critical Damage Bonus are very strong to scale bossing damage in particular.
Increased Duration of Damaging Ailments on enemies can help with CoEA energy generation and quality-of-life. Increased chance to shock or inflict ailments is a solid fallback.
Flasks and Charms
Incindigon can drop a mana flask entirely because its natural mana regeneration is significantly higher than the effects of a mana flask, and no unique mana flask works well with the build.
A strong life flask will help bail you out of big hits or persistent DoTs that harry your life pool. An  Olroth’s Resolve can be great for giving an extra buffer against big hits and some more EHP.
For charms, this build really loves a  Rite of Passage of the Bear variety for the 20% increased max life and 20% damage reduction while mapping, both really scaling the tankiness of the build which can be otherwise tricky. Both of these effects have multiplicative efficacy with respect to your Enfeeble and Temporal Chains effects, making the charm particularly strong on this build. It’s very powerful, but correspondingly expensive, and should be one of the first things you farm for.
Other than this a The Fall of the Axe charm for a brief Onslaught effect when anything tries to slow you can be nice quality of life, and any generic shock/poison/bleed immunity charm is powerful here. Shock is probably the priority because your natural mana regeneration is so high that our Health resources are fairly well protected against DoT damage.
Changelog
- November 26th, 2025: Incindigon Guide created for Patch 0.3.1d
