 Druid
Druid Oracle
 Shaman
 Huntress
 Amazon
 Ritualist
 Spirit Walker
 Mercenary
 Gemling Legionnaire
 Tactician
 Witchhunter
 Monk
Monk Acolyte of Chayula
 Invoker
 Martial Artist
 Ranger
 Deadeye
 Pathfinder
 Sorceress
 Chronomancer
 Stormweaver
 Disciple of Varashta
 Warrior
 Smith of Kitava
 Titan
Titan Warbringer
 Witch
Witch Blood Mage
 Infernalist
 Lich
Lich Abyssal Lich
In Path of Exile 2, there is a greater focus on boss fights that feel engaging and difficult, even while playing through the acts. This guide will go over boss damage types, boss attacks, and how to deal with them in the Interlude campaign after Act 4.
When progressing through PoE2, certain attacks must be dodged, indicated by the boss flashing red and an accompanying sound cue. These attacks and abilities are highlighted in bold with the text (Requires Dodge) throughout this guide.
Isolde of the White Shroud and Heldra of the Black Pyre
Zone: Scorched Farmlands.
Damage Type: Physical, Cold, and Fire.
Isolde and Heldra are a mini version of Biera of the Rotten Pack and Ignagduk, the Bog Witch.
Throughout the entire fight, Isolde and Heldra will have a baseline for the attacks they use on the player. At specific health thresholds, they will begin using new attacks; however, the following will remain the same until she has been killed.
Isolde
- Attack with her sickle when in melee range.
- Fires five ice shards in a row; she tracks the player doing this attack.
- Fires ice shards in a 180-degree arc in front of her.
- Special Ability: Detonate Dead
- Isolde will detonate two wolf corpses, erupting ice spikes. Note: She will only use this ability if the player is within close proximity of a wolf corpse.
- Special Ability: Summon Wolves
- Isolde will unearth five wolves and resurrect them to fight for her.
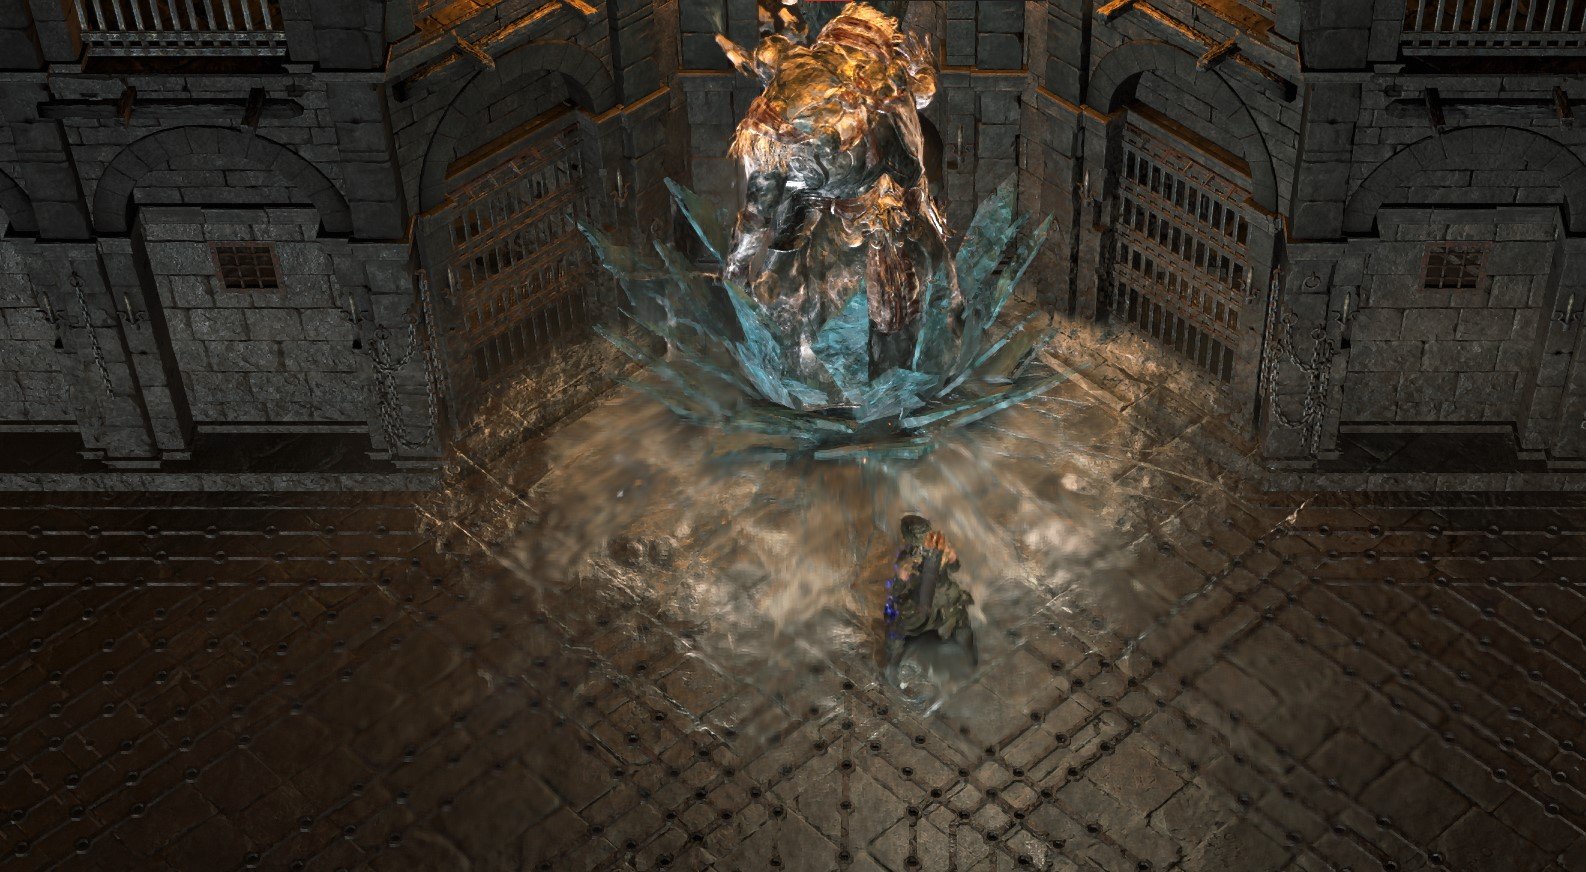
- Special Ability: Frost Sigils
- Isolde will cover the arena in small, circular cold area-of-effect telegraphs. After a short period of time, these will erupt into ice spikes, damaging the player if they’re hit. Note: These ice spikes have the ability to also damage her wolf summons, and can be used to the player’s advantage.
- Special Ability: Ice Nova
- Isolde summons small ice spikes around her after a few seconds. Upon casting Ice Nova, the ice spikes will travel in straight lines from the boss. Note: Look for gaps in the circle of spikes around Isolde; those areas mark the safe zone for the player once the spikes begin to shoot out.
Heldra
- Throws a fireball at the player.
- Special Ability: Infernal Corridor
- Heldra summons two walls beside the player before sending a wall of fire through the corridor that splits in a V-shaped pattern when it gets to Heldra.
- Special Ability: Firewalls
- Heldra Summons two firewalls that travel towards the player.
- Special Ability: Bone Eruption
- Heldra summons red sigils throughout the arena before erupting bone spikes.
- Special Ability: Fire Volley
- Heldra pulls fire from outside the arena to launch a volley of fireballs at the player.
- Special Ability: Flame Dash
- Heldra will dash around the arena.
- Special Ability: Flamethrower
- Heldra charges up and channels a beam of fire from her hands.
It is best to focus on killing one of them first instead of splitting your damage among them.
Siora, Blade of the Mist
Zone: Stones of Serie.
Damage types: Physical, Lightning, and Chaos.
There is a layer of darkness around the arena that deals damage over time if you step out into it. Monsters will circle in this darkness, shooting projectiles at the player throughout the fight as Siora’s health gets lower, and lightning also starts to strike down in the arena.
Throughout the entire fight, Siora will have a baseline for the attacks she uses on the player. At specific health thresholds, it will begin using new attacks; however, the following will remain the same until she has been killed.
- Sweeps with her sickles.
- Special Attack: Chaos Sunder (Requires Dodge)
- Siora sunders the earth, creating five lines in a 180-degree arc in front of her.
- Special Attack: Whirling Slashes
- Siora will do cartwheel spins with her sickles, moving towards the player’s location.
When Siora reaches 90% health, she gains the following ability:
- Special Ability: Hide in the storm
- Siora dashes out into the storm that surrounds the arena, creating darkness for the player. You need to run to the glowing monolith to light up the arena again.
When the Siora reaches 75% health, it gains the following ability:
- Special Attack: Chaos Cyclone
- Siora Cyclones towards the player’s location.
Godwin and Sigbert
Zone: Holten.
Damage Type: Physical, Cold, and Fire.
When you kill one of them, the other one will consume the other’s power, and after a short delay, be at full health again. If you die after killing one of them, that one stays dead even after respawning.
The best strategy is to get both of them low and kill one of them, then burst the other down while they are consuming the other’s power, thereby avoiding the empowered stage of the fight.
Throughout the entire fight, Godwin and Sigbert will have a baseline for the attacks they use on the player. At specific health thresholds, he will begin using new attacks; however, the following will remain the same until he has been killed.
Godwin
- A swipe attack with his left hand.
- Special Attack: Sundering Slam (Requires Dodge)
- Godwin slams the ground, creating a line of molten cracks towards the player.
- Special Attack: Fiery Stomp (Requires Dodge)
- Godwin stomps the ground, sending out three walls of fire that grow the further they get from Godwin. Note: There is a gap between the two outer walls and the middle one that gets bigger the further they travel from Godwin.
If you kill Sigbert first, Godwin gains the following ability:
- Special Ability: Supernova
- Godwin channels and creates a large circle around himself. After a short time, he explodes and deals damage in that large circle.
Sigbert
- Slams his hammer at the player
- Special Attack: Ice Crash (Requires Dodge)
- Sigbert holds his hammer in the air, freezing before slamming it down, releasing a burst of ice spikes in the area around the slam.
- Special Attack: Ice Spikes
- Sigbert taps his mace on the ground, creating minor sigils that erupt in spikes of ice when he slams the ground.
If you kill Godwin first, Sigbert gains the following ability:
- Special Attack: Slam Combo
- Sigbert will slam the ground three times first, alternating between in front of and behind him; each slam sends out a ring of ice shards.
Oswin, The Dread Warden
Zone: Wovlenhold.
Damage Type: Physical and Cold.
Throughout the entire fight, Oswin will have a baseline for the attacks they use on the player. At specific health thresholds, he will begin using new attacks; however, the following will remain the same until he has been killed.
- Heavy attacks with his axes.
- Special Attack: Ice Cyclone
- Oswin spins toward the player.
- Special Attack: Back Attack
- Oswin will stick his axe into the ground while turning around. Rips it out, throwing ice spikes that linger in the arena, and can only be destroyed by Oswin’s other attacks.
- Special Ability: Spike Traps (Requires Dodge)
- Oswin chooses a part of the arena where spikes will shoot up from the ground.
When Oswin reaches 90% health, she will gain the following ability:
- Special Ability: Bell Smash
- Oswin summons a bell in front of him, slams his axes into it, causing a frost explosion.
When Oswin reaches 75% health, she will gain the following ability:
- Special Ability: Ice Crash
- Oswin slams the ground, causing the ice to spike out in a growing circle around him.
Elswyth and Wulfric
Zone: Holten Estate.
Damage types: Physical, Chaos, and Fire.
Elswyth and Wulfric are a version similar to Draven and Asinia; killing either makes the other gain all of their empowered versions of their abilities
Throughout the entire fight, Elswyth and Wulfric will have a baseline for the attacks they use on the player. At specific health thresholds, they will begin using new attacks; however, the following will remain the same until he has been killed.
Elswyth
- Sweep at the player with her scythe in melee range.
- Unearths the ground, dealing damage in a cone if at range.
- Special Attack: Combo
- Elswyth does a combo of three attacks.
- Special Ability: Sigils
- Elswyth channels four circles (three small and a single, final big one) in succession that erupts after a short while.
- Special Ability: Teleport
- Elswyth gets enveloped in spirit energy and attempts to teleport behind the player. She does a small area of effect at the location she teleports to, which applies the Hindered debuff, slowing movement by 30% for 5 seconds, then proceeds to do two sweeping attacks with her sickle.
- Special Ability: Bone Cage
- Elswyth summons a bone cage around the player. After a few seconds, she rains down bone shards inside the cage. Destroy one of the walls of the cage to escape.
Wulfric
- Heavy slashes with his sword.
- Lunging slash if the player is at range.
- Special Attack: Combo
- Draven does a combo of three attacks with his sword. If empowered, he will do a fourth attack.
- Special Ability: Soul Slash
- Draven charges up and swings his sword, shooting out projectiles in a 180-degree arc in front of him. If empowered, he will do it twice instead, and there will be more projectiles.
- Special Attack: Sunder (Requires Dodge)
- Draven stomps the ground, creating two lines. After a few seconds, he slams his sword down, making the two lines expand outwards to each side.
This is the end of our Ogham Interlude boss guide. Check out our other related guides below.
