 Druid
Druid Huntress
 Mercenary
 Monk
Monk Ranger
 Sorceress
 Warrior
 Witch
Witch
Introduction
This guide has been fully updated for the Return of the Ancients league (Patch 0.5).
The Frostbolt Comet Blood Mage Witch utilizes an arsenal of Cold Spells to optimize gameplay for speed-farming maps and killing pinnacle bosses. To clear maps, ![]() Ice Nova freezes enemies to trigger a barrage of
Ice Nova freezes enemies to trigger a barrage of ![]() Frostbolt projectiles from
Frostbolt projectiles from ![]() Elemental Invocation. Against bosses,
Elemental Invocation. Against bosses, ![]() Frost Wall rapidly triggers
Frost Wall rapidly triggers ![]() Comet from
Comet from ![]() Cast on Critical to rain down for devastating damage.
Cast on Critical to rain down for devastating damage.
This build guide assumes you have reached endgame maps around Level 65. If you have not yet completed the campaign, follow the Ice Nova Snap Leveling Build Guide. For a starter version of this build that does not require  Snakepit, use the Ice Nova Comet Endgame Build Guide.
Strengths and Weaknesses
- Can start endgame maps with a low-budget
- Overlapping Frostbolt explosions shotgun enemies to hit multiple times for screen-wide clear
- Massive burst damage from Comets to instantly delete bosses
- High survivability with rapidly recovering Life
- Complex build mechanics
- Projectile speed of Frostbolt starts slow
- Needs enough Life and damage to sustain Life costs
Build Mechanics
Resource
Mana is a primary concern for the typical spellcaster. The Mana costs of Skills continue to grow as you increase skill gem levels, and most support gems multiply costs even further. To achieve enough Mana sustain for these high costs, a considerable investment must be made to gain Maximum Mana and Mana Regen using Skill Points and gear affixes.
The Blood Mage Ascendance node, Vitality Siphon, enables Spell damage to be leeched as Life. This enables the Blood Mage to utilize Blood Magic, removing mana entirely to only pay skill costs with Life.
Life is also recovered by ![]() Life Remnants, granted by Sanguimancy. These life globes spawn primarily from killing enemies and can overflow Maximum Life to 1.5 times the normal amount. Continue to absorb Life Remnants while clearing groups of enemies to become nearly invincible.
Life Remnants, granted by Sanguimancy. These life globes spawn primarily from killing enemies and can overflow Maximum Life to 1.5 times the normal amount. Continue to absorb Life Remnants while clearing groups of enemies to become nearly invincible.
Snakepit
The unique ring, Snakepit, is highly recommended as your first expensive purchase. Equip Snakepit in the left ring slot to remove the piercing effect from ![]() Frostbolt and cause the projectiles to fork. An additional 8 projectiles are fired around you when
Frostbolt and cause the projectiles to fork. An additional 8 projectiles are fired around you when ![]() Sione’s Temper procs for amazing screen-wide clearing. Each of the projectiles fired split into 2-3 projectiles after hitting the first enemy and then explode on the second enemy. Against groups of enemies, Frostbolt explosions can shotgun targets to hit them multiple times.
Sione’s Temper procs for amazing screen-wide clearing. Each of the projectiles fired split into 2-3 projectiles after hitting the first enemy and then explode on the second enemy. Against groups of enemies, Frostbolt explosions can shotgun targets to hit them multiple times.
Boss Fights
In boss fights, ![]() Comet is rapidly triggered from
Comet is rapidly triggered from ![]() Cast on Critical through multiple explosions from
Cast on Critical through multiple explosions from ![]() Frost Wall supported by
Frost Wall supported by ![]() Pinpoint Critical to reach 100% Critical Hit Chance.
Pinpoint Critical to reach 100% Critical Hit Chance.
Survivability
The Blood Mage ascendancy nodes, Grasping Wounds and Crimson Power, significantly boost survivability. Equip a Chest Armor with up to 1,200 Energy Shield to gain as much Maximum Life.
Once Rathpith Globe is obtained, the highly stacked Maximum Life also scales Critical Hit Chance and Spell Damage. Spells that reach 100% Critical Hit Chance are effective for instant leech when combined with Atziri’s Acuity.
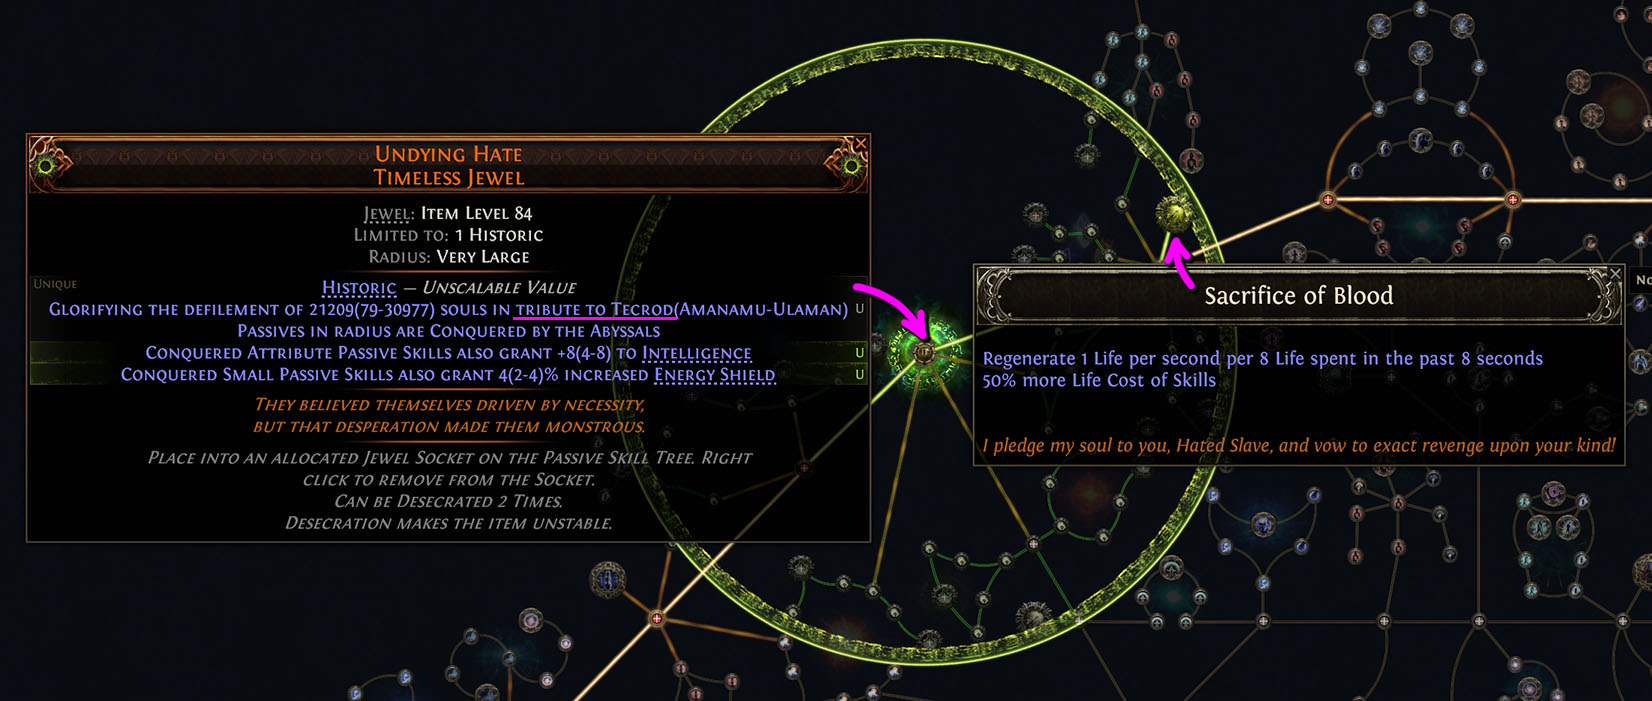
In addition to the instant Life Leech, Life Regeneration Rate is granted by Sacrifice of Blood, unlocked by an Undying Hate Timeless Jewel with Tribute to Tecrod. Sacrifice of Blood regens 25% of the life cost of skills over 4 seconds, and is further enhanced by other nodes in the passive tree, including Sanguimantic Rituals. Zealot’s Oath is allocated to apply the excess life recovery to Energy Shield, so Energy Shield Recharge effects are not necessary.
Life Cost Management
The default setup in this guide is designed to help players get started with the build without encountering resource issues. You need enough Maximum Life to rapidly cast skills, and damage needs to be high enough to leech the Life Costs back. Therefore, suggested supports don’t have big cost multipliers. Increased Cost Efficiency is an option if necessary.
Skill Rotation
Follow the basic skill rotation below to progress through the campaign and clear groups of enemies in maps:
- Cast
 Ice Nova to freeze enemies and build Energy for
  Elemental Invocation. Ideally, you want to deal enough damage to freeze enemies in one cast, as spamming Ice Nova can rapidly deplete your Life pool. Ice Nova needs to freeze enemies before Frostbolt to generate energy.
 - Cast Elemental Invocation to release
 Frostbolt. Aim in the direction you want the most Frostbolts to travel to.
  Sione’s Temper fires additional projectiles around you for efficient screen-wide coverage.
 - If additional damage is needed against tough elites, cast
 Frost Wall on top of them for additional explosions.
 - Cast
 Cold Snap to finish off any surviving enemies that are frozen.
Execute the steps below to optimize damage against bosses:
- Before starting a pinnacle boss fight, fully charge
 Spellslinger by spamming
  Orb of Storms. Allow Orb of Storms to expire to collect Lightning Infusions for Frost Wall.
 - Approach the boss to cast
 Sigil of Power from a Chiming Staff equipped in Weapon Set 2 to buff damage.
 - Switch back to Weapon Set 1 (can be set to automatically swap) before casting
 Elemental Weakness to reduce the Resistance of the boss. Elemental Weakness can be pre-cast before a boss spawns if supported by
  Cursed Ground.
 - Cast
 Frost Bomb to apply Elemental Exposure.
 - Cast Frost Wall on top of the boss.
- If you have charges for Elemental Invocation against map bosses, release all triggers of Frostbolt to hit Frost Wall for shotgun explosions.
- Cast Spellslinger to release multiple triggers of
 Comet.
 - Once Comet starts to land, repeat casts of Frost Wall to continue the chain reaction.
Video Guide
Skill Gems, Spirit Gems, and Support Gems
The Frostbolt Comet Blood Mage utilizes the following Skill Gems, Spirit Gems, and Support Gems. Gem Sockets are listed in order of priority.
The Spirit Gem setup requires 137 total Spirit to activate ![]() Cast on Critical and
Cast on Critical and ![]() Blink. Ensure you apply 20% quality to the Cast on Critical skill gem and allocate Efficient Inscriptions in the passive tree to reduce the Spirit reservation. Defeat The King in the Mists (Act 1), Ignagduk (Act 3), and Lythara (Interlude) to gain 100 base Spirit. Obtain the remaining 37 Spirit from your Amulet.
Blink. Ensure you apply 20% quality to the Cast on Critical skill gem and allocate Efficient Inscriptions in the passive tree to reduce the Spirit reservation. Defeat The King in the Mists (Act 1), Ignagduk (Act 3), and Lythara (Interlude) to gain 100 base Spirit. Obtain the remaining 37 Spirit from your Amulet.
While clearing maps, activate ![]() Elemental Invocation to trigger
Elemental Invocation to trigger ![]() Frostbolt. Craft a lower-level Elemental Invocation gem to reduce its Dexterity requirement (Level 13 recommended). All other Skill Gems can be leveled as high as possible.
Frostbolt. Craft a lower-level Elemental Invocation gem to reduce its Dexterity requirement (Level 13 recommended). All other Skill Gems can be leveled as high as possible.
Against bosses, deactivate ![]() Elemental Invocation to instead activate
Elemental Invocation to instead activate ![]() Cast on Critical to trigger
Cast on Critical to trigger ![]() Comet.
Comet.
Equip a Chiming Staff in Weapon Set 2 to unlock ![]() Sigil of Power, which provides a damage buff against bosses. Ensure you set all your other skills to only be used with Weapon Set 1, so you automatically swap back.
Sigil of Power, which provides a damage buff against bosses. Ensure you set all your other skills to only be used with Weapon Set 1, so you automatically swap back.
![]() Orb of Storms can be crafted at Level 3 to reduce its Life cost.
Orb of Storms can be crafted at Level 3 to reduce its Life cost.
![]() Rakiata’s Flow is the final upgrade and is not included in the Skill Gem setup below. After you obtain Rakiata’s Flow, replace the
Rakiata’s Flow is the final upgrade and is not included in the Skill Gem setup below. After you obtain Rakiata’s Flow, replace the  Deliberation supporting
  Frostbolt. Against bosses, Rakiata’s Flow can also be moved to replace the
  Energy Retention supporting
  Comet. Remove
  Elemental Weakness and
  Frost Bomb entirely, as they are no longer needed to lower enemy resistances.
Perfect Jeweller’s Orb priority on Skill Gems: Elemental Invocation > Ice Nova > Cast on Critical > Frost Wall > Snap > Frost Bomb.
Ascendancy
Blood Mage is the recommended Ascendancy for the Frostbolt Comet Witch. The chosen Ascendancy can be switched within the base class by repeating your highest trial completion.
Allocate the Ascendancy nodes for Blood Mage in the following order:
- Sanguimancy and Vitality Siphon — These nodes need to be allocated together to be able to sustain the Life costs of Skills with Spell Leech.
- Sunder the Flesh — Sets the base Critical Hit Chance of Spells to 15%.
- Grasping Wounds — The delayed damage taken drastically improves survivability against getting one-shot by allowing you time to recover Life.
- Crimson Power — Energy Shield granted by your Body Armor also provides Maximum Life, which can amount to 1000+. The Maximum Life also scales damage output when Rathpith Globe is equipped.
Passive Skill Tree
In the Passive Skill Tree, utilize attribute nodes to fulfill any Intelligence and Dexterity requirements, and then allocate the remaining points to Strength for Maximum Life. Follow along as you level by using the left and right arrows in the tool to track the allocation order.
Starter Passive Tree Setup
The following Passive Tree setup focuses on scaling damage and obtaining benefits for invocation/triggered skills. This setup is optimized with the assumption that you equip Rathpith Globe for a massive amount of Critical Hit Chance and Increased Spell Damage, which diminishes the value of nodes with those stats. Nodes enhancing Energy Shield recharge rate and start delay are necessary for survivability when spending Life to cast spells.
Final Passive Tree Setup
The Passive Tree below is the final setup after you obtain an Undying Hate Timeless Jewel with Tribute to Tecrod (souls number value does not matter). Insert the jewel into the socket next to Elemental Equilibrium to convert the keystone to Sacrifice of Blood. A portion of Life spent is regenerated, and Zealot’s Oath allows the life regeneration to recover Energy Shield. This setup offers the most survivability without requiring any Energy Shield Recharge nodes.
Gear
The preferred gear for the Frostbolt Comet Blood Mage is listed below with affixes ranked in order of importance. Prioritize Rare Items with the correct base stats and beneficial explicit affixes. Recommended Unique Items are listed below the Rare Item table.
Rare Items
| Equipment Slot and Base Stats | Affix Priority | Notes |
|---|---|---|
| Wand — Dueling | 1. Level of all Cold Spell Skills 2. Spell Damage with Spells that cost Life or Spell Damage 2. All Extra Damage types with a priority on Lightning and Cold 2. Cast Speed 2. Critical Spell Damage Bonus 3. Critical Hit Chance for Spells | Sockets: 1. (Expensive) Hedgewitch Assandra’s Rune of Wisdom for +1 to Level of all Spell Skills 2. (Cheap) Greater Glacial Rune for 10% Extra Cold Damage |
Focus (replaced by  Rathpith Globe) Rathpith Globe) | 1. Level of all Spell Skills 2. Critical Spell Damage Bonus and Critical Hit Chance for Spells 3. Spell Damage 4. Cold Damage 5. Maximum or Increased Energy Shield | Sockets: 1. Any Rune that grants Resistance if not yet capped. 2. Owl Idol for 10% Increased Cooldown Recovery Rate |
| Helmet — Energy Shield | 1. Resistances 1. Maximum Life 2. Maximum or Increased Energy Shield 3. Critical Hit Chance | Sockets: 1. Any Rune that grants Resistance if not yet capped. 2. Idol of Eeshta for 10% Increased Cost Efficiency |
| Body Armor — Energy Shield | 1. Maximum and Increased Energy Shield (prioritize the highest total Energy Shield) 2. Resistances 2. Maximum Life | Sockets: Greater Iron Rune |
| Gloves — Energy Shield | 1. Resistances 1. Maximum Life 2. Critical Damage Bonus 2. Maximum or Increased Energy Shield | Sockets: 1. Any Rune that grants Resistance if not yet capped. 2. Kurgal’s Gaze (limit 1) for 40% increased effect of Arcane Surge 3. Fenumus’ Rune of Spinning for 8% Increased Cast Speed |
| Boots — Energy Shield | 1. Movement Speed 1. Resistances 1. Maximum Life 2. Maximum or Increased Energy Shield | Sockets: 1. Any Rune that grants Resistance if not yet capped. 2. (Expensive) Farrul’s Rune of the Chase for 5% Increased Movement Speed 3. (Cheap) Farrul’s Rune of Grace for 6% Reduced Movement Speed Penalty from using Skills |
| Amulet | 1. Spirit (37) 2. Level of all Spell Skills 3. Maximum or Percent Increased Life 4. Maximum Energy Shield 4. Resistances | Anointment: Split Shot Quality: Flesh Catalyst |
| Left Ring Slot — Snakepit | 1. Cast Speed 2. Spell Damage | Quality: Sibilant Catalyst |
| Right Ring Slot | 1. Resistances 1. Maximum Life 2. Cold Damage 3. Rarity of Items Found | Quality: Flesh Catalyst |
| Belt — Heavy | 1. Maximum Life 2. Resistances 3. Flask Life Recovery Rate 4. Charm Effect Duration 4. Stun Threshold | – |
Unique Items
The following required and recommended Unique Items for the Frostbolt Comet Blood Mage are listed below:
- Snakepit (required) enables Frostbolt to fork and then explode when equipped in the left ring slot.
- Rathpith Globe (recommended) provides a massive damage boost that scales by stacking Maximum Life.
Jewels
The beneficial affixes for Jewels are listed below, ranked in order of importance. Prioritize Rare Jewels with two prefixes and two suffixes.
- Prefixes
- Increased Energy Shield
- Energy Shield Recharge Rate or Faster Start (if not yet using Zealot’s Oath)
- Area of Effect
- Cold Penetration
- Triggered Spell Damage, Spell Damage, Elemental Damage, or Cold Damage
- Suffixes
- Critical Damage Bonus or Critical Spell Damage Bonus
- Critical Strike Chance or Critical Strike Chance for Spells
- Cast Speed
In addition to the Rare Jewels, a Prism of Belief Unique Diamond with 1-3 Levels of Frostbolt (for clearing maps) or Comet (for killing bosses) is a priority to increase damage output.
Campaign Buffs
Quest rewards during the campaign offer a selection of buffs to your character. Choose the following buffs for the build:
- Valley of the Titans Altar: 30% increased Charm Charges gained
- Venom Draught: 30% increased Elemental Ailment Threshold
- Trial of Ngkanu: Resistances
- Goddess of Justice: 20% increased Life Recovery from Flasks
- Seven Pillars: 12% increased Cooldown Recovery Rate
For more details, check the guide on Campaign Difficulties and Permanent Stat Bonuses.
Flasks and Charms
Prioritize the following Flasks and Charms:
- Health Flask
- Prefix: Increased Life Recovered, Remove Life Recovered from Mana when used
- Suffix: Increased Charges
- Mana Flask
- Prefix: Any
- Suffix: Increased Charges
- Charms
- Thawing Charm: Increased Duration
- Stone Charm: Increased Duration
- Silver Charm: Increased Duration (The Fall of the Axe Unique Silver Charm preferred)
Changelog
- June 4th, 2026: Skill Tree updated for Patch 0.5.1.
- May 27th, 2026: Guide updated for the Return of the Ancients league (Patch 0.5).
- December 10th, 2025: Guide updated for the Last of the Druids league (Patch 0.4).
- August 27th, 2025: Guide updated for the Third Edict league (Patch 0.3).
- May 24th, 2025: Guide created for Path of Exile II, Early Access.
