POEGuy's Self-Ignite Fulcrum Chieftain Gear & flasks (Poe Secrets of the Atlas)
Summary – TL;DR
This build is very easy to set up because it uses many unique items. Relying on uniques allows you to put the build together faster and saves you a lot of hassle when it comes to character optimization.
Since this is an endgame build designed for difficult content, you should have around 60 Divine Orbs and a character around level 94 before starting this setup. I’m mentioning these two requirements to help players transition smoothly into the build without any issues.
If you need an in-depth explanation of the gear, click HERE.
The setup should look something like this:
| Item Slot | Item Name | Rarity | Notes |
| Head | Rare Helmet (Fractured Chaos Resistance, Armour Base) | Rare | Check the Crafting Guide to learn how to make and avoid overpaying! |
| Amulet |  Defiance of Destiny Defiance of Destiny |
Unique | A very powerful defensive layer; aim for one with a 24% roll on the last line! |
| Chest |  Cloak of Flame Cloak of Flame |
Unique | |
| Gloves |  Breathstealer Breathstealer |
Unique | These gloves can be anointed. Anoint “Circle Of Life” |
| Boots |  Windscream Windscream |
Unique | |
| Belt |  Kaom's Binding Kaom's Binding |
Unique | |
| Ring#1 |  Valyrium Valyrium |
Unique | |
| Ring#2 |  Ventor's Gamble Ventor's Gamble |
Unique | Needs to have 15% Increased mana reservation efficiency of skills! Apply 20x  Fertile Catalyst to bump it up to 18% Fertile Catalyst to bump it up to 18% |
| Weapon |  The Fulcrum The Fulcrum |
Unique |
Armour Pieces
Helmet
We’ll craft our helmet to avoid overpaying, and the craft is very easy!
Buy an armour-based helmet with a fractured Chaos Resistance modifier, then spam  Deafening Essence of Loathing on it until you also hit a good Life roll. After that, use your Crafting Bench to add a “10% increased Area of Effect.”
Finally, apply  Greater Eldritch Ichor to roll for the physical-to-elemental conversion modifier (Fire, Cold, or Lightning – all are great choices since we have 90% to all maximum resistances).
Here is an example:
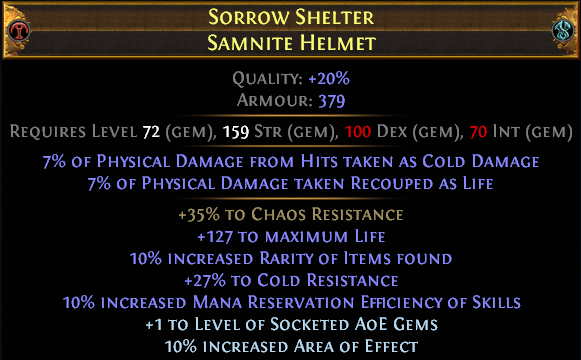
You also have a step-by-step video guide on how to craft your helmet here.
Body Armour
For the body armour, we use  Cloak of Flame. This greatly helps with physical damage mitigation and also provides a significant amount of Fire Resistance, which synergizes well with our Tasalio, Cleansing Water ascendancy node.
You also have a step-by-step video guide on how to color your body armor here.
Gloves
For the gloves, we use  Breathstealer. These special gloves can be anointed, and we’ll use the Circle of Life anoint on them. Additionally, they trigger Blighted Spores when killing rare monsters, which grant us several mini auras. Since this build farms monster-packed maps, we’ll get a lot of value from that effect. On top of everything, they also provide decent elemental resistances.
Boots
For the boots, we use  Windscream. They provide an additional curse and increase the area of effect for Hex skills. If possible, try to get a pair with the +1 to maximum Endurance Charges corruption, as this will make us even tankier.
Weapon
For the weapon, we use  The Fulcrum. This is a vital piece of the build, mainly because of this line: Elemental Ailments you inflict are reflected to you. This allows us to self-ignite, effectively turning us into a living bomb.
Jewellery
Amulet
For the amulet, we use  Defiance of Destiny. We use it for the last line: Gain #% of MIssing Unreserved Life before being hit by an enemy. This modifier instantly recovers a percentage of missing life immediately after the wearer fails to evade or dodge a hit, before that hit deals damage. Make sure to buy one with good rolls on the last modifier (ideally you want 24%), use a
  Blessed Orb on the implicit, apply 20x
  Fertile Catalyst, and anoint it with Vampirism (Amber, Teal, Violet)
Ring#1
For the first ring, we use  Valyrium, specifically for this line: Stun Threshold is based on Energy Shield instead of Life. This ring makes it easier for us to get stunned – which is exactly what we want. It synergizes well with the
  Bloodnotch and
  Immutable Force jewels.
The ideal corruption for this ring would be Cannot be Poisoned .
Ring#2
For the second ring, we use  Ventor's Gamble, specifically for this line: #% Increased Mana Reservation Efficiency of Skills. Buy one with a 15% roll on this modifier! You will apply 20x
  Fertile Catalyst to further increase it to 18%. In addition to this special mod, look for good resistances – especially Fire Resistance.
Belt
For the belt, we use  Kaom's Binding. It’s a cheap and effective item that will further help with physical damage mitigation.
Jewels
To avoid mistakes, try to place the jewels exactly where the Skill Tree in Path of Building (PoB) indicates.
The build uses the following Jewels: Immutable Force (this needs to be at least 960% as this makes us recover instantly from being stunned, effectively being stun immune, but still able to be stunned to activate the recovery from
  Bloodnotch and proc
  Cast when Stunned Support)
 Bloodnotch (We recover life from stunning hits, a higher roll is better)
 The Light of Meaning with 4% Chaos Resistance (Helps us cap our Chaos Resistance easily)
 Watcher's Eye (Buy one with useful
  Vitality modifiers.
  Vitality must stay at level 1)
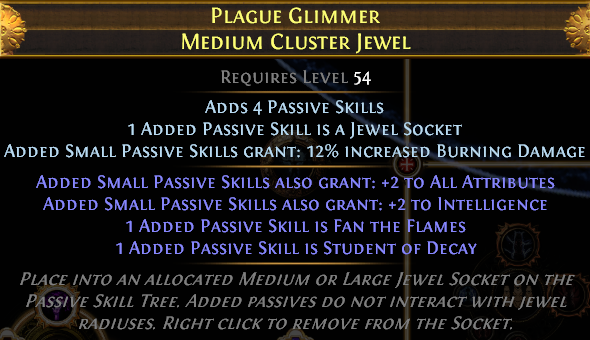
 Medium Cluster Jewel with the notable “Fan The Flames” (Spreads our Ignites! Very Important for our build) / Ideal jewel would have for the second passive: “Student of Decay” (extra Chaos Resistance and Damage Over Time bonus) and be 4 passives
 Medium Cluster Jewel with the notable “Heraldry” (Gives us Fire Exposure!) / Try to look for one with 4 passives
- 2x random rare jewels with +2% Maximum Fire Reistance and some % Increased Maximum Life.
 Elegant Hubris commemorated in the name of CASPIRO (This will give us the SUPREME OSTENTATION Keystone that will allow us to ignore attribute requirements on our items!). In addition to being commemorated in Caspiro’s name, you need one that also grants Endurance Charge generation. If you don’t know how to search for one, I have made a step-by-step video guide here.
Flasks
| Slot | Flask | Notes |
| 1 |  Divine Life Flask Divine Life Flask |
*You need to get one with the “Recover an Additional #% of Flasks Life Recovery Amount..” |
| 3 |  Quartz Flask Quartz Flask |
Grants us Phasing |
| 2 |  Granite Flask Granite Flask |
Helps with Defenses |
| 4 |  Quicksilver Flask Quicksilver Flask |
Helps with Movement Speed |
| 5 |  Silver Flask Silver Flask |
Gives us Onslaught |
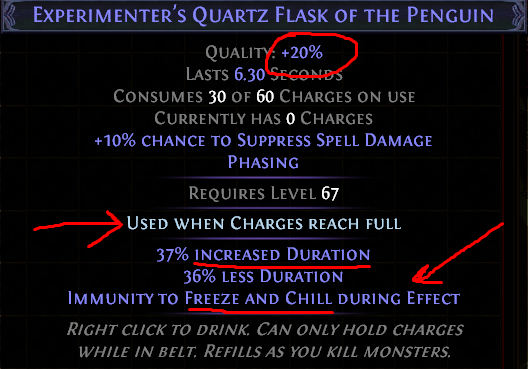
For the Prefixes, you need to have the Increased Duration modifier on all 4 of your utility flasks!
For the Suffixes, you need to have the following four modifiers. You can obtain them on any of the flasks – ensure you have all of them.
Immunity to Freeze and Chill during effect
Immunity to Shock during effect
Immunity to Poison during effect
15% of Damage Taken from Hits is Leeched as Life during effect
All your flasks need to be automated! They should have the Enchant: “Used When Charges Reach Full”
You can get this enchant either by applying  Instilling Orb or by using your Crafting Bench.
[REMINDER] Apply quality to your flasks! All flasks should have 20% quality. You apply quality using  Glassblower's Bauble
Here is a random flask example. I highlighted what’s important in red.
Mercenary Setup
Patch 3.26 introduced the “Mercenaries of Trarthus” league, which allows us to have our own personal bodyguard. You can equip the mercenary with various items, and here’s what I highly recommend using for this build:
Strength-Based Mercenary with Determination aura and a Two-Handed Weapon.
Helmet: A random armour-based rare helmet with the following Warlord modifier: “Nearby enemies have -9% to Fire Resistance.”
[TIP] If it’s expensive, you can force this modifier using the Horticrafting Station’s “ Reforge a Rare item, with Fire modifiers” crafting option.
Amulet:  Xoph's Heart
Boots:  Legacy of Fury
Belt:  Kaom's Binding
Ring#1:  Anathema
Ring#2: A random rare ring with resistances and life.
Gloves: Random armour-based gloves with the following corruption: “Curse enemies with Elemental Weakness on hit”.
Weapon:  Kingmaker
Body Armour: A lot of flexibility for this slot! I personally used 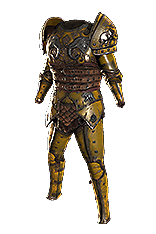 Blunderbore


