GhazzyTV's Necromancer leveling Guide (PoE Mirage 3.28)
Introduction
Hey Exiles, welcome to my Necromancer leveling walkthrough.
The objective of this guide is to help new players, or players who are not familiar with minions, succeed with the Campaign. This guide is a work in progress and will be updated over time. If you have any questions about the content, please don’t hesitate to contact me.
In the first acts of the Campaign, we will go into more detail, while in the later acts, you most likely fly through them as zones are mostly linear.
The first thing to understand is that minions are doing all the real work. Our job is to not stand in the fire, drink potions, and summon them. This is not an extremely active playstyle, but it does require a few button presses. It is also essential to understand that we need to go through a few levels before we can genuinely be a minion player.
The second thing to understand is that minion builds need very few stats in the campaign. We only care about Life, Resistance and some attributes on our gear. Should we find some items with minion modifiers, they are welcome, but by no means required.
+1 level to minion modifier on Wands, Shields or Helmets is fantastic. These are not required, but will make your run feel much, much better if you come across them.
Let’s get started!
This guide will assume that you have PoB installed to follow the skill tree. If you do not, you can find a guide on how it works here
The PoB for this build can be found here: https://pobb.in/8-9u-rZYxc0a
Act 1
We will start our journey on the beach with a  Fireball gem. Proceed along the beach and don’t fight anything. Open the chest, grab the support gem, and slot the support gem on the same link as your
  Fireball. Follow the beach until you find Hillock. Kill Hillock and move into the town.
Upon entering the town, you talk to Nessa’s and take  Rolling Magma as your quest reward and replace
  Fireball. Speak to all the NPCs and enter the next zone. Avoid the unique monster that does a rain of Fireballs. Be sure to grab the waypoint before entering the next zone, called Mudflats.
Please don’t stand still and tank the Rhoas, move as they charge, and then kill them. This is by many veterans considered the hardest zone in the entire game, so don’t feel bad if the Rhoas kill you. Collect the three quest items and finish this zone, then enter the caverns, which are the next zone. Before we proceed, please take the waypoint here and return to the waypoint before entering Mudflats. From this waypoint, take the path down and enter the Tidal Island. After finishing the quest to kill the unique monster make sure you loot him. To skip walking back to town, we log out to the character screen and log back in to spawn in town.
Take  Summon Raging Spirit as your quest reward, and go to Nessa to purchase
  Holy Flame Totem. For your other quest reward, you take
  Summon Phantasm Support. You should have some items now that have two sockets linked. Place the
  Holy Flame Totem and
  Summon Phantasm Support together on a linked socket. We also need to place
  Summon Raging Spirit in a socket so the gem can level; it’s not effective yet, so we won’t be using this skill for now.
If you have the currency, you also pick up  Shield Charge,
  Frostblink and
  Raise Zombie. If not, you can return later and buy them. Make sure to keep
  Frostblink at a low level (you can right-click the gem when it appears to dismiss the popup).
As we progress through the game from here, be on the lookout for an item with BBR links. Helmet/wand/shield/boots/gloves. We need these socket colours for later, so be on the lookout for that.
Continue until you enter the Prison and take the waypoint back to town. Speak to Nessa and take  Minion Damage Support and purchase a
  Melee Splash Support. This is where the BBR socket link from earlier comes in: link
  Summon Raging Spirit –
  Minion Damage Support –
  Melee Splash Support.
At this point, we stop using  Rolling Magma and use our minions.
After you kill Brutus, go back to town. Take  Vitality as your quest reward and purchase
  Clarity from Nessa. Try not to level Clarity too high, Vitality won’t be a problem as we discard it early in the next act.
Take the waypoint back to The Submerged Passage, locate the exit to The Flooded Depths, find and kill The Dweller of the Deep, log out to the character screen, log back in to spawn in town, and turn in the quest.
Proceed through the Prison and ensure you complete the trial located in the Prison on the first level. Please do not leave this zone until you have finished it. Continue to the second level and look out for a boss called Brutus. Kill Brutus to proceed.
Find your way through the next zone and get to the Ship Graveyard. In the Ship Graveyard, look for a Ship that has a cave entrance (The Ship Graveyard Cave), but do not enter. Use a portal scroll here to create a portal. Continue through the Ship Graveyard to find the next zone, Merveil’s Caverns, enter, and take the waypoint back to Town. Speak to Nissa. Take  Flesh Offering as your reward. Purchase
  Absolution and
  Added Lightning Damage Support from Nessa. Replace the gems in your BBR item with
  Absolution –
  Minion Damage Support –
  Added Lightning Damage Support.
If you don’t have a cold resistance ring yet, check with Nessa to see if she’ll sell you one. If you have a spare blue gem, you can always purchase an  Iron Ring and sell this spare blue gem with the iron ring for a cold resistance ring.
Take the portal back that we placed earlier at The Ship Graveyard Cave, and then enter the cave. Continue through the cave, pick up the quest item, and leave the cave to go back to the Ship Graveyard, and you spawn at an NPC called Fairgraves, kill him, and take the waypoint back to Merveil’s Cavern that we picked up earlier. Continue through the zone until you encounter the boss, Merveil. Use your Flesh offering to boost the Absolution minions’ cast speed and kill Merveil.
Before you leave Act 1, buy a  Bone Offering and socket it in your second weapon set. If you’re new to ARPGs, you have two weapon sets. The “main set” that we actually use, and the “secondary set” that we only use to level gems. Grab any item with a blue socket, press X, insert the item, add
  Bone Offering, and press X again. Now it’ll level without wasting your sockets. You can repeat this with other gems later if you get socket issues, so the gem doesn’t fall behind. You can, and most players do, skip this and come back for these gems before they hit level 44. However, as PoE is overwhelming and you might forget, I suggest you grab it now.
Gems in Act 1.
 Fireball
 Rolling Magma
 Summon Raging Spirit
 Holy Flame Totem
 Summon Phantasm Support
 Shield Charge
 Frostblink
 Raise Zombie
 Minion Damage Support
 Melee Splash Support
 Vitality
 Clarity
 Absolution
 Flesh Offering
 Added Lightning Damage Support
 Bone Offering
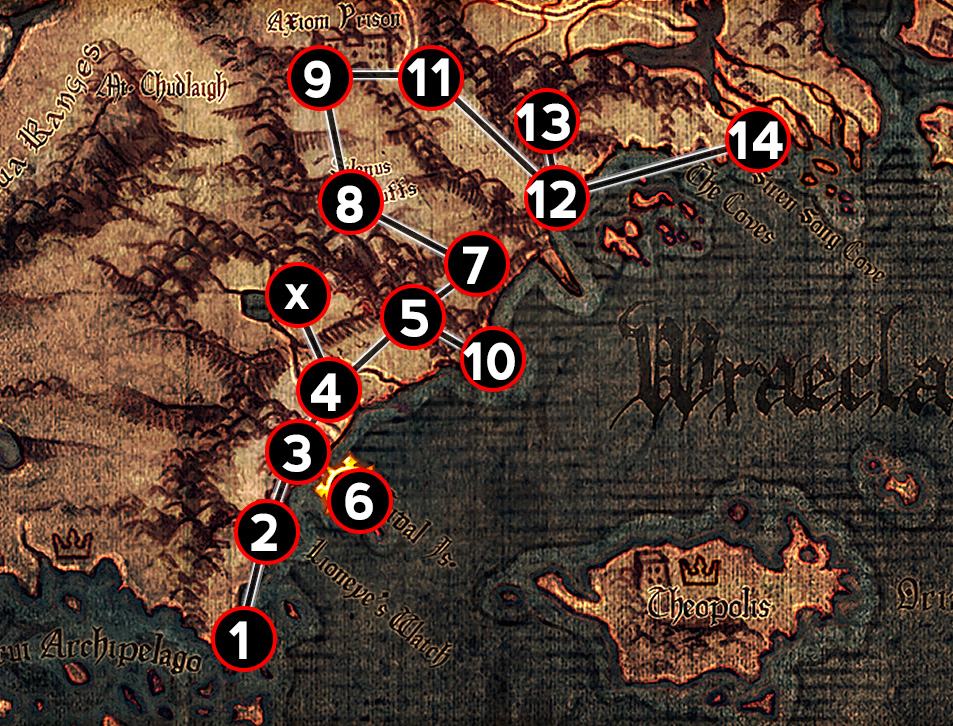
This concludes Act 1.
Act 2.
As you enter the Forest Encampment, we can go in two directions. Take the east entrance, which will lead you to the Fields. Continue through the Fields until you reach the Crossroads, make sure to take this Waypoint.
From here, we go north and find the Chamber of Sins. In the Chamber of Sins, you will find another trial; be sure to complete it. Continue through the zone and kill Fidelitas, then use a portal scroll to portal to town.
Turn in your quests and purchase  Summon Skitterbots from Yeena and try to socket it in, but if your mana reservations are tight (and they probably are), you can stop using
  Vitality. If your clarity is level 5, stop leveling it.
Return to the Crossroads from the waypoint, go east to find the exit to The Broken Bridge. Continue the zone until you see the first bandit, Kraityn, talk to the NPC, and choose the option to kill him. Take a portal back to town, and use the waypoint to go to Crossroads again. This time, you’re going south towards the Crypt. Continue the zone until you find the Crypt. On the first level, you will find another Trial. Complete the Trial and proceed through the zone to level 2, and find the quest item. Portal to town after picking up the quest item.
This time, we go west into the Riverways. Try to follow the road so you won’t miss the waypoint. You will encounter broken bridges; frostblink over them. From the waypoint, go north to the Wetlands, find the NPC Oak, and pick the option to kill him. Take his amulet, find the area’s waypoint, and return to the Riverways. Go west, find the Western Forest.
In the Western Forest, there are three things we want to find. Follow the road until you find the waypoint. On the side of the road where the waypoint is located, proceed directly to the edge of the screen (or until Alira’s camp appears). Find it, speak to the NPC, and select Help Alira. Please do not kill her this time, as we want the resistance perk that comes with helping her. Go toward the bottom of the map, find the blackguard, kill them, and insert the quest item they drop in the wall. Follow the map up the other way until you find the Weaver’s Chambers. Enter and continue to kill the boss called The Weaver, pick up the quest item, and portal to town.
Pick up  Faster Casting Support and replace
  Added Lightning Damage Support with it. Purchase
  Minion Life Support for your Zombies and socket the
  Raise Zombie on your gear. Purchase
  Desecrate, which you socket in whichever green socket you have. Keep this at a level as low as possible for spawning corpses, as the level of the gems does not matter here.
  Desecrate is a gem that spawns corpses. We use this to fuel our
  Flesh Offering and to spawn corpses for our
  Raise Zombie should they die.
Teleport back to Riverways and go north into the Wetlands, and enter the next zone. Continue till you see the entrance to the Vaal ruins. Make sure you have turned all your quests in, as you will receive an item to open the door to the Vaal Ruins.
Continue through the zone, but be aware that it can be confusing as you traverse several floors. Keep moving up until you reach the Apex, kill the boss, and proceed onwards to Act 3.
Gems in Act 2.
 Summon Skitterbots
 Faster Casting Support
 Minion Life Support
 Desecrate
 Controlled Destruction Support
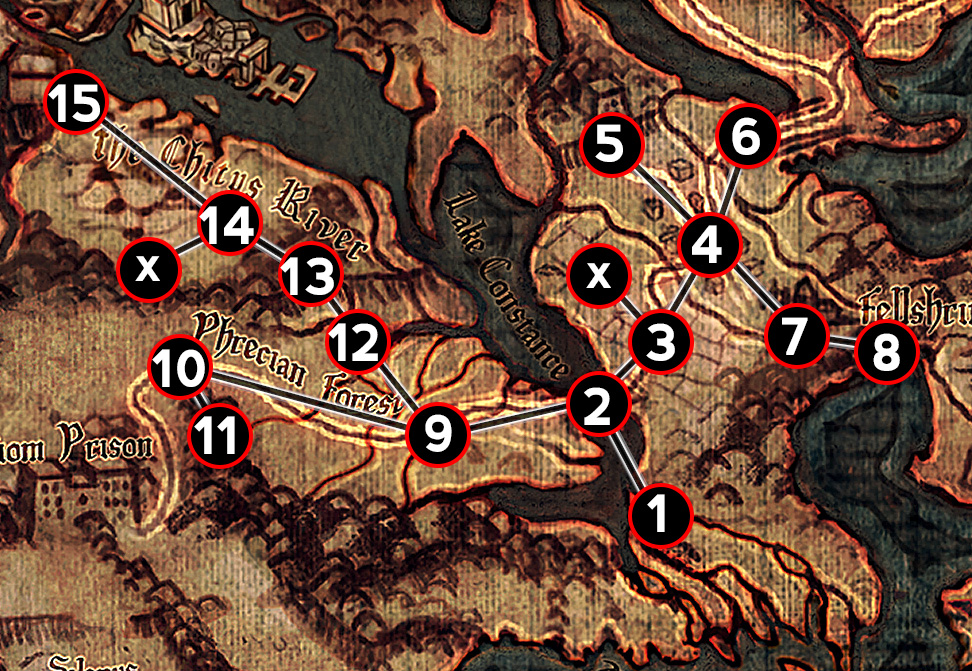
This concludes Act 2.
Act 3
Pick up the recipe and continue through the zone until you find Clarissa. Kill the enemies surrounding her, and wait until she is on her feet and can speak with you. Speak to Clarrisa and follow the water to enter the town.
Enter the next area and proceed into town. Pick up all the quests that are available and then proceed back up the stairs until you reach the next zone, the Slums. Continue through the Slums and find the Crematorium. There is another trial here, so complete it. Continue through the Crematorium until you find Piety, kill her, and take the portal back to town. Don’t forget to pick up the quest item and take it back to Clarissa.
Speak to Maramoa and take  Purity of Elements as your reward here, and socket it, as it will fix our resistances. At this point, you run
  Summon Skitterbots and
  Purity of Elements.. Additionally, it means we are no longer at risk of being frozen, chilled, ignited, or shocked.
As you could be overleveled a bit and might already have Eldritch Battery from the passive tree by now, you can unsocket Clarity as you no longer need it. Please keep in mind that you need to have some energy shield on your gear from this point, so Eldritch Battery functions properly.
Once you have taken the reservation nodes in the passive skill tree, buy  Zealotry and you can replace
  Summon Skitterbots. Don’t discard
  Summon Skitterbots, we use it again later when we have Energy Shield on our gear to sustain mana through Eldritch Battery. Please make sure you put
  Summon Skitterbots in your offhand weapon so it still get levels.
We also get  Conductivity after finishing the quest mentioned above. Be sure to grab it, as it drastically increases single-target DPS.
At this point, you might have a 4-L item with BBBR (Blue – Blue – Blue – Red) or try to find one. You can also check the vendor NPC’s to see if they have one for sale. For our fourth link to your Absolution, we use  Controlled Destruction Support, so please go back to Act 2 and purchase one.
Take the stairs back up and re-enter the Slums. Continue through the Slums and find the Sewers. Proceed through the Sewer and go on into the next zone, the battlefront. For the most part, Act 3 is very straightforward. You progress through zones and do quests, and you can’t go the wrong way.
Once you reach the Ebony Barracks, you can access the Imperial Gardens. In this zone, there is another Trial; make sure you complete it. You also find the entrance to “the Library,” which has an optional quest; we cannot skip this! We need gems that only the NPC found here will sell to us, and he becomes available after we have done the quest. Once you finished the quest purchase the following gems  Convocation,
  Feeding Frenzy Support and
  Physical to Lightning Support.
 Convocation is a fantastic utility gem that allows us to summon our minions to us if we start to move away from them. This is the point at which veteran minion players start to shield charge ahead and pull the minions after them with Convocation. You don’t have to do this, but I think you should be aware that is an option.
 Feeding Frenzy Support is a buff support that we link to
  Raise Zombie. It will make all minions faster, not just the Zombies. So this allows the zombies to not only be meatshields, but also provide a damage buff to
  Absolution Sentinel’s.
 Physical to Lightning Support Replaces
  Controlled Destruction Support if you have a four link, and
  Faster Casting Support if you are still on a three link.
It may be tempting to attempt the Labyrinth now, as you will get the text prompt after finishing the Trial in The Imperial Gardens. Please refrain from doing this yet; it’s unnecessarily complex for a new player at this stage.
Instead, let’s talk about the crafting bench.
You will have received a Hideout from an NPC called Helena in Act 2 when you did the Chambers of Sin. Go to a waypoint and teleport to your hideout. Find the picture of a chair on your menu called (Decorations), click on it, and find the crafting bench in the UI. Place it somewhere in your hideout.
Click the crafting bench and start examining your equipped items. Any item that doesn’t have a resistance value but has an open suffix (hold down ALT to view this) can have a resistance added to it through the crafting bench.
Especially if your lightning resistance is low, craft it somewhere. If you’re at 60% for most of your resistances, then you are somewhat fine. Lightning resistance is significant against the upcoming Act 3 boss, Dominus.
Continue through the Imperial Gardens and enter the Sceptre of the Gods, go all the way up until you see the final act 3 boss Dominus, kill him, and proceed to the next zone. Follow the Aqueduct until you reach the Town of Highgate.
Remember to keep using the crafting bench. Adding crafts to your gear as you progress will make your journey a lot easier. It’s immensely powerful, and a new player should not ignore this. The crafting bench will be your friend through your entire journey in PoE 1, so you might as well become familiar with it now.
Gems in Act 3.
 Purity of Elements
 Zealotry
 Conductivity
 Controlled Destruction Support
 Convocation
 Feeding Frenzy Support
 Physical to Lightning Support
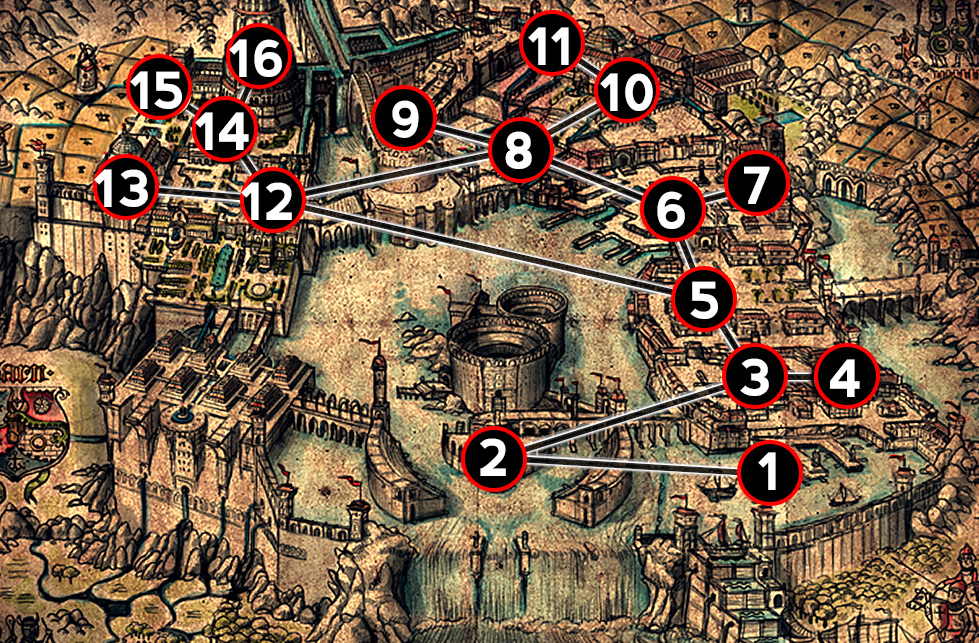
This concludes Act 3.
Act 4
Pick up all the quests in High Gate and complete them to get access to the Mines. Continue through the Mines until you reach the Crystal Veins. This will be a good time to complete your Labyrinth for your Ascendancy. You will need to return to the Act 3 town to open the labyrinth. It is located directly to the right as you come up the stairs; the best way I can describe it is a green, glowing door.
Before you enter the labyrinth, I advise that you make sure you have replaced your health flask with a higher-level one.
It’s likely also helpful to know that traps are the number one killer in here, and that doubling back in panic is what usually kills new players, so be careful because if you die, you have to do it all from the start again.
Finish the Labyrinth and ascend as a Necromancer. Take Commander of Darkness as your first node.
Teleport back to Crystal Veins and do Daresso’s and Kaom’s realms, respectively, in whatever order you prefer. Then speak to Dialla and go back to town. Petarus and Vanja will now sell you  Spell Echo Support.
This replaces  Faster Casting Support on your
  Absolution link. It will feel a little bit clunky at first, but it’s too big of a damage upgrade to pass up.
Once you finish this act, take the  Summon Stone Golem as your reward when you return to town; both of its buffs are very helpful to us. Our database is not yet updated for 3.26, but it currently has two buffs.
Gems in Act 4.
 Spell Echo Support
 Summon Stone Golem
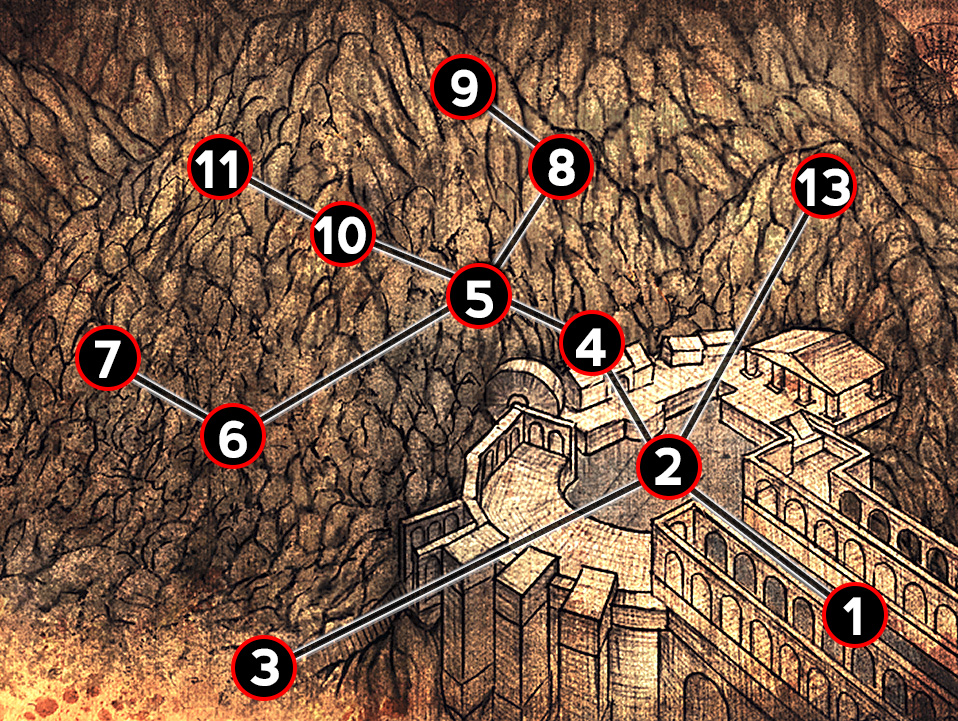
This concludes Act 4.
Act 5
If you haven’t obtained a four-link by now, continue to check vendors frequently as they refresh their inventory every time you level.
There are no Trials or Gem changes in this act, so keep things as is. If you have acquired an item with RG(Red – Green) linked and can add  Faster Attacks Support to your
  Shield Charge, I would suggest you do so.
If you don’t want to go fast, this matters less to you. Feel free to take your time if you prefer.
You should be flying through the Campaign now, and follow the quests and complete every zone. At the end of Act 5, you will fight Kitava.
After you beat him, you will get a -30% resistance penalty. You must keep this in mind and upgrade your gear to have resistances above the normal 75% cap. Remember the crafting bench.
From act 6 onwards, the game will assume you have 75% resistance, and it will penalise you quite heavily if you do not.
If the game wanted to hit you for 250 damage, it would send a hit of 1000, as the elemental resistances reduce it by 75%. What this means is the difference between 75 and 50% resistance is quite literally taking double damage.
Gems in Act 5
 Faster Attacks Support if you use Shield Charge.
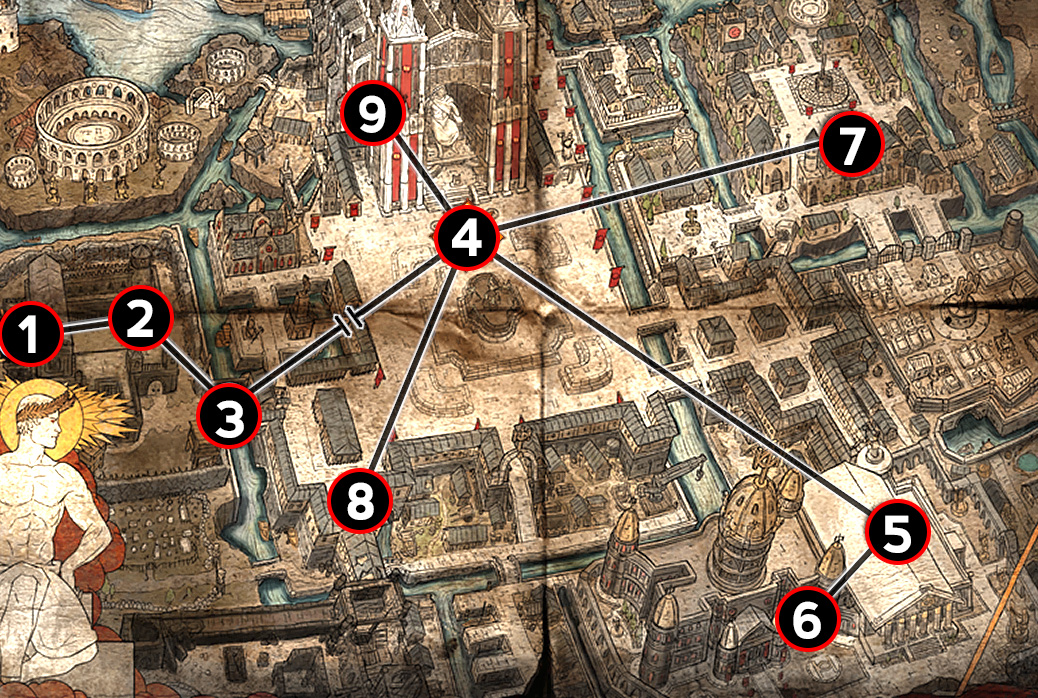
This concludes Act 5.
Act 6
This act has a host of optional quests, two of which grant skill points.
The first of them is the quest to the left of the act’s town, The Twilight Strand. I would suggest doing this first. This unlocks the vendor Lilly Roth, who sells almost any basic gem in the game, and she’s extremely handy.
Continue through the zones until you reach the Prison. There is a Trial in this area; find and complete it before moving onwards.
As you exit the Prison, you will find yourself in Prisoner’s Gate. There is a secondary area here, called the Valley of the Fire Eater. In it, you will find the Goatman Abberath. Fight and kill him, then return to Prisoner’s Gate and proceed onwards.
Keep going until you reach The Riverways. Once you find the waypoint in this zone, proceed directly to the left of the waypoint until you find The Wetlands. In this zone, there is a boss called Ryslatha. Kill it and portal back to town.
Deliver both quests, take both skill points, and teleport back to the waypoint in The Riverways.
Finish the rest of the act. As always, ensure your resistances remain as high as possible, ideally at 75%.
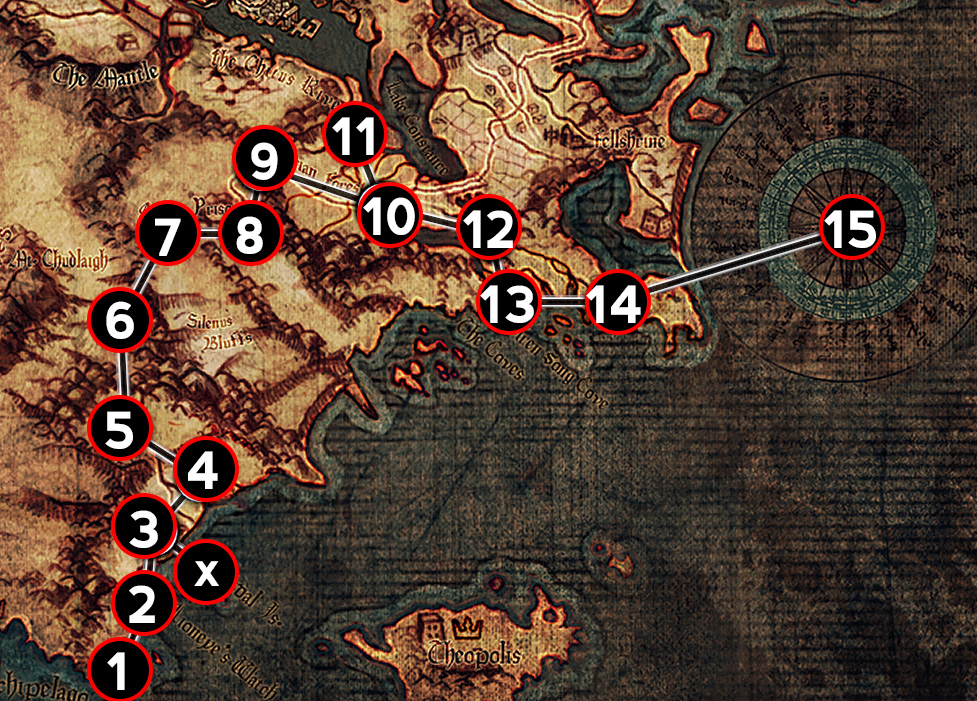
This concludes Act 6.
Act 7
In Act 7, you will find a Trial in the Crypt and the Chamber of Sins, level 2, as always, complete them.
Leave town and head to Crossroads, pick up the waypoint. Head south to The Crypt, do the trial as you progress through this area, and get the quest item.
Teleport back to Crossroads, then head north towards the Chamber of Sins. Find the waypoint in the middle of it, and insert the quest item into the map device (the giant circular thing). Finish the mini quest here and kill the various bosses, hand the quest item to Silk and get his key. Proceed down to level 2, do the Trial, and move onwards through the Den into the Ashen Fields. Kill the boss here and move to The Northern Forest.
Please stick to the lower walls of this zone as you progress through it, find the Dread Thicket, and explore it. You need to collect all the Firelies here. There is a crater in the middle of it, inside which you will find the boss Gruthkul.
Head North to The Causeway. Proceed through this maze-like zone until you come out at a zone exit. Ensure you obtain the quest item from the box to your right.
Now, it is time for The Vaal City. One of the most hated zones in the game. You will likely get lost, and this will take some time. I’m afraid there’s nothing you can do about that.
Find the temple, and proceed through it. Similar to the previous temple, diagonals are the thing here. Lower left, upper right, and so on. There are exceptions to this rule, but most layouts operate in this manner.
Kill Arakaali, and exit the act. Take the waypoint. At this point, I would suggest you do your second Labyrinth. We’ll be taking Mindless Agression as our second Ascendancy.
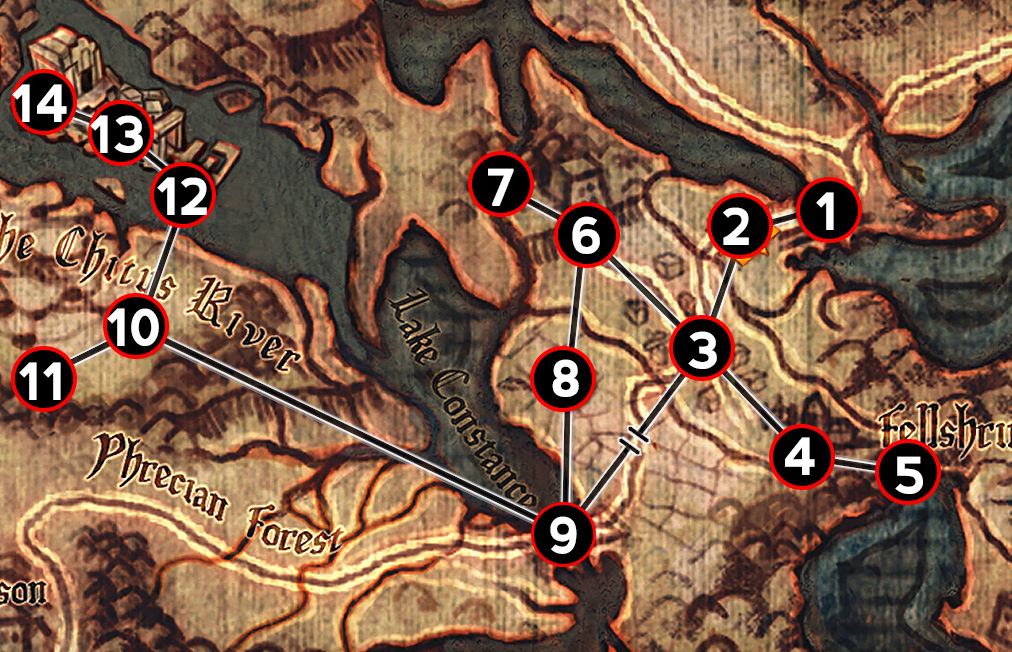
This concludes Act 7.
Act 8
Once again, we’re faced with an east-west situation in this act. I’ll explain further.
Initially, we head straight into the Toxic Conduits, where we will fight Doedre. As we exit her Arena, we head west, to the Grand Promenade and into the Bath House.
Find and kill the special NPC charging around in the middle of this zone, and the waypoint (we will need this waypoint later).
Find and complete the areas’ Trial, then exit. Do not go to the High Gardens. Proceed to Lunaris Concourse, and head left to the Lunaris Temple. Kill the boss, take the orb, and go back to town.
Back into Toxic Conduits, this time heading west. As you enter the Quay, you stick to the water’s edge. You will eventually find a long, thin bridge. Walk across it and pick up the quest item in the box in the middle.
Continue along, along the water (it’ll feel like heading right) until you find the special arena with Tolman, Clarissa, and the zombies. Kill everything in here (you can’t kill Clarissa, don’t worry). Then proceed north to Grain Gate.
In the Grain Gate, there is a group of mercenaries dressed in black. They are usually easiest to find if you hold a top-right angle, in my experience. Kill them, then exit the area.
Through the fields to the temple, kill this boss and take his orb. Back to town again.
This is going to sound weird, but we’re teleporting to the Bath House again. This time we are headed to the High Gardens. Find and kill Yugul, the reflection boss.
This zone can be challenging due to porcupines; they may prick you a few times. This is fine, don’t worry about it. If your gear doesn’t have sufficient evasion or armour, you can sometimes die.
Once Yugul falls, you teleport to town and take the waypoint to the Lunaris Concourse and head right towards the bridge. Halfway across, there’s a door, enter and use your orbs. Kill the twins.
Exit into the Blood Aqueducts and continue the zone.
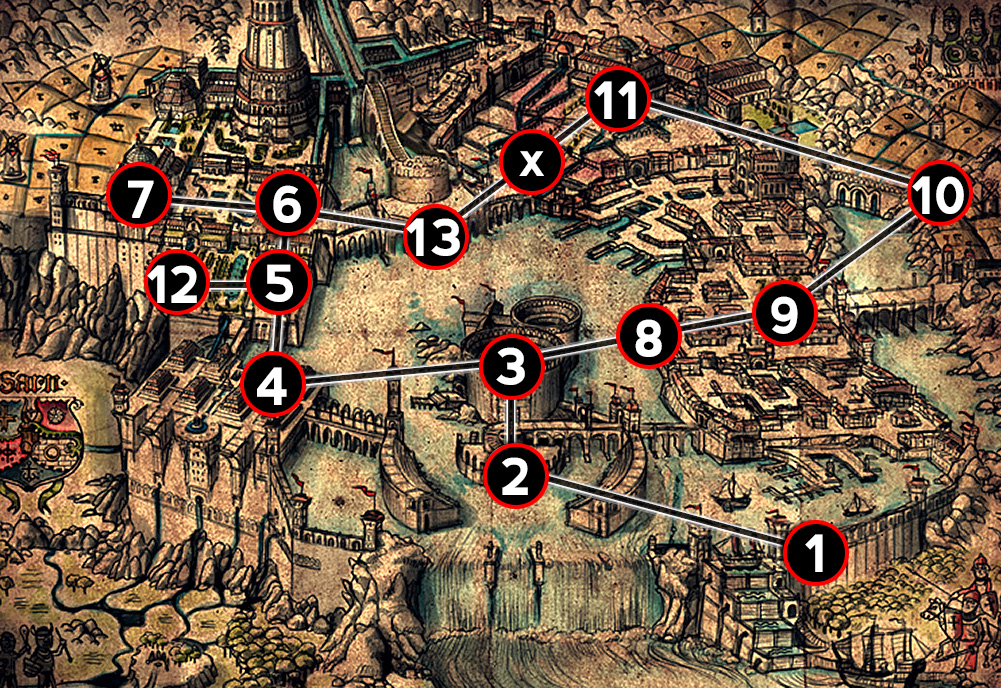
This concludes Act 8.
Act 9
Act 9 offers numerous choices and optional paths. I’m not going to suggest you do exactly what the entrenched players do, because it relies on how quickly they do things.
Instead, I will suggest the easiest and most foolproof path. If you’re a seasoned ARPG player and you know the usual route, take the normal route.
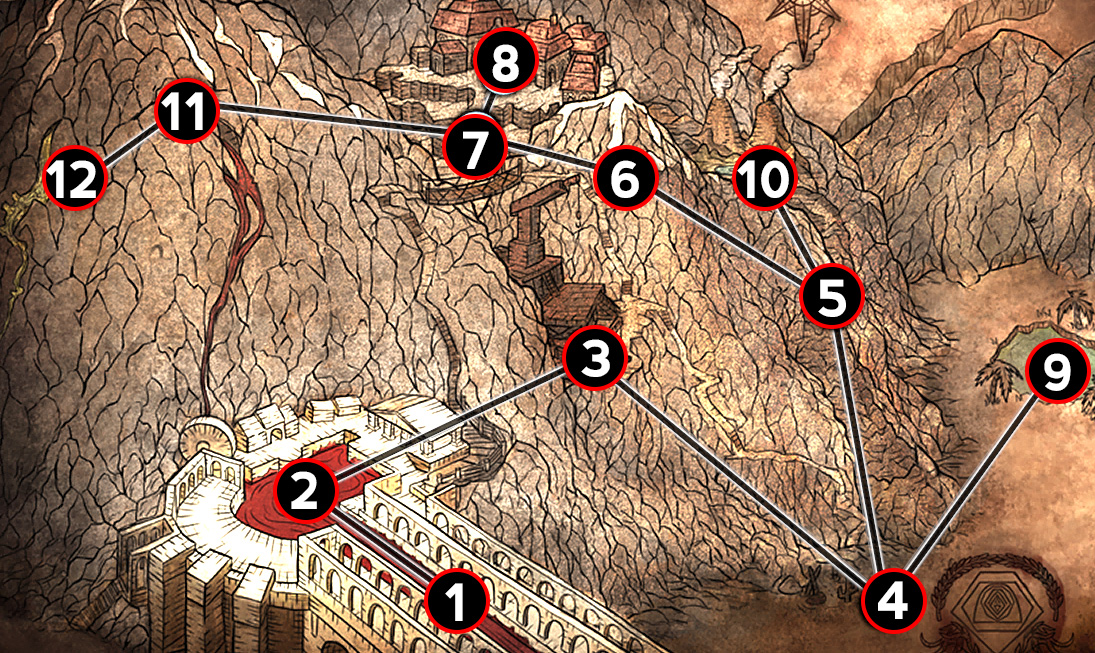
Proceed through the Descent until you get to the Vastiri Desert. Take the waypoint, find the quest item (it’s a giant circle with a ! in it, hard to miss), and win the fight. Then head north towards the Foothills.
Hold to the right through this zone, following the contour of the mountain surface. Take the waypoint, do not go to the boiling lake. Change direction to the north-west and find The Tunnel. There is a trial in the Tunnel; find it before proceeding.
As you exit into The Quarry, run straight ahead towards the middle and locate the waypoint (we will need it later).
Then head southwest on the map until you find the Shrine of the Winds, fight the boss here, and take the quest item. Go back into the Quarry and search for the Refinery.
The Refinery is a vital zone for us, as it contains a crafting option we need. Unfortunately, it is not very well marked, and you might have to search for it a bit. It’s hidden in an unmarked underground area, and the door is a square blue field. If you come across it, click on it and then go down into the cellar and click on the crafting recipe. Proceed to kill the area’s boss.
At this point, we get the option to craft the modifier “Trigger a Socketed Spell when you Use a Skill, with an 8-second Cooldown”. Craft this on your wand. This will automate both casting  Desecrate and
  Flesh Offering, reducing the buttons we need to press by 2. You will need a wand with both green and blue sockets for this. The gems have to be socketed in the wand for this to work.
Go back to town and speak to Petarus, Vanja, and Sin a few times, until we get a Bottle Faith item. We return to the Vastiri Desert waypoint and head to the far right of the map, searching for the Oasis. There’s a scorpion boss here that we kill.
Then portal to town and waypoint to The Foothills and enter The Boiling Lake. Find and kill the area boss and loot it. You have all the items you need, teleport back to town again, and take the waypoint to Quarry. Proceed through to the end boss (this will take some time).
This concludes Act 9.
Act 10
Thankfully, there’s not too much that can go wrong path-wise in Act 10, so if you get lost, you will eventually end up where you need to go.
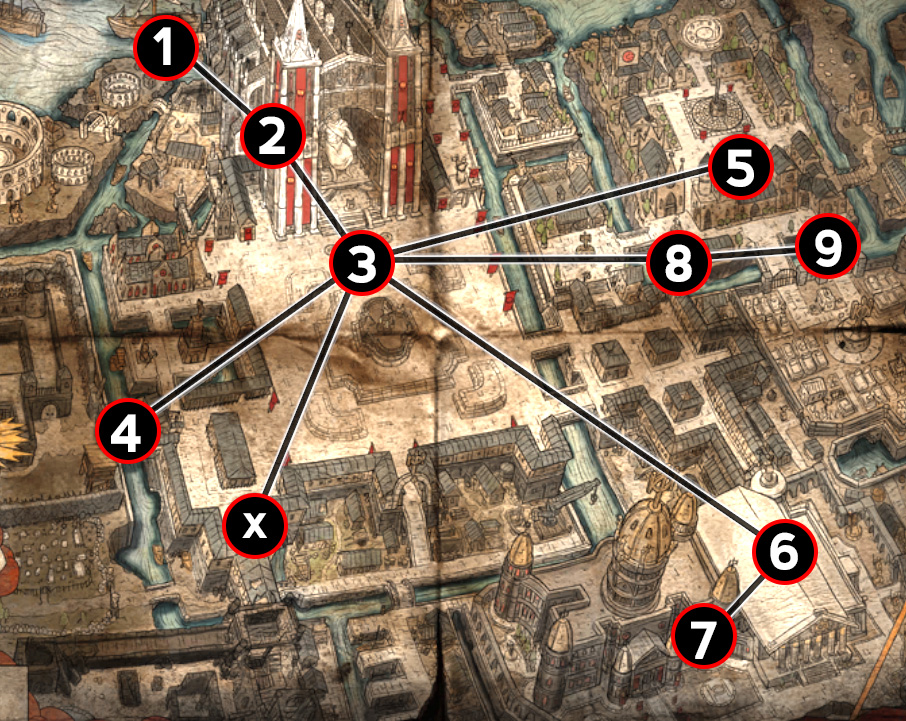
Climb up the ladder to Rooftop and save Bannon (area to the west of where you enter), then exit his little arena and run across the whole rooftop.
Exit onto the square, and head south. You’re looking for the Control Blocks. Take the waypoint, then find and kill Vilenta. Then portal to town and return to the start of the control blocks.
Head directly North, pick up the waypoint outside the Ossuary. Enter the Ossuary and locate the trial. Complete it, and find the quest item.
Exit the ossuary and head to the right. You will eventually come to The Torched Courts, continue through the zone, and find the Deserated Chambers. Defeat the boss and collect his staff.
Portal to town, and hand in various quests. Make sure you speak to all of them so you will have all the guests.
This is a good time to do your third Labyrinth and grab Mistress of Sacrifice as your Ascendancy. Remember to bring a copy of the gem you are looking to play later, as you do this Labyrinth, as it has an increased chance of giving you transfigured gems.
For instance, if you’re looking to play Skeleton Mages, you will bring a  Summon Skeletons gem. You might get Skeleton Archers, you might get Skeleton Mages, or you might get something random. Bring it regardless, it’s a good opportunity to get the transfigured gems you’re looking for. The same goes for any transfigured gem you are looking to play; the skeletons are merely an example here.
You’re about to fight Kitava again, and he will once again inflict his -30% resistance penalty on you. This will stack with the previous debuff, resulting in a total of -60%.
As your resistance is about to tank, doing the labyrinth before Kitava is much easier. You will take Mistress of Sacrifice as your third Ascendancy node.
Take the waypoint back to Square and walk a few meters to the right. You’ll find a familiar NPC here, and he’ll open the way for you to move forward. Proceed through the Canals and The Feeding Through. These zones are somewhat lengthy and might take you a few minutes. Eventually, you will find the waypoint, marking the second and final Kitava fight.
I would strongly suggest you take a second to look over your gear before fighting him, so you don’t start your adventures in maps with bricked resistances. Ideally, you want to be 30% above each elemental resistance cap, so he puts you down to the capped level.
Having finished Kitava, and thus the Campaign, you should now swap your  Flesh Offering to a
  Bone Offering for added defences going into the endgame.
This concludes Act 10.
Prologue
You will end up back in the harbour, talk to Lilly to be sent to the new base. Upon arrival, you will meet Commander Kirac. He’s going to send you on various missions into maps, but that’s a bit too involved for this guide.
At this point, you should begin transitioning to the build you intended to play, both in terms of gear and talent points. Most minion trees are pretty similar, so you shouldn’t need to make too many respecs.
If you need more than the Campaign provided, you can respec with gold through the NPC Faustus, whom you will find in Kingsmarch.
Congratulations, you finished the Campaign!
Questions?
To guarantee that my guides are tools you can utilise to enhance your experience in Path of Exile, you may have questions. Please join the PoE Vault discord, and they will attend to them as soon as they are able.


