
Greek's Phase Run Pathfinder Build Guide (PoE Heist only 3.29)

Introduction
This build guide is meant to be played as a Heist Only character. Only the leveling portion of this guide has a damaging ability.
Speed! 100%? 200%? How about 600% Movement Speed? This Pathfinder Setup is all about defense and speed. This build is designed for clearing Contracts and Blueprints in Heist as fast as possible!
Currently, this written guide is the only version I have made of this guide. I will update here if I decide to make any video guides later on.
If you have any questions about the build, you can always join the PoE Vault discord to get help from @Greek or help from others in the community.
Build Overview
In this section, I will outline the pros, cons, and the general play style. This will allow you to determine if this build is a fit for you.
Pros
+ League Starter – Due to the cheap starting cost and goal of this build, we can play it right off the start of a league.
+ Speed – If you enjoy moving extremely fast in PoE, this can be super fun to play with!
+ Minimal Gear Cost – The baseline gear to get going is generally very cheap. While we can always spend money to improve the build, the floor of this build is easy to reach.
+ Specialized for Heist – This is a specialized build for Heist, and if you enjoy Heist, this is a great build for you!
Cons
– Heist Only – Due to how this build is designed, it can’t do much else outside of Heist. This can be a downside if you like variety, and if this is your only character.
– No Damage – This build works by keeping enemies from targeting our Heist Party members through distraction skills, but has no damage skills.
– Market Dependent – This build does not function in SSF and is very dependent on the market and trade.
– Large Respec – Because we need to kill mobs and level before we can truly go pacifist, we have to level with Pconc (Poisonous Concoctions). After this, we respec ~70 points on our tree which can be a bit cumbersome.
Playstyle
This Pathfinder moves fast, while being nearly immortal. You will move through Heist at speeds from 400% – 600% movement speed as you progress through the build. Any time mobs try to interfere with you, you use skills like  Decoy Totem or
  Void Sphere to distract. We get the loot and leave just as fast as we came!
Initially, we are just using  Poisonous Concoction of Bouncing to level up to level 90. We start with Poisonous Concoction from level 12 and swap to Poisonous Concoction of Bouncing as soon as we can get the gem, finishing the campaign up until Act 10 Kitava. Do not kill Act 10 Kitava until we have reached level 90 and have fixed our gear. Pconc is an aimed ability that throws a barrage of projectiles at your target, poisoning them until death. While Pconc of Bouncing has a more fire and forget method, making it super comfy for clearing Heist early on.
As stated, this is a Heist Only build. We will mainly be focused on buying Blueprint and Contracts and running them very quickly.
PoB, Passive Tree, and Gems Links
This can be found in the link below, but be sure to use the Loadouts dropdown. Located in the top right, changing the different parts of the build altogether so that you don’t get confused with mismatched stages of the build conflicting with each other.
 PoB
PoB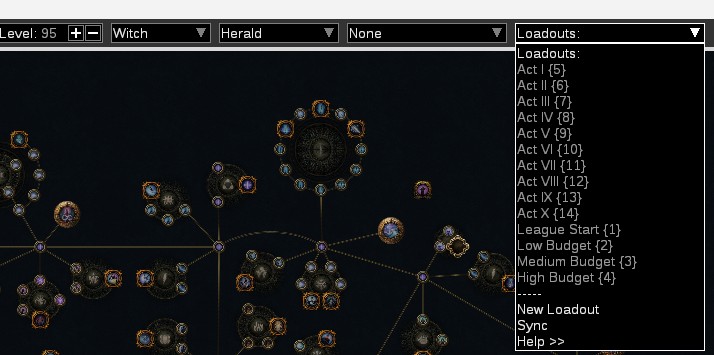
Gear
Much of the end-game gear can be self-crafted, but some items may be cheaper to purchase. We suggest looking at both crafting and purchasing options to find out which one is cheaper.
You can read more details about gearing recommendations on the dedicated page below.
 Gear, Jewels, and Flask Page
Some unique items to look out for are the following:
 The Embalmer (Leveling to 90 only)
 Fury Valve (Leveling to 90 only)
 Devoto's Devotion
 Widowhail
 Rearguard
 Rumi's Concoction
 Queen of the Forest
 The Highwayman
 Pure Talent
 Unnatural Instinct
Ascendancy, Bandits & Pantheon
You can read all about these on the dedicated page found below:
 Ascendacy, Bandit & Pantheon Page
Leveling
Do not kill Act 10 Kitava until we have reached level 90 and have fixed our gear.
Be sure to check out the Heist Strategies section of this guide to learn everything we utilize to farm gold and currency early in preparation for the swap.
We can’t start Heist at level cap, therefore I have provided my favorite leveling path using Poisonous Concoction and Poisonous Concoction of Bouncing to get you to Level 90.
Life Flasks are very important to the DPS, both Poisonous Concoction and Poisonous Concoction of Bouncing are vital as you are going through the acts upgrading your life flask. The more life recovered by the flask, the more DPS our skills can churn out. You will want two of the best flasks you can obtain, as our skill uses the flask with the most charges first from left to right. Below are the life flasks I would look out for and try to upgrade to at various levels.
- Level 12
 Greater Life Flask
 - Level 18
 Grand Life Flask
 - Level 24
 Giant Life Flask
 - Level 30
 Colossal Life Flask
 - Level 36
 Sacred Life Flask
 - Level 42
 Hallowed Life Flask
 - Level 60
 Divine Life Flask
 - BiS Divine Life Flask at iLvl 81 w/ 70% increased Amount Recovered, 33% reduced Recovery rate
The PoB covers all the gems, gear, and links needed to smoothly level. Below you will find suggestions and a regex you can use while leveling.
Regex
What is a regex? A regular expression, commonly known as regex or regexp, is a specialized sequence of characters that defines a search pattern for text processing. Or in PoE terms, it will highlight items in Vendors when searching for certain items!
https://poe.re/ is a useful sight to make your own vendor regex! I have made a few to help you in the campaign.
Act I-III: This will highlight 3-link options we can use, as well as movement speed boots:
([rgb]-){2}[rgb]|Runn|rint
Act III+: This will highlight 4-links we are looking for as well as movement speed boots:
([rgb]-){3}[rgb]|Runn|rint
Gambling for Items
Act III Easy 4-Links
The introduction of gambling for items has given us easy access to 4-Links. Once you have hit 24 in Act III, I would suggest gambling Evasion bases with Maramoa in the Sarn Encampment. These have a high chance to be 4-linked and can help you power up if the vendor doesn’t have your links.
I suggest going for evasion helmets due for a chance to get a  Goldrim. While this doesn’t happen often, it can help carry resistances through the Acts.
Be conservative on Gambling
Once we have received our 4-link, I would suggest saving as much gold as possible. While its always a good idea to Gamble for a piece of gear if you are in dire need up an upgrade, we need to save as much gold as possible for our eventual respec.
Early Heist
Basics of Heist Guide
You can find out all the basics of heist here: Heist Guide.
Act VI Heisting
Once you find your first rogue markers from heist stashes in Act VI I highly suggest you run a few Demolition, Perception or Lockpicking contracts. These can be found from heist lockers in the Acts or you can purchase them for  Orb of Chance or
  Orb of Alchemy from Whakano the Barber in the Rogue’s Harbor. This is a great way to get early chaos to purchase a few starter uniques.
Here is a regex for contracts from Whakano:
Lockpi|Percep|Demo
Here are the uniques I would consider buying for leveling in order of importance:
- The Embalmer – This gives us a pseudo 5-Link for Poisonous Concoction when 4-linked and sockets with the skill
- Fury Valve – Only with Poisonous Concoction of Bouncing, do not use this with a normal Poisonous Concoction
- Goldrim
Gathering Contracts for Act X Pre-Kitava Heisting
Heist contracts from Whakano reset every time you level. This allows you to go back to the rogue harbor periodically when leveling and spend any Orb of Chance on Demolition contracts that he has available. This will give you a healthy amount of contracts to keep you going at Act X before you kill Kitava. Running these contracts can net you a ton of early chaos to grab good rares and uniques as soon as they are available on the market.
As we won’t be killing Kitava in this guide until much later in progression compared to a normal build, it is very important to do. While it does slow us down in the short term, this is key to our success later.
Requirements to Make the Swap
Since we are using Poisonous Concoction of Bouncing to level up we eventually make a large swap to our Speed Heister setup. This has a few requirements to meet before making the swap. If you have followed the guide you should have most if not all of these requirements by the time you hit level 90.
- Widowhail
- Rearguard
- Level 90
- A mix of around 500k Gold and ~40 respec points. The more
 Orb of Regret you have, the less gold and vice versa.
 - Uber Lab completed and 4th Ascendancy unlocked
- Resistance Capped Gear
- Act X Kitava Killed (Check to make sure your resistance is still capped after this)
While these next few items aren’t required, I would suggest grabbing them for a better experience after the swap.
Questions?
To guarantee that my guides are tools you can utilize to enhance your experience in Path of Exile, you may have questions. Please join the PoE Vault discord and they will attend to them as soon as possible.
Final Note
As much as I love making build guides, I’m very new to writing guides. So, if you see any mistakes or have any suggestions feel free to reach out to me through Discord!
No guide is absolute. If something doesn’t suit you, change it to fit your needs. There are many ways to play Pconc and Heisters this is just my personal preference!