Bladestorm Berserker Gear, Jewels, and Flasks
Path of Building
Path of Building for this build is available here.
Included is the recommended set of mid-game gear, a full skill tree, and all the gem links needed to get the build to tick.
We use the Path of Building Community Fork for all of our builds, which is highly recommended. If you are encountering errors importing the build, please ensure you are using the Community Fork.
Gear Summary / TL;DR
These items strike a balance between power and cost-effectiveness. If you want to explore more options for Gear (both budget and high-end), Flasks, or get more information on alternatives and specialty items, please ensure you read the Gear, Jewels, and Flasks section in its entirety.
Our recommendation:
| Item Slot | Item Name |
| Head | Rare  Concentrated Effect Support Helmet Concentrated Effect Support Helmet |
| Amulet | +1 Physical Skill Gems Amulet |
| Chest | Nearby Enemies Explode  Astral Plate — additional options inbound for 3.14 soon Astral Plate — additional options inbound for 3.14 soon |
| Gloves |  Hands of the High Templar or Rare Hands of the High Templar or Rare  Spiked Gloves Spiked Gloves |
| Boots | Tailwind  Two-Toned Boots (Cold and Lightning Resistances) Two-Toned Boots (Cold and Lightning Resistances) |
| Belt | Rare  Stygian Vise Stygian Vise |
| Rings | Rare  Steel Rings Steel Rings |
| Weapon | Rare 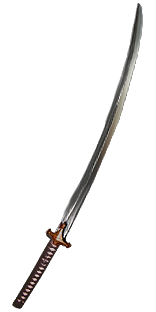 Exquisite Blade Exquisite Blade |
For crafting Rare items, you can check out all the affixes that can roll on an item base, depending on its level, influence, and many other factors, using our affix tool.
Armour
Chest
A Rare Crusader influenced  Astral Plate is the best option late game, boosting our clear with its explosions. Late game you will want to find a hybrid influence
  Awakener's Orb craft for additional critical strike.
- [Uncapped] Elemental Resistances
- Enemies you Kill Explode, dealing 3% of their Life as Physical Damage
- +# to Maximum Life
- Attacks Have +% to Critical Strike Chance (Hunter)
- Armour
For uniques there are some basic options:
 Carcass Jack an option for offense. Not only does it boost clear by virtue of vastly increased area of effect, but it also adds a significant damage increase to your
  Bladestorm. The fact that you also get some Maximum Life and Elemental Resistances is merely icing on the cake. One downside of using
  Carcass Jack is that it can be irritating to properly colour — it is an Evasion/Energy Shield item (Green/Blue), and we need at least four Red sockets and two Green.
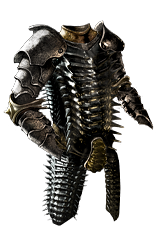 Belly of the Beast is the best easily attainable option for defense, and especially for Hardcore and Solo Self-Found. Coloring it is as easy as it gets, and we get a heaping of Maximum Life and some nice Elemental Resistances. Though clear speed suffers a bit when compared with the largely increased area of effect of
  Carcass Jack, this can be compensated for by instead swapping in
  Pulverise Support as a part of your main link.
Head
A rare 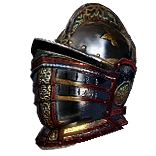 Royal Burgonet or
 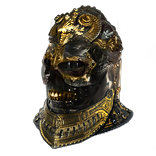 Eternal Burgonet is ideal. We can use an Elder affix to create a pseudo 5-Link for our
  Vaal Ancestral Warchief, which is a huge boost for bossing.
- [Uncapped] Elemental Resistances
- +# to Maximum Life
- Socketed Gems are Supported by Level # Concentrated Effect
- +# to Accuracy
- Nearby Enemies take 9% increased Physical Damage
- Armour
+Recommended Helmet Enchantments:
- Single Target/Bossing: +1 to maximum number of Bladestorms
- Clear Speed: Bladestorm deals 40% increased Damage
Increased maximum Bladestorms can be massive if you are allowed to fully ramp up your damage, however, it can also be penalized by heavy movement.
Gloves
 Hands of the High Templar can offer a huge amount of damage and utility with the right implicits. The core four to lock down as soon as possible are:
- +2 to Level of Socketed Warcry Gems
- % Increased Attack Speed
- Curse Enemies with Level #
 Vulnerability on Hit
 - Attacks have +% to Critical Strike Chance
A Rare set of  Spiked Gloves is a great choice for the early and mid-game.
Prioritize stats as follows:
- [Uncapped] Elemental Resistances
- +# to Maximum Life
- +# to Accuracy (as needed)
- % Increased Attack Speed
- Adds # to # Physical Damage to Attacks
- % of Physical Attack Damage Leeched as Mana
- % of Physical Attack Damage Leeched as Life
- % Increased Armour
- +# to Armour
Boots
A Rare pair of boots is typically the best option, offering a strong blend of movement speed, Life, and defense.
Prioritize stats as follows:
- % Increased Movement Speed (25%+)
- [Uncapped] Elemental Resistances
- +# to Maximum Life
- You have Tailwind if you have Dealt a Critical Strike recently (Hunter)
- % Increased Armour / Energy Shield / Evasion
- +# to Armour / Energy Shield / Evasion
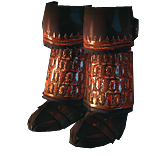 Kaom's Roots can be a helpful pair of boots to employ if you are new to Uber Elder, or you are struggling to avoid mechanics.
Recommended enchantments for this build are:
- 16% increased Attack and Cast Speed if you’ve Killed Recently (Clear Speed)
- 10% Chance to Dodge Attack Hits if you’ve taken a Critical Strike Recently (Defense)
We recommend the Attack Speed enchant, as it has the most applicable use across the board.
Weapons
This build is best executed using a 2H sword, with an  Exquisite Blade forming the best base.
First and foremost, aim for high Physical DPS on a weapon. This means it should have high rolls on:
- % Increased Physical Damage
- Adds # to # Physical Damage
After this, you should start to look for other potent damage affixes for this build. Some great ones to keep an eye for are:
- % Increased Attack Speed
- % to Global Critical Strike Multiplier
- % Increased Critical Strike Chance
- % Chance to Deal Double Damage
There are also plenty of excellent influenced affixes, though these are often exorbitantly rare and expensive on a high pDPS weapon. Always check in Path of Building if something is an upgrade before making a large purchase, or ask in the comments below.
Accessories
Amulet
A Rare amulet presents the maximum possible damage and defense, though it comes with a scaling cost — the better the stats, the higher the currency investment ascends into the stratosphere. A relatively strong piece can be cheaply obtained, but for players with currency to spend you can catapult your DPS to truly herculean levels.
Ideally, you want to have Resistances covered on your other pieces to allow for full damage itemization. If this is not possible, make sure you get enough Elemental Resistances here to fill out your build. Prioritize stats for your amulet as follows:
- +# to Maximum Life
- +1 to Level of All Physical Skill Gems
- % Increased Global Critical Strike Multiplier
- Adds # to # Physical Damage to Attacks
- % Increased Global Critical Strike Chance
- % Increased Attack Speed
- % Increased Area of Effect (Elder)
- % of Physical Attack Damage Leeched as Life
Rings
 Steel Rings are ideal, but use Resistance bases if you still need to safely cap. Prioritize stats as follows:
- [Uncapped] Elemental Resistances
- +# to Maximum Life
- Adds # to # Physical Damage to Attacks
- % Increased Global Critical Strike Multiplier
- % Increased Global Critical Strike Chance
- Curse Enemies with Level #
 Assassin's Mark on Hit (only if you don’t have
  Vulnerability on
  Hands of the High Templar)
 - Shock Nearby Enemies for 4 Seconds When You Focus (Crafted)
- % Increased Damage (Crafted)
The Critical Strike mods are not realistic for most players, but we have included them in the priority just for clarity’s sake.
Belt
A Rare  Stygian Vise socketed with a
  Murderous Eye Jewel is best option. Prioritize stats as follows:
- [Uncapped] Elemental Resistances
- +# to Maximum Life
- % Increased Global Physical Damage
- % Increased Melee Damage During Flask Effect
- % Increased Damage (crafted)
- +# to Strength
- +# to Armour
- % Increased Effect of Flasks on You
Jewels
Standard Jewels
This build uses Standard Jewels ( Crimson Jewel and
  Viridian Jewel primarily) over Abyss Jewels, as they are simply better in every respect. Prioritize stats as follows:
- % Increased Maximum Life
- % to Critical Strike Multiplier with Two-Handed Melee Weapons
- % to Melee Critical Strike Multiplier
- % Increased Global Critical Strike Multiplier
- % Increased Attack Speed with Swords
- % Increased Damage with Swords
- % Increased Attack Speed
- % Increased Damage
Resistances, or any other helpful damage mods, are perfectly fine to work in as well!
Flasks
This is our recommended Flask setup. Feel free to swap out Flasks or Prefixes/Suffixes to suit your preferred style of play, as there are no real “mandatory” flasks for this build.
- Seething
 Divine Life Flask of Thawing (or available/preferred Freeze suffix)
  Lion's Roar
- Physician’s
 Diamond Flask of the Dove
  Cinderswallow Urn (Crit veil is ideal) or Physician’s
  Silver Flask of Incision
- Physician’s Basalt Flask of Incision/Abalone/Preferred Suffix
 Cinderswallow Urn can also replace your Silver flask, but you will need to move the Heat suffix to your fifth flask.


