POEGuy's Siege Ballista Hierophant Build Guide (Poe Mirage 3.28)
Introduction
I’ve been playing Siege Ballista Hierophant for more than five years in a row now; it’s one of my top builds in Path of Exile. I’ve kept the build alive through many patch changes and shaped it into something easy to understand, cheap to assemble, and not a glas cannon. If I were to sum up this build in a few words, they would be: cheap, T16 map blaster, and fun.
Siege Ballista is also a great league starter – it can take you from nothing to T16 maps quickly and with minimal investment. If you want to learn more, scroll to the bottom of this page.
Over the years, I’ve tried every possible version of Siege Ballista out there (from mirror-tier glass cannons to wacky experimental). What you have here is a casual / new-player-friendly setup: a build that has already been tested by thousands. More than half of my YouTube PoE1 videos are Ballista-related; that’s how much I love this build archetype.
Video build guide and gameplay showcase
This is the most recent build guide:
Below is gameplay footage from the latest version to showcase this build’s power on T16 maps with different budgets featuring a League start budget, Low budget, and a Normal budget:
Build Overview
In this section, I will outline the pros, cons, & general playstyle.
Pros
+ Works great on a budget (great league starter too!)
+ Fast T16 and T16.5 mapper (can do all in-atlas content)
+ Lazy play (ballistas target and kill enemies for you; this is a one-button build)
+ Good defenses (once the build is fully done!)
Cons
– Cannot farm pinnacle bosses on Uber Mode difficulty
– This build was not designed for T17 mapping
- If you’re new to Path of Exile 1, know that you don’t need to stress about farming Uber Mode Pinnacle bosses or running purple maps (T17). PoE1 is a complex game, and it will likely take you quite some time to reach that kind of content.
However, if you do decide to go for that type of farming, know that you can later transition from a Siege Ballista Hierophant to a Shrapnel Ballista Hierophant, which is much more powerful featuring similar playstyle. The only major difference is the budget. Siege Ballista is much cheaper than Shrapnel Ballista, so keep that in mind. You can find the full Shrapnel Ballista Hierophant build guide here.
Playstyle
I adapted this build for lazy play; all that you need to do is move around and place your ballistas. Summoning  Siege Ballista will also trigger
  Frostbite,
  Frost Bomb,
  Frenzy, and
  Ensnaring Arrow.
  Steelskin is also automated.
Damage Scaling & Defensive Layers
The core concept behind this build is that we are a Dexterity stacking build. The more Dexterity you have, the more damage you will do and the more tanky you will become. The build revolves around the  Iron Commander bow that grants +1 extra
  Siege Ballista totem for each 200 Dexterity you have.
  Iron Commander also has synergy with Hierophant’s Ritual of Awakening ascendancy node, granting 5% More Damage, 1% Life Regen, and 0.5% Mana regen per totem.
Once fully done, the build becomes quite tanky! We gain 100% Spell Suppression for free from the Magebane Keystone. As well as more than a 75%+ chance to evade attacks, over 60% physical damage reduction, immunity to elemental ailments, and an absurd life regeneration rate (approximately 1200 life regenerated per second). On top of everything, we are a ranged build.
Another defensive layer that players often overlook is that we are freezing our enemies! Frozen enemies cannot move and cannot damage you. Our ballistas will also Taunt enemies when they are summoned.
[TIP] If you are playing this build on the Low budget, know that moving around can help you immensely. Moving around is a natural defense, and is especially useful in league start scenarios when people lack items and character levels. A common mistake that new PoE players make is to sit in one place.
PoB and Passive Skill Tree
You can find an optimized Path of Building here Every build I release will use the community fork of Path of Building. You can find PoB’s Fork by LocalIdentity through this link.
Gear Summary
This build is very easy to set up because it utilizes many cheap uniques (even at league start). Having a lot of unique items means you can construct the build faster, and it also gives you fewer headaches when it comes to character calibration.
The only items that might cause problems at league start are the amulet and the boots, but we have plenty of cheap alternatives for those!
For the league start scenario item progression, scroll to the bottom of this page.
The setup should look something like this:
| Item Slot | Item Name | Rarity | Notes |
| Head |  Fractal Thoughts Fractal Thoughts |
Unique | |
| Amulet |  Astramentis ( Astramentis ( Hyrri's Truth for budget) Hyrri's Truth for budget) |
Unique | If you are using  Hyrri's Truth, do not enable the level 30 Precision Aura! Hyrri's Truth, do not enable the level 30 Precision Aura! |
| Chest | Crafted Rare Body Armour (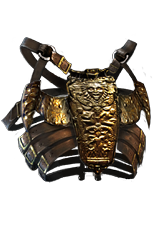 Briskwrap for budget) Briskwrap for budget) |
Rare | Check the Crafting Guide to learn how to make and avoid overpaying! |
| Gloves |  Hrimsorrow Hrimsorrow |
Unique | |
| Boots |  Garukhan's Flight (Rare Boots with T1 Dexterity, Life and Movement Speed for budget) Garukhan's Flight (Rare Boots with T1 Dexterity, Life and Movement Speed for budget) |
Unique | |
| Belt | %Increased Dexterity Synthesised belt ( Stygian Vise with T1 Dexterity, Life, and Resistances for budget) Stygian Vise with T1 Dexterity, Life, and Resistances for budget) |
Rare | Check the Crafting Guide to learn how to make and avoid overpaying! |
| Rings | 2x %Increased Dexterity OR flat Dexterity Synthesised rings (Rare Rings with T1 Dexterity, Life and Resistances for budget) | Rare | Check the Crafting Guide to learn how to make and avoid overpaying! |
| Weapon |  Iron Commander Iron Commander |
Unique | |
| Quiver |  The Poised Prism The Poised Prism |
Unique |
Read the gear page for details on all these items!
Ascendancy, Bandits, and Pantheons
The Ascendancy, Bandit, and Pantheon Power page goes into detail about all the choices you need to make in these regards.
Map modifiers & Eater of Worlds altars
The following script is the Siege Ballista REGEX filter: “!gen|tal d|s rec”
(No Regen, Low Recovery Rate & Elemental Reflect)
[TIP] The build can do all map modifiers if you do the following:
1) For No Regen swap  Inspiration Support with
  Lifetap Support gem. This will allow you to summon totems by spending Life instead of Mana. When Life gets lower (as you summon totems) you will use your Life Flask to bring it back up.
2) For Low Recovery swap  Inspiration Support with
  Lifetap Support gem. Just know that if you take too many “map explicit modifier” Atlas nodes, your less recovery rate can exceed 100, and you will not regen at all. Life Flasks will no longer heal you!
3) For Elemental Reflect know that  Awakened Elemental Damage with Attacks Support support gem (at Level 5 or higher) allows your totems to become immune to Elemental Reflect. However, you are not! Your
  Manaforged Arrows Support setup will trigger
  Frenzy and you will instantly get one-shot! The quick fix is to remove
  Manaforged Arrows Support from the bow setup for that particular map, and you will be fine. Also know that this build can do Elemental Reflect maps even without the
  Awakened Elemental Damage with Attacks Support support gem. Just keep resummoning your totems as they die!
For the Eater of Worlds altars you will need to avoid “% less recovery rate for each Endurance Charge” modifier. This is because we have 4x Endurance Charges up at all times, which can be very punishing for us. A quick fix is to swap the  Inspiration Support with
  Lifetap Support gem. You can do this if you have a valuable altar (Like a Divine Orb altar)!
Common Mistakes
- Not taking Dexterity on rare items (most common problem).
- Not having 20% quality on the Siege Ballista skill gem (this is a significant DPS loss!).
- Using a low-level Siege Ballista skill gem.
If you use a low-level gem, you deal Low DPS, and your totems die fast. - Not unlocking the labs.
You should not enter the mapping phase without completing the first three labs.
There’s a big reason we picked Hierophant for this build concept! - Not taking the “Point Blank” Keystone / not using a “Sleepless Sentries” Medium Cluster Jewel.
Tip: Buy one with 4 or 5 passives – it will save you 1 skill point! - Not using the right flasks / Not using the bow setup correctly (to summon the Golem and curse with Frostbite).
- Not having elemental resistances capped during the mapping phase.
League-start leveling progression
You can find an optimized Path of Building ( PoB ) for League Start progression here.
*Every build I release will use the community fork of Path of Building. You can find PoB’s Fork by LocalIdentity through this link.
If you’re new to Path of Building, we have a guide available here.
If you’re completely new to Path of Exile 1 and know little about the game, I highly encourage you to check this out our Beginners Guide to Path of Exile.
This is a great league starter – it can take you from nothing to T16 maps quickly with minimal currency investment. I’ve been league starting with this build for more than five years in a row!
Here is the latest guide on “How to start a league with Siege Ballista”:
Here you can see me leveling a Templar from scratch. Acts 1–3 are the most problematic, but once you switch to EA Ballista, everything becomes easy!
For league-starting with Siege Ballista, we’ll go through three simple transition phases (If you’re new to the game, I highly encourage you to watch the video guide. This is because it visually walks you through the entire process for each phase).

[TIP] Do not stress too much regarding your items. I’ve adapted this starter to be as simple and easy as possible.
Check the following note and make sure to watch the league start guide once!
Acts 1 – 3 ( Skill Tree: Use Act 1 – 3 LEVELING [HF TOTEM] )
First Town: Buy  Purifying Flame (Complete the quest “Breaking Some Eggs,” then go back to town).
Buy  Holy Flame Totem. This will be your main skill until you reach Act 3 (Library), at which point you’ll transition to Explosive Arrow Ballista.
Main setup:
-  Purifying Flame (Drop this skill gem once you get the “Ancestral Bond” keystone. Refer to the “Tree” and “Skills” sections in the PoB).
-  Holy Flame Totem +
  Combustion Support +
  Elemental Focus Support
-  Flame Wall (When projectiles pass through these walls, they gain added fire damage. You can summon up to 3 walls at a time!)
Utility:
-  Frostblink
-  Flammability (Curse enemies with Flammability to deal more damage.)
Auras:
-  Clarity
-  Herald of Ash
TIPS:
It’s okay to have low-quality items in the early Acts!
In Acts I–III, items with multiple links and sockets are more valuable than raw stats.
You will want to use two sceptres or two wands. We will not use a shield in this phase.
When picking up gear in Acts I–III, look for stats that boost your damage, such as:
- % increased spell damage
- % increased fire damage
- +# to Level of all Fire Skill Gems
- Adds # to # Fire Damage to Spells
*You can gamble for weapon upgrades with the gold that you find. Each town has a vendor that gives you an option to gamble.
Acts 3 – 10 + Early mapping (white and yellow maps) ( Skill Tree: Use Act 3 – 10 LEVELING [EA BALLISTA] )
Once you reach the Library in Act 3, you should buy this setup for the next Acts and early mapping until you reach approximately level 78.
You will need to level up your gems after buying them — go to “The Docks” and kill some monsters there.
Main Setup:
-  Explosive Arrow
-  Ballista Totem Support
-  Elemental Damage with Attacks Support
-  Lesser Multiple Projectiles Support [Read!] In Patch 3.28 Mirage League, this gem has been renamed into: multiple-projectiles support! (same cost, same effect; just a different name)
- If you get your hands on a 5-link and decide to push red maps with EA Ballista, feel free to add
 Inspiration Support or
  Combustion Support.
Utility:
-  Frostblink
-  Steelskin +
  Automation
-  Flammability (Curse enemies with Flammability to deal more damage.)
-  Frenzy +
  Manaforged Arrows Support (Optional Setup)
Auras:
-  Clarity
-  Precision (After completing the campaign, swap
  Precision for
  Purity of Elements!)
TIPS:
Check vendors for a 4-link item with 2 green and 2 red sockets. If you can’t find one, go to a trade website and buy an item with these links (should be cheap).
Avoid using a 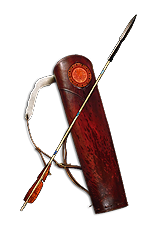 Penetrating Arrow Quiver since it grants pierce. This quiver is a very common drop during the campaign. You don’t want any pierce effects!

Buy a Siege Ballista skill gem and socket it in your weapon setup (Setup 2) so it levels up for the transition to the Siege Ballista build (minimum level 15).
Apply quality to the  Siege Ballista gem using the Lab’s Forges!
Complete all three Labyrinths before mapping:
- First Lab — Do it somewhere in the middle of Act 4 (allocate Pursuit of Faith)
- Second Lab — Do it somewhere in the middle of Act Act 8 (allocate Ritual of Awakening)
- Third Lab — Before killing Kitava in Act 10 (allocate Convocation of Power)
Your main stats to prioritize:
Dexterity, Maximum Life, Elemental Resistances
For rare items (during the Explosive Arrow Ballista phase), look for:
Attack Speed, Increased Elemental Damage with Attacks, Increased Fire Damage
The last thing that you need to know for this phase is that the best-in-slot weapon you can use is this unique bow:  Quill Rain.
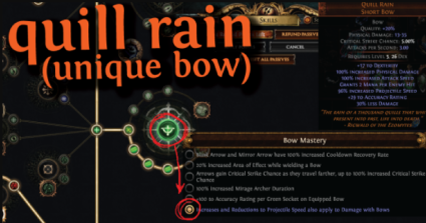
Make sure to take the mastery that converts % Projectile Speed into % increased Damage once you reach it. This cheap bow alone will carry you on easy mode to yellow maps / early red maps. This is a pretty common unique bow!
Another great unique item you can use during the Explosive Arrow Ballista phase is the  Skirmish quiver. It grants you one additional totem and helps with Intelligence, mana regeneration, and accuracy. Plus, it’s a very cheap quiver!
Siege Ballista Transition
(Open the PoB from the Siege Ballista build guide and continue from there!) 👉 The Siege Ballista PoB is here .- You will transition at level 78 minimum (There’s no need to rush the transition – my EA setup can carry you easily all the way to T16 maps!), when you have all the mandatory items prepared and a
 Siege Ballista skill gem that is at least level 15 with 20% quality.
 - When you transition, pay close attention to the skill tree, as we will be unallocating certain nodes at the top.
- Do not rush the Siege Ballista transition! You should have minimum 1000 Dexterity upon the early Siege Ballista transition! (If you have lower, please re-check your items, the PoB, or the “Common Mistakes” section).
If you’re new, the league start guide includes a timestamp that clearly shows, step by step, how to transition from Explosive Arrow Ballista to Siege Ballista. Good luck!
REMINDERS FOR THE SIEGE BALLISTA TRANSITION! The next 5 items are mandatory.
Helmet:  Fractal Thoughts
Bow:  Iron Commander
Chest:  Briskwrap (5-linked!)
( Siege Ballista =
  Faster Attacks Support =
  Added Cold Damage Support =
  Inspiration Support =
  Elemental Damage with Attacks Support)
Quiver:  The Poised Prism
Gloves:  Hrimsorrow
You also need these:
Amulet: For budget purposes, we will be using  Hyrri's Truth (Do not enable the Level 30 Precision aura provided by this amulet, as it will disable one of your core auras.)
Boots: Rare Boots with T1 Dexterity, some Life and Movement Speed
Rings: Rare Rings with T1 Dexterity, some Life, and Resistances
Belt:  Stygian Vise with T1 Dexterity ( Roll with one
  Deafening Essence of Sorrow )
Make sure to follow the skill tree exactly as it’s shown in the PoB!
Skill Gems for the Early Siege Ballista Transition
Main Setup (Chest):
 Siege Ballista (must have 20% quality)
 Inspiration Support
 Elemental Damage with Attacks Support
 Added Cold Damage Support
 Faster Attacks Support
You will need a level 15+ Siege Ballista skill gem with 20% quality. You can naturally reach 20% quality while completing your Ascendancy Labs.
Utility Skills:
 Dash +
  Second Wind Support
 Frenzy +
  Manaforged Arrows Support
 Frostbite (Cast manually for now)
 Steelskin +
  Automation
 Blood Rage
Auras:
If you’re still curious about how well this build performs in league start scenario conditions, you can check out my “Zero to Hero” progressions. At league start, I always fully unlock my Atlas by day 3. This is the main reason I always league start with this build. In these “Zero to Hero” playlists, I provide daily summaries of my character’s progression, along with tips, reminders for the players following along, and a PoB. Towards the end, you have gameplay footage for that specific day.
- You can see my “Zero to Hero” for Mercenaries league HERE
- You can see my “Zero to Hero” for Settlers of Kalguur league HERE
- You can see my “Zero to Hero” for Necropolis league HERE
- You can see my “Zero to Hero” for Affliction league HERE
- You can see my “Zero to Hero” for Trial of the Ancestors league HERE
Twink Leveling
If you already have some currency and want to level up a Templar very quickly, I highly encourage you to use my universal power-leveling method. You’ll finish the campaign fast while having fun and playing in a relaxed way. There’s just one transition at level 20 (Act 2), which will carry you all the way to Act 10. So you won’t need to stress about constantly changing items and gems as you progress through the acts!
Here is the latest guide on my Universal Power-leveling method:
Good luck! This will become your best build. It’s Fun, cheap, and bery effective!


 Grace
Grace