 Druid
Druid Oracle
 Shaman
 Huntress
 Amazon
 Ritualist
 Spirit Walker
 Mercenary
 Gemling Legionnaire
 Tactician
 Witchhunter
 Monk
Monk Acolyte of Chayula
 Invoker
 Martial Artist
 Ranger
 Deadeye
 Pathfinder
 Sorceress
 Chronomancer
 Stormweaver
 Disciple of Varashta
 Warrior
 Smith of Kitava
 Titan
Titan Warbringer
 Witch
Witch Blood Mage
 Infernalist
 Lich
Lich Abyssal Lich


In this build, we are going to Shapeshift next to our Companion and rampage through maps together like a couple of kaiju with screen-wide clear. Then toast any bosses unlucky enough to get on the wrong side of our Beast’s millions of Ignites DPS.
This aims to be the smoothest possible entry into the Infernal Legion (“IL”) Beast archetype, which is consistently one of the stronger endgame minion builds. We’ll level with minions from the start, using a tried-and-true Skeletal Snipers approach until we finish the campaign and realign to pure Beast damage. With a focus on minion life, our pet is almost unkillable – and we’ll match it as a high-armour, high-recovery juggernaut who can safely run through virtually all content.
Strengths and Weaknesses
- Essentially one-button clear, plus the occasional mobility skill for extra speed. Clears T16 maps, 200% Delirium, etc.
- Crushes bosses under the power of the Beast, dealing huge damage over time amplified by your debuffs. Can kill all Pinnacles.
- Leverages layers of damage mitigation and regeneration to be very tanky. Hardcore viable.
- No strictly required unique items or exotic items. Viable for Solo Self Found and League Start.
- Plays minions from the very start of the campaign.
- Transitioning out of Skeletal Snipers into the Beast takes considerable respecing and regearing.
- To get the most freedom with passive points, you’ll need a Catha’s Brilliance lineage support gem.
- Without enough attack/action speed, Oil Barrage can feel clunky.
- Catching a Tamed Beast with the most powerful mods takes time and luck.
- The downsides of the Lord of the Wild keystone makes your Spirit very limited.
Build Mechanics
Our version of the build on the patch before writing this came with a combined three hours of accompanying video between the comprehensive main guide and the deep dive. The majority of that information is still relevant, and the playstyle of that build (pure energy shield, crossbow instead of shapeshifting) is still very viable as an alternative to this variant. For literal hours of content covering mechanics and theory of IL Infernalist, you can watch those as a supplement to this guide.
Offense
 Infernal Legion II, or the upgrade
  Catha’s Brilliance, is a support gem for damageable minions that lights them on fire. They will burn for a percentage of their maximum life, while also radiating that burn as damage in a small area around them. Minion life can grow so large that it is a wonderful foundation to scale, giving us very strong ailment damage for very little investment.
Using the  Tame Beast skill to turn an enemy Rare monster to our side as a
  Companion, we’ll carefully choose the best types of monsters and types of Rare Monster Modifiers. With recent buffs to these Beasts they get extremely strong in the endgame, so combined with the free power from Modifiers, they are perfect IL minions.
IL can cook bosses quite easily, especially if we help amplify the beast’s damage with our many debuffs. But the small area of the burn makes it slow to clear maps on its own. So we will spread the damage for our pet by covering the whole screen in flammable  Oil Barrage. Once ignited, the oil will spread the IL burn everywhere, letting us clear about as fast as we can run and
  Pounce.
Defense
We build into both Armour and Energy Shield (“ES”), an underplayed hybrid style which Infernalist is adept at. Armour investment mainly defends against physical damage, but it can also be made to apply to Elemental, and even some Chaos damage. Against small enough hits we will take no damage at all, and larger hits will hurt less. Wearing  The Mutable Star often lets us almost double the effect of our Armour.

ES gives us a buffer to absorb what damage does come through the armour, and to keep that buffer full we take the Zealot’s Oath: a keystone on the passive tree that allows excess life regeneration apply to our ES. The keystone prevents ES from ever recharging, but we have more than enough regeneration to make the trade-off worth it. This avoids all the ES recharge nerfs in patch 0.5, and it also means our ES can refill during combat without having to wait for a recharge period!
Ascendancy
The Infernalist Ascendancy
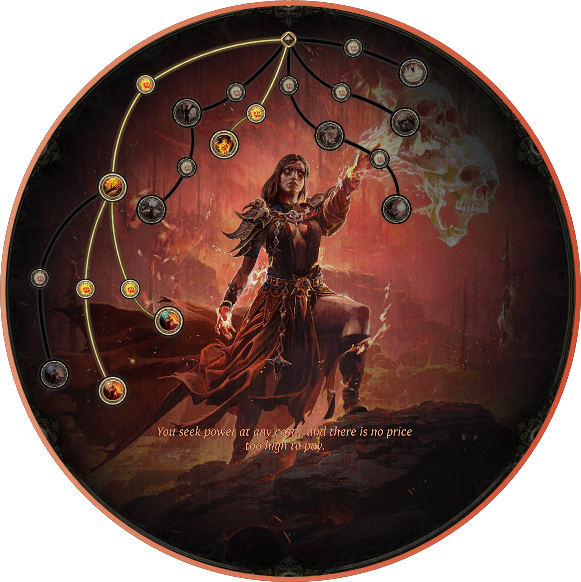
The Infernalist is a comfortable, easy-to-start Ascendancy for minions. It has one of the smoothest transitions into Infernal Legion; its excellent location on the tree is well-positioned to start minions from the very beginning of the game. She has a unique ability to simplify the process of Taming powerful Beasts, which removes one of the main struggles of that archetype. Defensively, she also has a unique ability to split damage types into smaller parts, giving enormous value from Armour. Her ability to convert Life into Energy Shield enables us to combine that with Armour for hybrid defenses, giving us high mitigation and raw life pool.
Some other classes manage to be stronger offensively by the endgame, but they are more complicated to put together. Whereas this build is extremely forgiving and suitable for any experience level with minions, or the game in general.
Loyal Hellhound
This first node gives us the Summon Infernal Hound skill, which creates a burning minion that costs no Spirit. Any enemy the Hound walks up to will quickly be ignited and set off our Sniper’s gas arrow explosions, making the Sniper phase of the build much smoother. The Hound’s burn is only a fraction as powerful as a Tamed Beast’s burn, so later in the game, we will refund this node.
Altered Flesh
By moving twenty percent of Physical, Lightning, and Cold damage types, Armour calculations become more favorable. The smaller a hit is, the better Armour performs. The 20% on its own may be completely mitigated to zero in some cases, and mitigation of the remaining 80% will be much more effective. Also taking some Physical as Chaos damage, which bypasses our energy shield, will help spread the incoming damage more evenly.
Bringer of Flame
For Infernal Legion, this is the main trick up our sleeve. Taking this node will let any Extra Damage types improve the burn of our minion. This greatly expands the possible combinations of Rare Monster Modifiers we can use, since we’ll get a 40% damage boost from each of Extra Fire, Cold, Lightning, and Chaos. In the best-case scenario, we get three of these for 120% extra damage, Infernalist is the only class that can use a triple extra beast for IL effectively.
Beidat’s Hand
This node helps shift some of our investment in life to Energy Shield, which can then be scaled by modifiers on the tree. This will help give us a comfortable cushion of ES, despite our having no pure ES equipment.
Beidat’s Will
This node will help us mitigate some of the severe penalties to Spirit that the Lord of the Wilds keystone gives us. Like Beidat’s Hand, we reserve life to convert that into Spirit. Giving us a little more flexibility in our spirit reservation.
Passive Tree
Transitioning out of the  Skeletal Sniper Minion early leveling tree, we’ll drop any passives that give us Minion Attack/Cast Speed, Minion Area of Effect, and especially all the passives that boost Command skills. None of those will help our Tamed Beast; instead, we are going to stack raw Minion Damage and Life. We also value Minion Movement Speed quite a lot since the faster our wasp gets to its targets, the faster they’ll burn, so we take Relentless Fallen plus you can Instill the Bond of the Cat cheaply. There are a few Companion-focused nodes in our area, we’ll take some of these as well.
This build is attribute hungry, keep that in mind. The skill tree above has all travel nodes allocated as dexterity, but that should change to whatever you need. Depending on what types of attributes you roll on your gear, and where you are with your gem levels, you will have different needs from the tree’s travel nodes.
To move into our final form (shapeshift pun intended), we are looking to reach the keystones Lord of the Wilds and Zealot’s Oath as soon as we can.
Lord of the Wilds will let us hold a sceptre while we are shapeshifted, sceptre stats give us a massive amount of damage since we are going to spend most of our time shapeshifted, this is important. The cost to take this keystone is steep, half of our spirit and making non-minion spirit gems much harder to reserve. Nonetheless, the payoff is worth it to clear at full power.
Zealot’s Oath is the critical tool for recovering our ES even in the middle of combat. The keystone will cost us the ability to Recharge our shield, but again the payoff is worth it. We won’t need to invest in any Recharge and can double dip off our Life Regeneration instead: most of which comes from our gems not the tree, saving passive points.
Until you get Catha’s Brilliance you will need to dedicate a large part of your tree to keeping your minion alive through it’s own burn. The keys for this defense are Vile Mending, Crystalline Flesh, Living Death, and the small fire nodes next to Regenerative Flesh. A  Heart of the Well with a high percentage of minion life regeneration might also help replace some of those passives. Without enough fire resistance and regeneration Infernal Legion II will often kill your beast, which is not game-ending but does add very annoying downtime while you wait for it to respawn.
Once you have Catha’s Brilliance you can reallocate your points away from these defences. Streamlining our pathing we’ll shift towards the outer edge of the tree to extend our reach. We’ll also remove the less efficient minion nodes at the start of our path, instead taking attributes and Pure Energy.
Mostly we will put the new freed up points into more defense. Adaptive Skin, Dominus’s Providence, Bhatair’s Storm, Enhanced Barrier. Getting Thickened Artiries and the small nodes leading to it will improve the rate we regenerate while standing still, pairing nicely with our Concentrated Ground and ally’s healing aura strategies.
Weapon Set Two – Four of our points on this set will go towards getting Stripped Defences, picking up the two small exposure effect nodes on the way. We use  Frost Bomb on this weapon set, which will get the flat -5% resistance and as much increased exposure effect as
  Potent Exposure… Another four points will go towards getting Howling Beast (how apt!); this will let us apply Critical Weakness with our warcries so our IL burn can critical. Because we have this warcry route, we don’t need to use an Omen Sceptre for its aura.
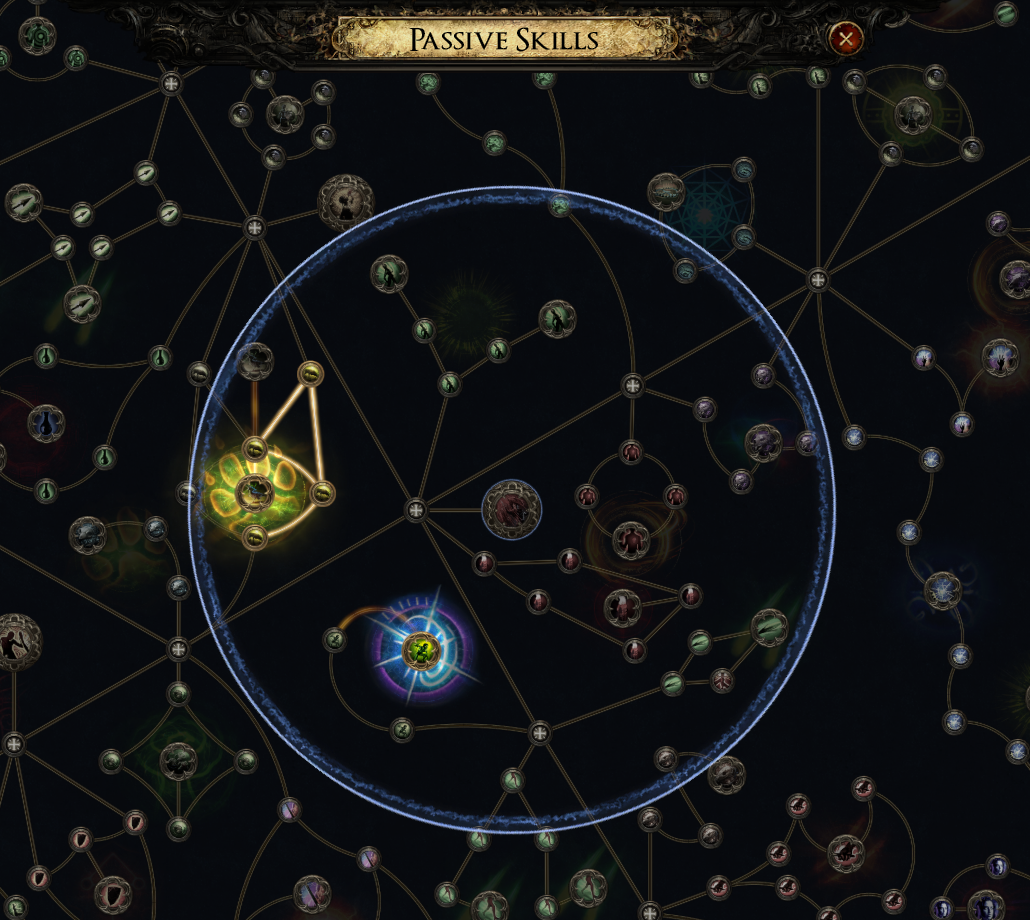
Weapon Set One – We are always shapeshifted on this weapon set, so our first point will go to getting Rallying Form and giving our companion Onslaught. Another point can be put into the valuable small node just past the notable. Three more points can be sunk into getting Hide of the Bear, tanking us up while in animal form. Lastly, we get Primal Growth for more area of effect on our Oil Barrage.
 From Nothing – Unable to demonstrate this on the passive tree tool; but you can finish off your tree by socketing a copy of this jewel with the affix “Passives in Radius of Crimson Assault can be Allocated without being connected to your tree”.
This allows us to pick up Nourishing Ally and Multitasking, as well as the valuable small companion nodes in range.
Skill Gems, Support Gems, and Spirit Gems
After you switch from the Sniper Earlygame set into Infernal Midgame set, your further progression filling out support gems is shown in the Catha’s Endgame set.
Companion: Plague Harvester
The key to the whole build is taming a beast that has elemental/chaos Extra Damage mods, at least one but ideally three. To help make catching a beast easier I suggest at least starting with a Plague Harvester – which is an oversized wasp which you can efficiently catch in the Interludes, see this short video explaining the process. You can always catch a more wild beast later as you play through the atlas.
The wasp is a speedy minion with a lot of quality of life, it can fly over most terrain and has an aggressive personality, it also has a great dive bomb skill to light large areas on fire quickly. The wasp does not have the highest Life, and we use Life to gain our damage, so it’s important to have rare mods to empower it. We could talk at length about the rare mods and their relevance to IL; the TLDR is besides the extra damage, you mostly will want utility (Temporal Bubble, All Damage Shocks, Stuns) or survival (Regenerates Life, Fire Resistant, Elemental Resistance Aura) modifiers. Avoid mods that create explosions, like volatile crags or explodes corpses.
Your goal is to replace Infernal Legion II with Catha’s Brilliance as soon as you can. Until you do, you will need to take minion Elemental/Fire Resistance and Maximum Resistance nodes across the Skill Tree. Catha’s does no burn damage to your beast so once you get it, you will be able to spec out of these defensive nodes and get more reach across the tree.
 Scouring Flame and
  Searing Flame II do about the same damage as each other, pick whichever you prefer. If you don’t have Gigantic Following on the tree you will want to socket
  Hulking Minions support for a lot of health and damage.
  Feeding Frenzy II is some of the most effective damage we can get on a single minion, and worth the downside. The strongest final support is
  Concentrated Area, but you might prefer
  Minion Mastery.
Oil Barrage
This skill is our secret to speed clearing; spitting oil as you run sets up your companion for sets up wild fire chain reactions. The minion has to ignite an enemy standing on the oil to start the fire, once that happens the whole slick will burn as will any slicks that touch it.
Getting a high attack speed and/or skill speed is important to make this skill feel smooth, focus on the attacks persecond when choosing a talisman!  Rapid Attacks III will help quite a bit as well.
Oil Barrage naturally shoots a series of projectiles at once, unforunately these pile up on top of each other which is not what we want for oil coverage. Socketing  Nova Projectiles I will separate them, shooting one to wherever our mouse is targeting and the rest out to our sides. You can use Nova Projectiles II which adds more projectiles for better area saturation, but the cooldown might feel too awkward for most players: Try it out.
The oil puddles will merge with  Encroaching Ground and project your burn far ahead of you. If you find you move too fast for Prolonged Duration to be worth it, you can use
  Multishot II to improve saturation around you instead of ahead of you.
 Magnified Area II,
  Salvo, and
  Hit and Run are all considerations for your final support slot. This comes down to player preference so you may want to try each of them out.
 Purity of Fire
This can be any of the three elemental Purity auras, use whatever has the best sceptre affixes and don’t concern yourself too much with the type.
The Lord of the Wilds keystone makes it hard for us to reserve many support gems on our persistent skills. The Purity family of auras has a unique ability to remove the cost of support gems, so it’s an important way for us to sneak in  Upwelling II,
  Vitality II, and more.
You can use a Perfect Jeweller’s Orb on your sceptre to unlock all five support sockets, if needed.
Pounce
Pounce is a great mobility tool, helping us move across the map and over obstacles quickly. Going into wolf form gives us the passive ability to get +30% movespeed when we run on all fours, giving us an alternative to Sprint in which we can’t be tripped. Rapid Attacks III helps improve the responsiveness of our leap.
We socket  Sniper’s Mark in so that we can apply this when we jump on top of a boss. Because we have Charged Mark support, when we next crit the boss it will drop shocked ground. Besides providing a 20% increased damage taken to any enemies standing on the shocked ground, this should also trigger the socketed Stormfire support which will scale the IL burn quite a lot.
Pounce can socket Holy Decent which will create Consecrated Ground, which will let us regenerate 5% of our life per second. This is perfect for us to keep our ES full, keep this in mind and use the leap defensively if you need triage.
 Spearfield
To understand why we use Spearfield we need to understand  Saitha’s Spear. Hits with this spear are the only source in the game, currently, of Aggravating Ignites. Like Aggravating Bleeds, this will make the ailment do 100% extra damage. Getting this huge scaling on our IL burn is one of the most efficient ways to boost it.
To get this to trigger we need to Aggravate a Bleed on our target, which the spear has a built in chance to do on hit. A dense Spearfield hits dozens of times, quickly enabling our extra damage.  Bleed III helps ensure every hit bleeds, increasing the likelihood follow-up hits will have a bleed to aggravate.
 Rage III and Rapid Attacks III are just to help improve the rate at which we get spears out,
  Rearm II can optionally improve the amount of hits you get out of every field. To save on jeweller’s orbs, you can delay adding some or all of these.
We have Inexorable Critical II just to combo with Sniper’s Mark, with so many spears the odds of triggering the mark with a crit is quite high. All the more so if our warcry has applied Critical Weakness.
 Devour
The main reason we use Devour is for the very very solid regen it provides. This is one of the fastest ways to refill your Life, and ES, provided there are enough snacks around to power it. Giving you the ability to cull is sometimes a useful bonus.
Devour is a slam so can socket  Holy Descent, which will create Concentrated Ground when you land. Another source of this alongside Pounce helps improve the odds of having Ground around to heal you.Rapid Attacks III lets us quickly jump in for a cull against a boss to end the fight sooner, and improve our mobility. You can sometimes use the Devour jump as a second Pounce, if given a target.
The rest of the supports are mostly optional quality of life.
Frost Bomb
Reducing the Fire Resistance of targets is important to keep them from, well, resisting our beast’s fire damage. Elemental Exposure is a quick way to reduce that Resistance.
The Exposure that Frost Bomb inflicts is very strong compared to most other sources of Exposure, such as the weak Exposure from Oil Barrage. Using Potent Exposure support will make it even stronger.
Overabundance gives you a limit of two orbs, and Spell Echo casts both of these at once. The overlap will double the rate at which exposure builds up on your target. Cooldown recovery will allow you to have just about full uptime.
Cold Mastery will let your Level 17 gem expose enemies of all levels, this helps you avoid raising the gem’s intelligence requirement. Remember to max the quality of this gem.
 Elemental Weakness
To further reduce the Fire Resistance of our enmies another standard route is hexing.  Heightened Curse will boost the curse magnitude, getting more bang for your buck.
 Cursed Ground support will give you two zones you can place to afflict targeted areas.
  Ritualistic Curse will make these zones larger, and
  Prolonged Duration II will let you cast less often to maintain them.
 Cold Mastery will let your Level 17 gem curse enemies of all levels, this helps you avoid raising the gem’s intelligence requirement. Remember to max the quality of this gem.
 Infernal Cry
We take the Howling Beast notable on one of our weapon sets, this lets our Warcries inflict three stacks of Critical Weakness. Critical Weakness will get a base critical strike chance to IL, the higher the stacks of Weakness, the higher the chance – it maxes out at twenty stacks, which is a 10% chance to crit. Since crit is a separate scaler to all the other damage we’ve been doing, it can be very effective to boost damage vs strong bosses.
Use  Echoing Cry support to hit three times total per cry, giving nine stacks. Use
  Second Wind III to be able to cry again ignoring cooldown, getting you close enough to the max stacks. Use
  Astral Projection to be able to target from a safe distance, and Magnified Area II to increase the accuracy. Prolonged Duration II will make the stacks last longer.
 Spectre: Vaal Embalmed Bearer
Since Lord of the Wilds makes it hard to use non-minion aura skills, we are going to use a minion who has it’s own aura! The Vaal Embalmed Bearer has an aura around it that will heal you for a significant amount of your life per second.
You can find and bind this enemy in The Molten Vault, Act 3. See more info about at it’s page on The Spectre Wiki.
Support it with  Brutus’ Brain to make sure it stays alive: if you don’t have access to that then use
  Meat Shield II and other defensive minion supports. Use Magnified Area II to improve its aura range.
Tame Beast
If you have a free skill slot to place this, it is useful to have equipped and ready to use – in case you see a rare you want to catch in the wild and need to grab it before your minion burns it to death! You may need to use an unset ring to slot this. Prolonged Duration II will slightly improve your taming window.
Gameplay Style and Skill Rotation
Endgame Clearing
- Tap Oil Barrage to shoot oil forward, ideally using Pierce III to splash through multiple packs at once. Nova Projectiles I will spread extra oil around you, and Encroaching Ground will help quickly cover the entire area.
- Pounce is a great mobility tool to move you through the map faster. Rushing forward will encourage your Beast to follow you, igniting enemies faster and improving your clear speed overall.
- And remember, while in wolf form you drop to all fours gaining 30% increased movement speed, when not springing.
- If needed as you travel, keep your Energy Shield and Life full by getting some fast food with Devour. Both that and Pounce can create Consecrated Ground, take a rest stop on this to heal. And the aura of your Spectre: Vaal Embalmed Bearer will also heal you.
- If you encounter a very tanky enemy while clearing, you can start up the bossing rotation on it to speed up the kill. In stationary encounters, keep oil coverage up and deny the area with Elemental Weakness cursed ground and a forest of Spearfield spikes.
- Upwelling II support gives your minions 50% increased Damage, but only while you are not on full mana. Try to use enough skills as you travel so you keep your mana below full, if you want this bonus.
Endgame Bossing
You can just let the Beast kill the boss while you focus on dodging, if you want. However to speed up the process we should be able to quadruple our damage output with the following utilities.
- Before the Boss spawns, cast Elemental Weakness and spam out several Spearfield on their expected location.
- As soon as the Boss spawns, drop Frost Bomb and Infernal Cry on them to apply a strong Exposure and stacks of Critical Weakness.
- Pounce on the boss to mark them with Sniper’s Mark, setting up for Shocked Ground and Stormfire support.
- Reposition if needed, then keep hitting them with Spearfield until you see the mark get consumed. Apply a second application of the warcry if Echoing Cry has finished repeating.
- The boss is usually dead by now, but if it has an invulnerability phase or the like, repeat the rotation as needed.
- Cull the boss with Devour when you can to end the fight faster, and because it looks awesome.
- If you are undergeared/leveled and the boss is not killed right away, focus on dodging and occasionally reapplying what debuffs you can as you see them expire, with an emphasis on Spearfield.
- Cull the boss with
Gearing
Core Unique Items
Saitha’s Spear – When combined with Spearfield and Bleed III you can reliably apply Bleed, Aggravate it and the Ignite from your Beast, and effectively double your damage! This is the most impactful single item, a priority to find or buy.
On trade, you should eventually buy a Twice Corrupted version with the “Hits with this Weapon have Culling Strike against Bleeding Enemies” affix. Make sure it still has both aggravate affixes, ideally you want to replace the fire damage modifier. Getting a second augment socket would also be ideal.
The Mutable Star – This is an extra payoff for building into hybrid Energy Shield and Armour. With all of our regen we are usually at about full Shield, which lets us defend with nearly 100% More Armour. This is an inexpensive way to double our Armour, and has a level requirement of just fifty.
On trade, for the best flexibility, eventually upgrade into one with three or even four augment sockets.
Equipment Table
| Slot | Base | Prefix Priorities | Suffix Priorities |
|---|---|---|---|
| Main Hand (Set 1) | Saitha’s Spear | 1. % chance to Aggravate Bleeding on Hit | |
| Off Hand (Set 1) | Rare Shrine Sceptre | 1. Allies deal % increased Damage while in your Presence 2. % increased Spirit 3. % increased Spirit / +# Maximum Mana | 1. +Level of All Minion Skills 2. Minions have % increased Maximum Life 3. Minions have % increased Magnitude of Damaging Ailments |
| Main Hand (Set 2) | Rare Fang Talisman or Familial Talisman (Exceptional Bases are very valuable) | 1. Companions deal #% increased Damage | 1. % increased Attack Speed 2. Strength and/or Intelligence |
| Off Hand (Set 2) | (Your single Sceptre is used on both sets) | ||
| Helm | Rare Str+Int Helmet | 1. % increased Armour and Energy Shield 2. # to Armour, # to Energy 3. +# Maximum Life | 1. +Level of Minion Skills 2. % Resistances as needed 3. # Attributes as needed 4. % of Armour also applies to Elemental Damage |
| Body | The Mutable Star (Extra Augment sockets are very valuable) | 1. % increased Armour and Energy Shield | |
| Gloves | Rare Str+Int Gloves | 1. % increased Armour and Energy Shield 2. # to Armour, # to Energy 3. +# Maximum Life | 1. % Resistances as needed 2. # Attributes as needed 3. % of Armour also applies to Elemental Damage |
| Boots | Rare Str+Int Boots | 1. % increased Movement Speed 2. % increased Armour and Energy Shield 3. # to Armour, # to Energy 4. +# Maximum Life | 1. % Resistances as needed 2. # Attributes as needed 3. % of Armour also applies to Elemental Damage |
| Belt | Rare Plate Belt | 1. +# Maximum Life 2. +# to Armour 3. Minions have % increased Maximum Life | 1. Resistances/Attributes as needed 2. +Level of All Minion Skills 3. Minions have % increased Movement Speed |
| Ring 1 | Rare Ring (Resistance Base) | 1. +# Maximum Life 2. Minions have % increased Magnitude of Damaging Ailments 3. Minions have % increased Maximum Life | 1. % Resistances as needed 2. # Attributes as needed 3. % increased Rarity of Items found |
| Ring 2 | Rare Ring (Resistance Base, or an Unset Ring if you want a skill slot for Tamed Beast) | 1. +# Maximum Life 2. Minions have % increased Magnitude of Damaging Ailments 3. Minions have % increased Maximum Life | 1. % Resistances as needed 2. # Attributes as needed 3. % increased Rarity of Items found |
| Amulet | Rare Amulet (Spirit or Attribute Base) | 1. +# Maximum Life 2. % increased Armour 3. % increased Energy Shield 4. +# Energy Shield | 1. +Level of All Minion Skills 2. Resistances/Attributes as needed |
Anything Bolded is considered mandatory. Make sure that you are capped at 75% Elemental Resistances and meet all Attribute Requirements when you are changing gear pieces.
Color Legend: Anything in Green is an Abyssal mod, requiring specific Abyssal crafting using Desecration. Anything in Blue requires Runeforging, or using Alloys or Runic Crafting. Anything in Purple is either crafted at the Breach Genesis Tree, or is obtained with Altered Bones during Desecration Crafting.
Amulet Instilling Recommendations
Once you get to the endgame and progress a little ways down the Deleruim questline, you will unlock The Withered Hollow where you can instill your amulet with Liquid Emotions. Depending on the combination of Emotions you instill, you will unlock a different notable from the passive skill tree. This is an important way to reach a notable that is too far away to path to.
For this build, some notables to consider are:
- Envy, Ire, Ire: Bond of the Cat
- Companions have 20% increased Movement Speed
- 5% reduced Movement Speed Penalty from using Skills while moving
Bond of the Cat uses extremely cheap oils and gives your minion a lot of mobility, a recommended starting point.
- Ire, Greed, Disgust: Bond of the Mamba
- Guilt, Ire, Despair: Bond of the Owl
These both give your companion 12% damage as extra, Chaos and Cold respectively. Okay offense for the price.
- Isolation, Guilt, Greed: Captivating Companionship
- 5% of Damage from Hits is taken from your Damageable Companion’s Life before you
- 20% increased Armour, Evasion and Energy Shield while your Companion is in your Presence
If you are looking for more personal defense, this is solid. Removing 5% of the damage we take will help a little to make our armour more effective, plus we get more Armour and ES.
- Envy, Guilt, Isolation: Gigantic Following
- Your Minions are Gigantic
- 25% reduced Reservation Efficiency of Minion Skills
Taking this will let you replace Hulking Minions with a different support of your choice, but be warned it will also increase the cost of your Spectre, potentially making it too expensive to use.
- Fear, Fear, Paranoia: Warlord Leader
- Allies in your Presence deal 40% increased Damage
- 40% increased Presence Area of Effect
Warlord Leader is a balanced and popular notable for many minion builds and is good enough to last you all game.
Flask and Charm Recommendations
- Ultimate Life Flask
- Prefix: % of Recovery applied Instantly
- Suffix: Gains # Charges per Second
-
 Lavianga’s Spirits or an Ultimate Mana Flask with
- Prefix: % Increased Amount Recovered
- Suffix: Gains # Charges per Second
- Thawing Charm with
- Prefix: % Increased Duration
- Suffix: Gains # Charges per Second
- Stone Charm or Dousing Charm
- Prefix: % increased Duration
- Suffix: Gains # Charges per Second
- If you do not have max Chaos Resistance,
 Forsaken Bangle.
Otherwise, a Golden Charm with:- Prefix: % Increased Duration
- Suffix: % Chance to gain a Charge when you kill an enemy
Use Glassblower’s Baubles on flasks to improve their Quality. You could use a Vaal Orb on your charms to try to improve their quality, if you are feeling lucky.
Augment Recommendations
| Slot | Socketable |
|---|---|
| Main Hand | Greater Runes of Alacrity, up to x3 |
| Off Hand | Idol of the Sycophant Idol of Ralakesh Stoat Idol Primate Idol |
| Main Hand 2 | Greater Runes of Alacrity, up to x4 |
| Helm | Soul Core of Tacati (if you don’t have max chaos res.) Idol of Ralakesh Primate Idol |
| Body Armour | Panther Idol The Greatwolf’s Rune of Willpower Rune of Foundations Soul Core of Tacati (if you don’t have max chaos res.) Perfect Iron Rune |
| Gloves | Soul Core of Tacati (if you don’t have max chaos res.) Perfect Iron Rune |
| Boots | Farrul’s Rune of the Chase Soul Core of Tacati (if you don’t have max chaos res.) Perfect Iron Rune |
You may need to prioritize runes to cap elemental resistances or meet attribute requirements, none of which are listed. Bold socketables are considered mandatory and you should do everything you can to fit them in. Where multiple Socketables are suggested, they are listed in priority order.
Getting Exceptional bases and/or Corruptions will let you fit extra Augments: in this build extra sockets are especially useful in your body armour and both main-hand weapons.
Ancient Augment
You can only have one Ancient Augment in your build. These are usually expensive and are optional, but if you have the budget you could consider adding one of these:
- Tecrod’s Gaze in Body Armour: Regenerate 1.5% of maximum Life per second
- Guatelitzi’s Thesis in Helmet: Gain Armour equal to 35% of Life Lost from Hits in the past 8 seconds
- Amanamu’s Gaze in Body Armour: +2 to Armour per 1 Spirit
Aldur’s Legacy
When this sockable is placed in certain unique items, it will destroy that item and absorb some of that unique’s qualities. The resulting Legacy socketable can be placed in your items of a type matching what was destroyed. You will only be able to have a single one of these in your whole build and they are expensive, but if you can afford one consider:
- Legacy of Blackbraid: +50% of Armour also applies to Elemental Damage
- Legacy of Starkonja’s Head: 5% of Damage from Hits is taken from your Damageable Companion’s Life before you
- Legacy of Wanderlust: Your speed is unaffected by Slows
Raven-Touched Shard
Socketing this into your helmet will allow you to instill a passive tree notable on it, similar to instilling an amulet. If you have the budget consider if instilling one of the suggestions in the annointment section above is worth the cost.
Cadigan’s Epiphany
Dropping this into your gloves will destroy the augment sockets on it, in exchange you will get a jewel socket. If you have an abundance of strong Emeralds or other jewels, this can be a powerful upgrade.
Jewels
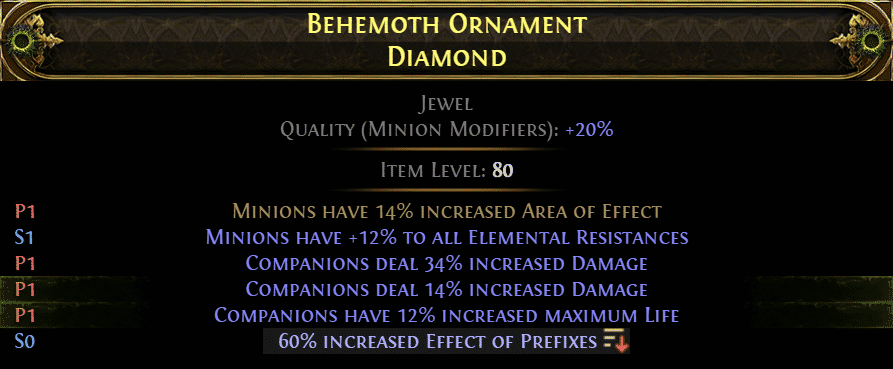
This build can leverage strong affixes on Emerald Jewels to scale your Companion Life and Damage, both useful for scaling the damage from Infernal Legion II or Catha’s Brilliance. Our key mods are:
- Companions deal % increased Damage
- Companions have % increased Maximum Life
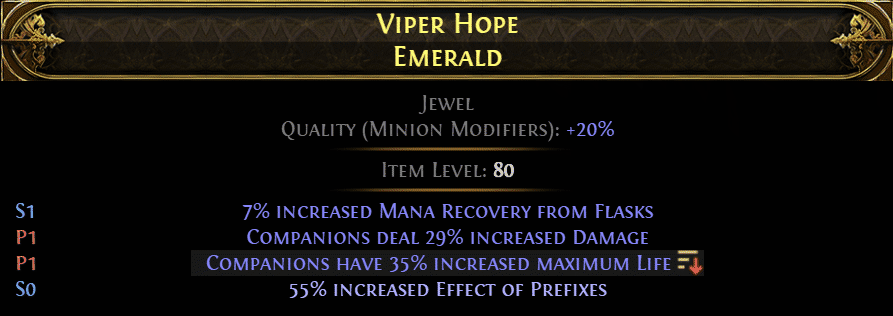
Quality from Necrotic Catalysts will enhance the value of minion modifiers. Crafting with a Potent Liquid Ferocity has a 50/50 chance to boost your minion prefixes, or delete one of them.
Jewel Upgrades
Heart of the Well – Getting a high roll on the “Minions Regenerate % of maximum Life per second” affix is very powerful for offsetting the damage your minion takes from Infernal Legion. This might be a cost effective item to use until you get a Catha’s Brilliance.
Other affixes to combine with this could be increased Cooldown Recovery Rate, increased Skill Speed, increased Exposure Effect, +1% to all Maximum Elemental Resistances, increased Skill Effect Duration, and more.
From Nothing – A From Nothing on Crimson Assault gets you access to a lot of powerful Nodes on the Passive Tree.
 Megalomaniac – You can use this jewel to grab up to three notables from the Skill Tree. Again, see the annointment section above for some ideas. It is also worth keeping in mind that unlike instilling, this will not cost any Emotions; so you might want to get a more expensive passive on this item, i.e. Lord of Horrors.
 Prism of Belief – A +3 Levels to all Companion Skills is one of the more powerful items you can buy for the build, but the cost will be prohibitive for most players.
Super Emeralds/Diamonds – Patch 0.5 brought the ability to craft five modifier jewels, as well as quality boosting minion modifiers, and the Increased Effect of Prefixes suffix, and of course the ability to create Diamonds… Combined all of this can create some monstrous jewels, if you have thousands of divines to fill your sockets with these it will obviously boost your power.
Leveling Strategy Through the Campaign


Our leveling skill of choice will be the Skeletal Sniper Minion; these are fragile long-range attackers who we mostly want to use for the power of their Command Skill. When Commanded, they will shoot an arrow that spreads a poisonous green gas at a target location; this gas is highly flammable, and igniting it will cause an explosion that will be our main damage. This will be the core of our build until we transition into IL.
Act I Overview
As you play through the acts, the single most important thing is trying to get increases to Minion Levels on your sceptres, helms, and amulets. Prioritize this stat in those slots over any other affix. Every time you level, if you are able, return to town and check the vendors for new stock with these mods. Besides this, your priority for gear is Movement Speed on boots, to get to the endgame Beast fun faster.
First gem we cut should be Skeletal Snipers, as you progress, prioritize leveling this up whenever you get a new tier of gems. Minion levels are extremely important. Your first support gem should be  Fire Attunement, giving your sniper’s default arrow attack its own chance to catch the gas on fire. As you progress your support priorities will be Multishot I and II,
  Muster, Feeding Frenzy I and II. If you have a perfect jewelers orb for a sixth slot, save it instead for your tamed beast.
The next gem to cut is  Flame Wall. Drop this on an enemy to light them on fire, so that your gas will trigger. You can also position a wall so your snipers fire through it, adding fire damage to their arrows and speeding up the ignition process. Support this with
  Fortress I to simplify the positioning.
The next gem will be Frost Bomb, drop this on tough enemies to make your fire gas explosion hit harder. Support it with Prolonged Duration I to start, then replace that later with the endgame Frost Bomb gems as soon as you can rig the combo. Also add Potent Exposure when able.
Look mostly for strength, Armour, items for your equipment. Armour and Energy shield hybrid is also fine.
If you are feeling offensive, you can keep a Withered Wand and hurl projectiles through Flame Wall to help ignite. We recommend your focus instead be on casting Flame Wall and commanding your minions, while you get a large shield and act as a bodyguard between your backline ranged minions and danger. Using  Raise Shield, you can slow down the enemy and keep your Snipers alive long enough to have gas come off cooldown and blast the horde. Support it with
  Steadfast I and keep an eye on your stun meter, it’s better to fall back and let the snipers be overrun than to get stunned and killed on the front line.
On the  Skeletal Warrior Minions from your sceptre, you want to socket defensive supports like Meat Shield I and
  Last Gasp. And Fire Attunement if you have supports to spare. We only want the two free minions from this skill, unless there really is nothing better to spend Spirit on.
 Unearth you might as well leave equip since it was free, use this if your other minions get wiped out while you wait for a respawn. Later if you want to support it with Infernal Legion I and/or
  Minion Instability to help try to ignite enemies, no harm in that.
When you do the act one quest that unlocks more spirit, spend that on another Sniper, not on any support aura.
Act II Overview
Pick up or buy some normal/magic Familial Talismans when you are around level 16. These bases with Minion Damage implicit mods are the only ones you will see drop until endgame bases. Once you overlevel you can no longer buy them, so getting a small stock to craft on now may pay off later. We don’t care about the damage on them, so the lower-level base with fewer attribute requirements can be a good thing. Hitting it with a Greater Essence of Haste will get a high attack speed roll, the main thing we want.
Cut Elemental Weakness when you get a chance, to improve the impact of your gas explosions and blow through bosses even faster.
If you feel you want even more boss damage, you can replace Last Gasp with  Sacrificial Lamb I on your Warriors and use
  Pain Offering. This is recommended, but it depends on if you prefer having more damage or having fewer buttons to press.
Depending on the spirit you have from your amulet / body armour / sceptre, you might want to put out a single  Skeletal Arsonist. If not now, work it in when you feel you can. If you have too many Snipers to use all their gas before the first one you fired comes back off cooldown, you have too many. Mixing in some Arsonists will help improve the bonus of Muster and give you gas detonation with their sacrifice command skill: blow up your Unearth Minions or, in a pinch, your Warriors, to trigger gas.
Run the Sekhema Trial as soon as you feel comfortable doing so, Accend into an Infernalist, and take Infernal Hound as your first node. This will smooth the gas explosion process greatly.
Remaining Acts Overview
All of your chess pieces are on the board, and you can play out the rest of the campaign now. Upgrading your skill levels, support gems, and support sockets is all you have to do while coasting along to the atlas.
If you are on trade, you can get The Mutable Star and wear it as soon as level 45.
Take Altared Flesh for your next ascendancy for more defense, then Biediat’s Will, then Biediat’s Hand. Remember you will respec away from the Hellhound into Bringer of Flame when you swap to IL.
Having strong gear, say +3 minion to levels, would let you transition to IL as soon as you get to the Interludes at the wasp farming location. If you are not well geared, IL will feel worse than the Snipers at this point: Tame beasts get More Damage the higher their level is, using it too soon won’t have the same punch as later. Swapping can be delayed until the atlas, which will give you plenty of time to prepare.
You’ll want to collect a surplus of skill gems, support gems, and jewler’s orbs to enable the swap. You will need to have a lot of Dexterity to use a high-level Best, keep this in mind and prepare an overabundance of attributes.
You will also need a talisman soon; you can craft on your Familial Talismans from Act II, or you can plan to use something temporary until you can get a Fang Talisman at around level 77 on the atlas.
And lastly, you’ll need some gold to pay for the respecing of the tree.
Changelog
- September 20th, 2026: Added 0.5.5 video link. Small tweaks to suggested items and gems.
- July 7th, 2026: Guide created.