 Druid
Druid Oracle
 Shaman
 Huntress
 Amazon
 Ritualist
 Spirit Walker
 Mercenary
 Gemling Legionnaire
 Tactician
 Witchhunter
 Monk
Monk Acolyte of Chayula
 Invoker
 Martial Artist
 Ranger
 Deadeye
 Pathfinder
 Sorceress
 Chronomancer
 Stormweaver
 Disciple of Varashta
 Warrior
 Smith of Kitava
 Titan
Titan Warbringer
 Witch
Witch Blood Mage
 Infernalist
 Lich
Lich Abyssal Lich


Build Introduction
The Spiritwalker Companion Build focuses on leveraging the power of the Azmeri Spirits to lead an army of fierce animal companions. You will be supported in combat by a Spectral Bear Companion,  Wolf Pack, and even a powerful Unique Beast Boss! It will start out using the powerful
  Twister leveling strategy until Act 3, depending on unrevealed information, where it will switch to a wholly minion-focused approach.
If you are looking for a Huntress build for the Endgame, you can find all of our available options on the Huntress Build Page!
Strengths and Weaknesses
- Minions take agro and block incoming attacks
- You can focus on positioning and safety while your minions deal damage
- You get to tame huge, powerful bosses
- Will be a bit slower than the Twister playstyle that you start with
- Is a new build archetype, so is slightly riskier
Ascendancy
Select your first Ascendancy after completing the Trial of the Sekhemas in Act 2. The trial is not difficult, so complete it within the 20-30 level range. During the early access of Path of Exile 2, you have the option between Amazon, Ritualist, and Spiritwalker. This build will be utilizing the Spiritwalker ascendancy to allow you to have multiple Companions early, including taming a powerful Unique Boss!
Spiritwalker
The Spiritwalker focuses on empowering your abilities with boosts from your Azmeri Spirits and using Companions to improve your offense and defense. This ascendancy is new in Update 0.5, so these are our best guess at the most valuable nodes based on current information.
Allocate Spiritwalker Ascendancy points in the following order:
- Wild Protector summons a Spirit Bear to fight by your side, leaping at enemies, intimidating and maiming them.
- The Natural Order allows you to use
 Tame Beast on Unique Beast monsters, allowing you to capture some very cool, powerful Bosses.
 - The Catha’s Balance allows all Companions in your army gain added damage based on the damage of your main hand weapon, scaling their damage significantly.
Progression Basics
Path of Exile II’s campaign is not meant to be taken lightly. The best way to get gear while leveling is by checking the vendors every time you visit a town after leveling up. The gear you can get from vendors scales with your level, making it a great option for finding upgrades, especially weapons.
Check for the following items from vendors:
- Spears with Added Flat Damage, %Physical Damage, Accuracy or Critical Strike/Damage.
- Gloves and Rings with Added Flat Damage
- Any gear with Maximum Life, Resistances, or Evasion.
Upon reaching Act 2, you will want to start keeping an eye out for Minion-related gear, specifically a Helmet with +Level of Minion Skills and a Scepter with these mods, in order of priority
- + Level of Minion Skills
- % Increased Minion Damage
- + Flat Added Damage to Minion Attacks
- % Increased Minion Attack Speed
Crafting currency can be used on decent gear, but keep in mind that you might be able to trade currency for better items. Consider searching the trade site to buy upgrades with your Exalted Orbs, especially for weapons.
Do not forget to pick up loot, especially Rare Items, and vendor it for gold. You can then use this gold to purchase gear upgrades from vendors, or to gamble if you haven’t found meaningful upgrades in a while.
Kill enemies in groups to gain experience efficiently. Skipping too many enemies can cause you to be under-leveled, putting you at a disadvantage later on.
Leveling Passive Tree
The Passive Tree below can be followed all the way through the campaign and into early mapping, but you will need to decide on an Endgame guide to follow at that time. There are additional optimizations achievable through weapon set passives, but the overall gains are quite small. For simplicity’s sake, as this is a leveling guide, we have chosen to avoid some of those tiny optimizations.
When assigning your small travel passives, with a choice of attributes, you may need to make decisions based on which attributes are required, the gear you are wearing, and the support gems you currently have equipped. These can be changed by speaking to The Hooded One for a very low cost.
Skill Gems
Listed below are all Skill Gems that should be used during the leveling process. There may be a slight variation depending on which Act you’re currently progressing. Notes for each Act will be listed below the Skill Gem tool.
Skills Before Minion Swap:
After Minion Swap:
Act I
Start your new character by picking up  Whirling Slash from the chest in the first zone, and then craft Twister with the first Level 1 Uncut Skill Gem you receive in town. Cast Whirling Slash 3 times to build the maximum stage of Whirlwind, and then cast Twister to consume the Whirlwind. The build is not dependent on the damage of Whirling Slash, so you can keep its Skill Level lower to reduce mana consumption.
You can add  Frost Bomb to apply exposure to help scale damage in Boss encounters, or to absolutely maximize your damage, you can utilize Parry and
  Fangs of Frost to create chilled ground, which will improve the damage of your Twisters. Getting used to using this combo will dramatically improve your potential damage output
Once you gain access to  Ice-Tipped Arrows with your first Level 5 Uncut Skill Gem, and
  Herald of Ice, you will start consistently freezing enemies with Twisters, causing them to explode on death. This will improve your safety and damage significantly.
If you are lucky enough to find a second Level 5 Uncut Skill Gem, get  Barrage and add it to your combo whenever you would use Ice-Tipped Arrows
Here’s how the build is played during Act 1:
- For very tanky enemies and Bosses, you can Parry, then cast Fangs of Frost to generate chilled ground to empower your Twister combo.
- If you have flat added elemental damage on your gear, or are using the step above, cast Frost Bomb to apply Exposure.
- If you have Barrage already, you can use it here.
- Cast Whirling Slash 3x, then Cast Twister.
- Return to step 1 when you no longer have Chilled Ground to cast your Twister Combo on.
Act 2
Your first Level 2 Uncut Support Gem should be used to get  Frost Nexus for your Twister, causing enemies it freezes to generate a patch of chilled ground. This lets you stop using Parry and Fangs of Frost, making the whole clearing process much smoother.
During Act 2 you will want to keep an eye out for any gear that can be used after swapping to the full Companion Focused setup in the middle of Act 3. This includes
- Helmet with +Level of Minion Skills
- Sceptre with:
- + Level of Minion Skills
- % Increased Spirit
- % Increased Minion Damage
- % Increased Minion Attack Speed
- Amulet with +Level of Minion Skills
- Evasion Buckler with good Defensive Stats
In Act 2, you will gain access to the Trial of the Sekhemas after traveling through the Traitors’ Passage. This build has no problem clearing the Trial early, so you can do it as early as you want to gain access to your first 2 Ascendancy Passive Points. For this build your first Ascendancy passives will grant you the Wild Protector, a Spiritual Bear that will leap into combat, debuff enemies, boost your damage and generally cause a ruckus.
Cutting a  Freezing Mark Skill Gem and adding
  Mark for Death will allow your Companions to break enemy armor, dramatically improving the damage of your physical damage minions during Boss fights, and granting you a boost to cold damage when you freeze the boss
As always, continue to check the Skill Gems section to make sure you are running all of the correct Support Gems, as these do change as you can gain access to higher level Uncut Support Gems.
Here is how the build is played after getting your Act 2 Skill Gems:
- Cast Ice-Tipped Arrows on cooldown.
- Cast Barrage for large packs, tanky Rare monster or Bosses.
- Cast Freezing Mark on Bosses to apply the Mark for Death armour shred effect.
- Cast Whirling Slash 3x, then Cast Twister.
Act 3
Other than updating your Support Gems and improving your Gear, Act 3 will follow the same play pattern as Act 2 until you Ascend in the Trial of Chaos. Simply continue doing what you were doing, and make sure to check the Skills section of the guide to ensure you have the right Support Gems equipped.
After defeating Ignagduk in the Azak Bog, you will unlock an additional 30 Spirit, and get access to a guaranteed Uncut Spirit Gem. Use this to cut Wolf Pack.
In Act 3, you will gain access to the Trial of Chaos. This second Ascension is when you will be transitioning from a Twister leveling style to a pure Minion-focused approach. This will require you to change some gear, swapping to a Scepter instead of a Spear, and changing your Helmet for one with +Level of Minion Skills, as well as changing your passive tree slightly to better support the companion playstyle.
With The Natural Order Ascendancy passive, you can now tame powerful Boss beasts, including the infamous Mighty Silverfist, and the 3 Bosses from the end of the Trial of Chaos. Feel free to experiment with these, though we recommend the Mighty Silverfist for the smoothest experience.
NOTE: If you do try out other bosses and would like to swap to a new one, you can Disenchant your gem at the Vendors in town to reset it Tame Beast to capture something new!
After the switch to the Companion-focused approach, you will want to add skills to support them. Adding  Pain Offering allows you to sacrifice a Skeletal Warrior from a Rattling Scepter for a significant damage boost,
  Despair will shred enemy resistances to improve your DPS, and
  Sniper’s Mark combined with Mark for Death will help shred enemy Boss armor and amplify the power of Mighty Silverfist’s Critical Strikes.
If you have a spare Uncut Spirit Gem, you can also add  Withering Presence with
  Upwelling II to provide a significant boost in your Companions’ damage, but only when you are not on full mana, so make sure to continue using your Mark and Curse skills to stay below full.
Act 4 and Interludes
Nothing changes that much between Act 3 and the Endgame for this build. You should, as always, continue to check the Skill Gem section to make sure you are using the correct supports, and continue to replace your gear with upgrades you find. The play pattern remains the same, and it should be smooth sailing through to the Endgame.
Remember to keep an eye out for cool Bosses you may want to Tame, as this mechanic is new and unsolved, so experiment and have some fun with it!
You can choose to complete Act 4’s Islands in any order. In the Runes of Aldur League, you MUST complete the Torn Map quest to progress down the League Quest chain, so make sure you don’t skip this. This build doesn’t specifically benefit from completing them in a particular order, so feel free to explore!
Once you reach the Interludes, you should complete the third Interlude first, as one of the rewards you will get early is +40 Spirit permanently from Lythara, the Broken Spear.
Rotation
Utilize the full Skill Rotation to maximize Twister count for coverage while mapping and damage output against bosses before your minion swap:
- Cast Ice-Tipped Arrows whenever its available.
- Cast Barrage for large packs or very dangerous enemies.
- Cast Freezing Mark
- If you are using
 War Banner and have the Glory, use it whenever it’s available during Boss fights.
 - Cast Whirling Slash x3 and then Cast Twister, ideally on patches of Elemental Ground.
Once you are fully transitioned into the Companion-focused approach, this is your play pattern:
- Cast Pain Offering on
 Skeletal Warrior Minions or
  Skeletal Cleric Minions for a damage steroid.
 - Cast |A Curse Skill to shred enemy resistances, based on the Tamed Boss you are using.
- Cast Sniper’s Mark with Mark for Death to help shred armor on Boss monsters.
Gearing Progression
The Twister Huntress build equips item upgrades to enhance damage and survivability during the campaign. Damage output is completely reliant on your equipped Spear. Equipment with Evasion base types are ideal to increase survivability.
NOTE: This build does use a variety of Attributes, and as such finding enough Strength, Dexterity and Intelligence to get everything working does provide some friction. Keep an eye out for gear with Attributes, as this will make your life easier, particularly after the Companion swap.
Offensive Gear
The most important item equipped during the first 3 Acts is your Spear, followed by your Gloves and Rings. Flat added Damage is particularly valuable. Here is a list of affixes you should keep an eye out for:
- + Flat Added Damage to Attacks (Spear, Rings, Gloves)
- % increased Physical Damage (Spear, particularly when combined with +Flat Physical Damage to Attacks)
- % increased Attack Speed
- + Level of Projectile Skills (Spear, Gloves)
After swapping to Companions, make sure you keep an eye out for Scepters, Helmets and Amulets with +Level of Minion Skills, and these affixes on the Scepter:
- + Level of Minion Skills
- % Increased Spirit
- % Increased Minion Damage
- + Added Flat Damage to Minion Attacks
- % Increased Minion Attack Speed
Defensive Gear
Prioritize the following stats on armor and jewelry to increase survivability:
- +# Maximum Life
- +% Resistances
- +# or %increased Evasion Rating
Augments
Socket Runes, Soul Cores and Idols into your gear to help bring your missing resistances to the base cap of 75%, or to help with meeting attribute requirements.
You can Salvage gear you would otherwise vendor that has sockets at the Salvage Bench to obtain Artificer’s Orbs to put extra sockets on your gear. This will allow you to frequently use these orbs to add sockets to your best gear pieces, and socket more resistances to make the campaign even easier!
Leveling Uniques
This build is entirely League-Start / no-budget viable. But if you do have extra currency, pick up these uniques for a twink leveling character.
Weapon
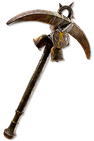 Trenchtimbre – Additional +Levels for Minions is a powerful boost to companion damage and survivability. Remember to Runeforge this using the new Runes of Aldur League mechanics!
Boots
 Wanderlust – Excellent boots with Move speed and immunity to slows, usable from Level 11.
Helm
 Goldrim – Tons of resistances, usable from Level 10.
Chest
 Foxshade – Grants Movement speed and Evasion, usable from Level 4.
Amulet
 Surefooted Sigil – Increases dodge roll distance, and Evasion after dodge rolling. Usable from Level 8.
Return of the Ancients Mechanics
With the Return of the Ancients update, and its accompanying Runes of Aldur League, there are a ton of new tools being introduced that will dramatically change up itemization. One of the additions is the introduction of powerful runes available at low levels that grant powerful stats for specific builds.
If you are struggling with your character or are running low on currency, you should consider engaging with this mechanic often to earn targeted rewards to help boost your power.
Campaign Buffs
- Valley of the Titans Altar (Act 2)
- 30% increased charm charges gained
- Venom Draught (Act 3)
- 25% increased Mana Regeneration Rate
- Eye of Hinekora (Act 4)
- Attributes from all 3 Tattoos
- Tribal Medicine (Act 4)
- Rakiata’s Lesson (Evasion as Deflection Rating)
- Solitary Confinement (Act 4)
- % increased recovery from Life Flasks
- Qimah Pillars
- These can be changed at will, so you can choose Resistances to help early and later swap to global defenses, movement speed, etc.
For more details, check the guide on Campaign Difficulties and Permanent Stat Bonuses.
Flasks and Charms
Throughout leveling, you will frequently find various charms and flasks. Make sure to swap them out for upgrades.
Prioritize the following Flasks and Charms:
- Health and Mana Flasks
- Prefix: Increased Amount Recovered
- Suffix: Increased Charges or Increased Charges Gained
- Charm: Thawing Charm, Staunching Charm, Stone Charm
Changelog
- May 30th, 2026: Updated with Boss recommendations, new supports, slight tree adjustments, quest reward update.
- May 25th, 2026: Guide created for Path of Exile II, Early Access.